Kitchen3N

Recipes and food fun from Apt 3N

  • About
  • Gallery
  • Recipes

Chocolate Zucchini Bread

July 18, 2017

fullsizeoutput_6048

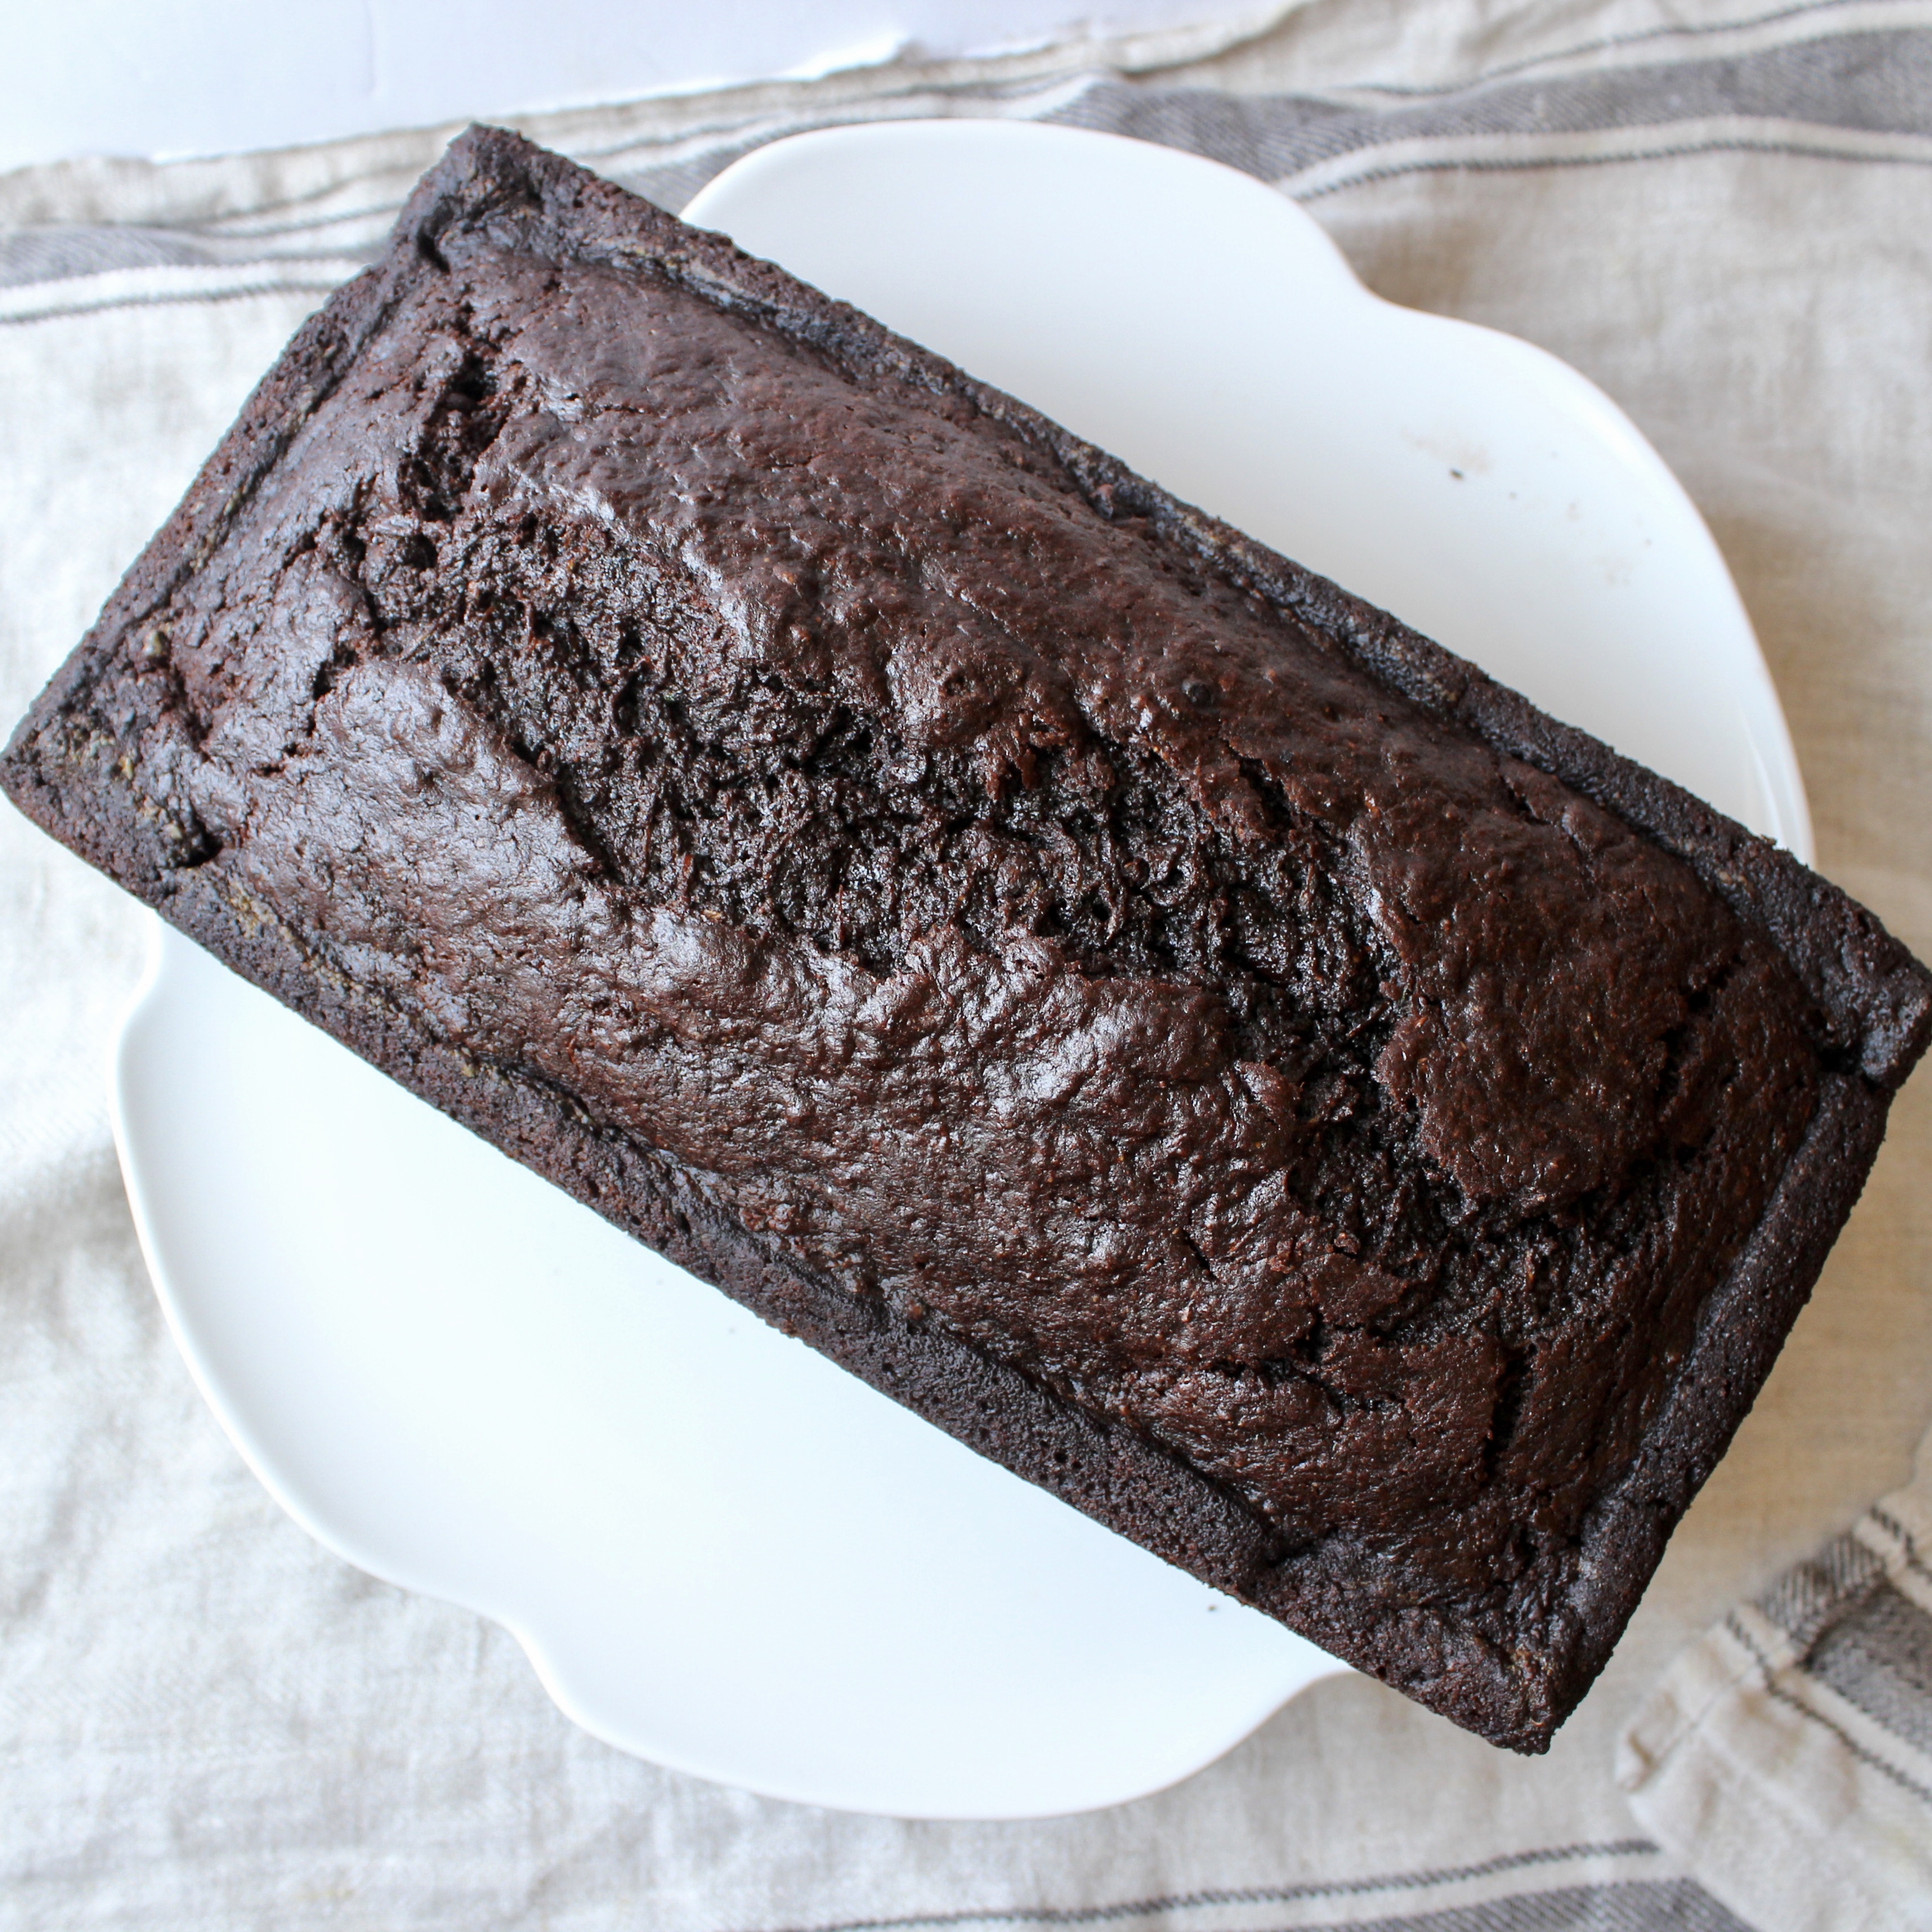
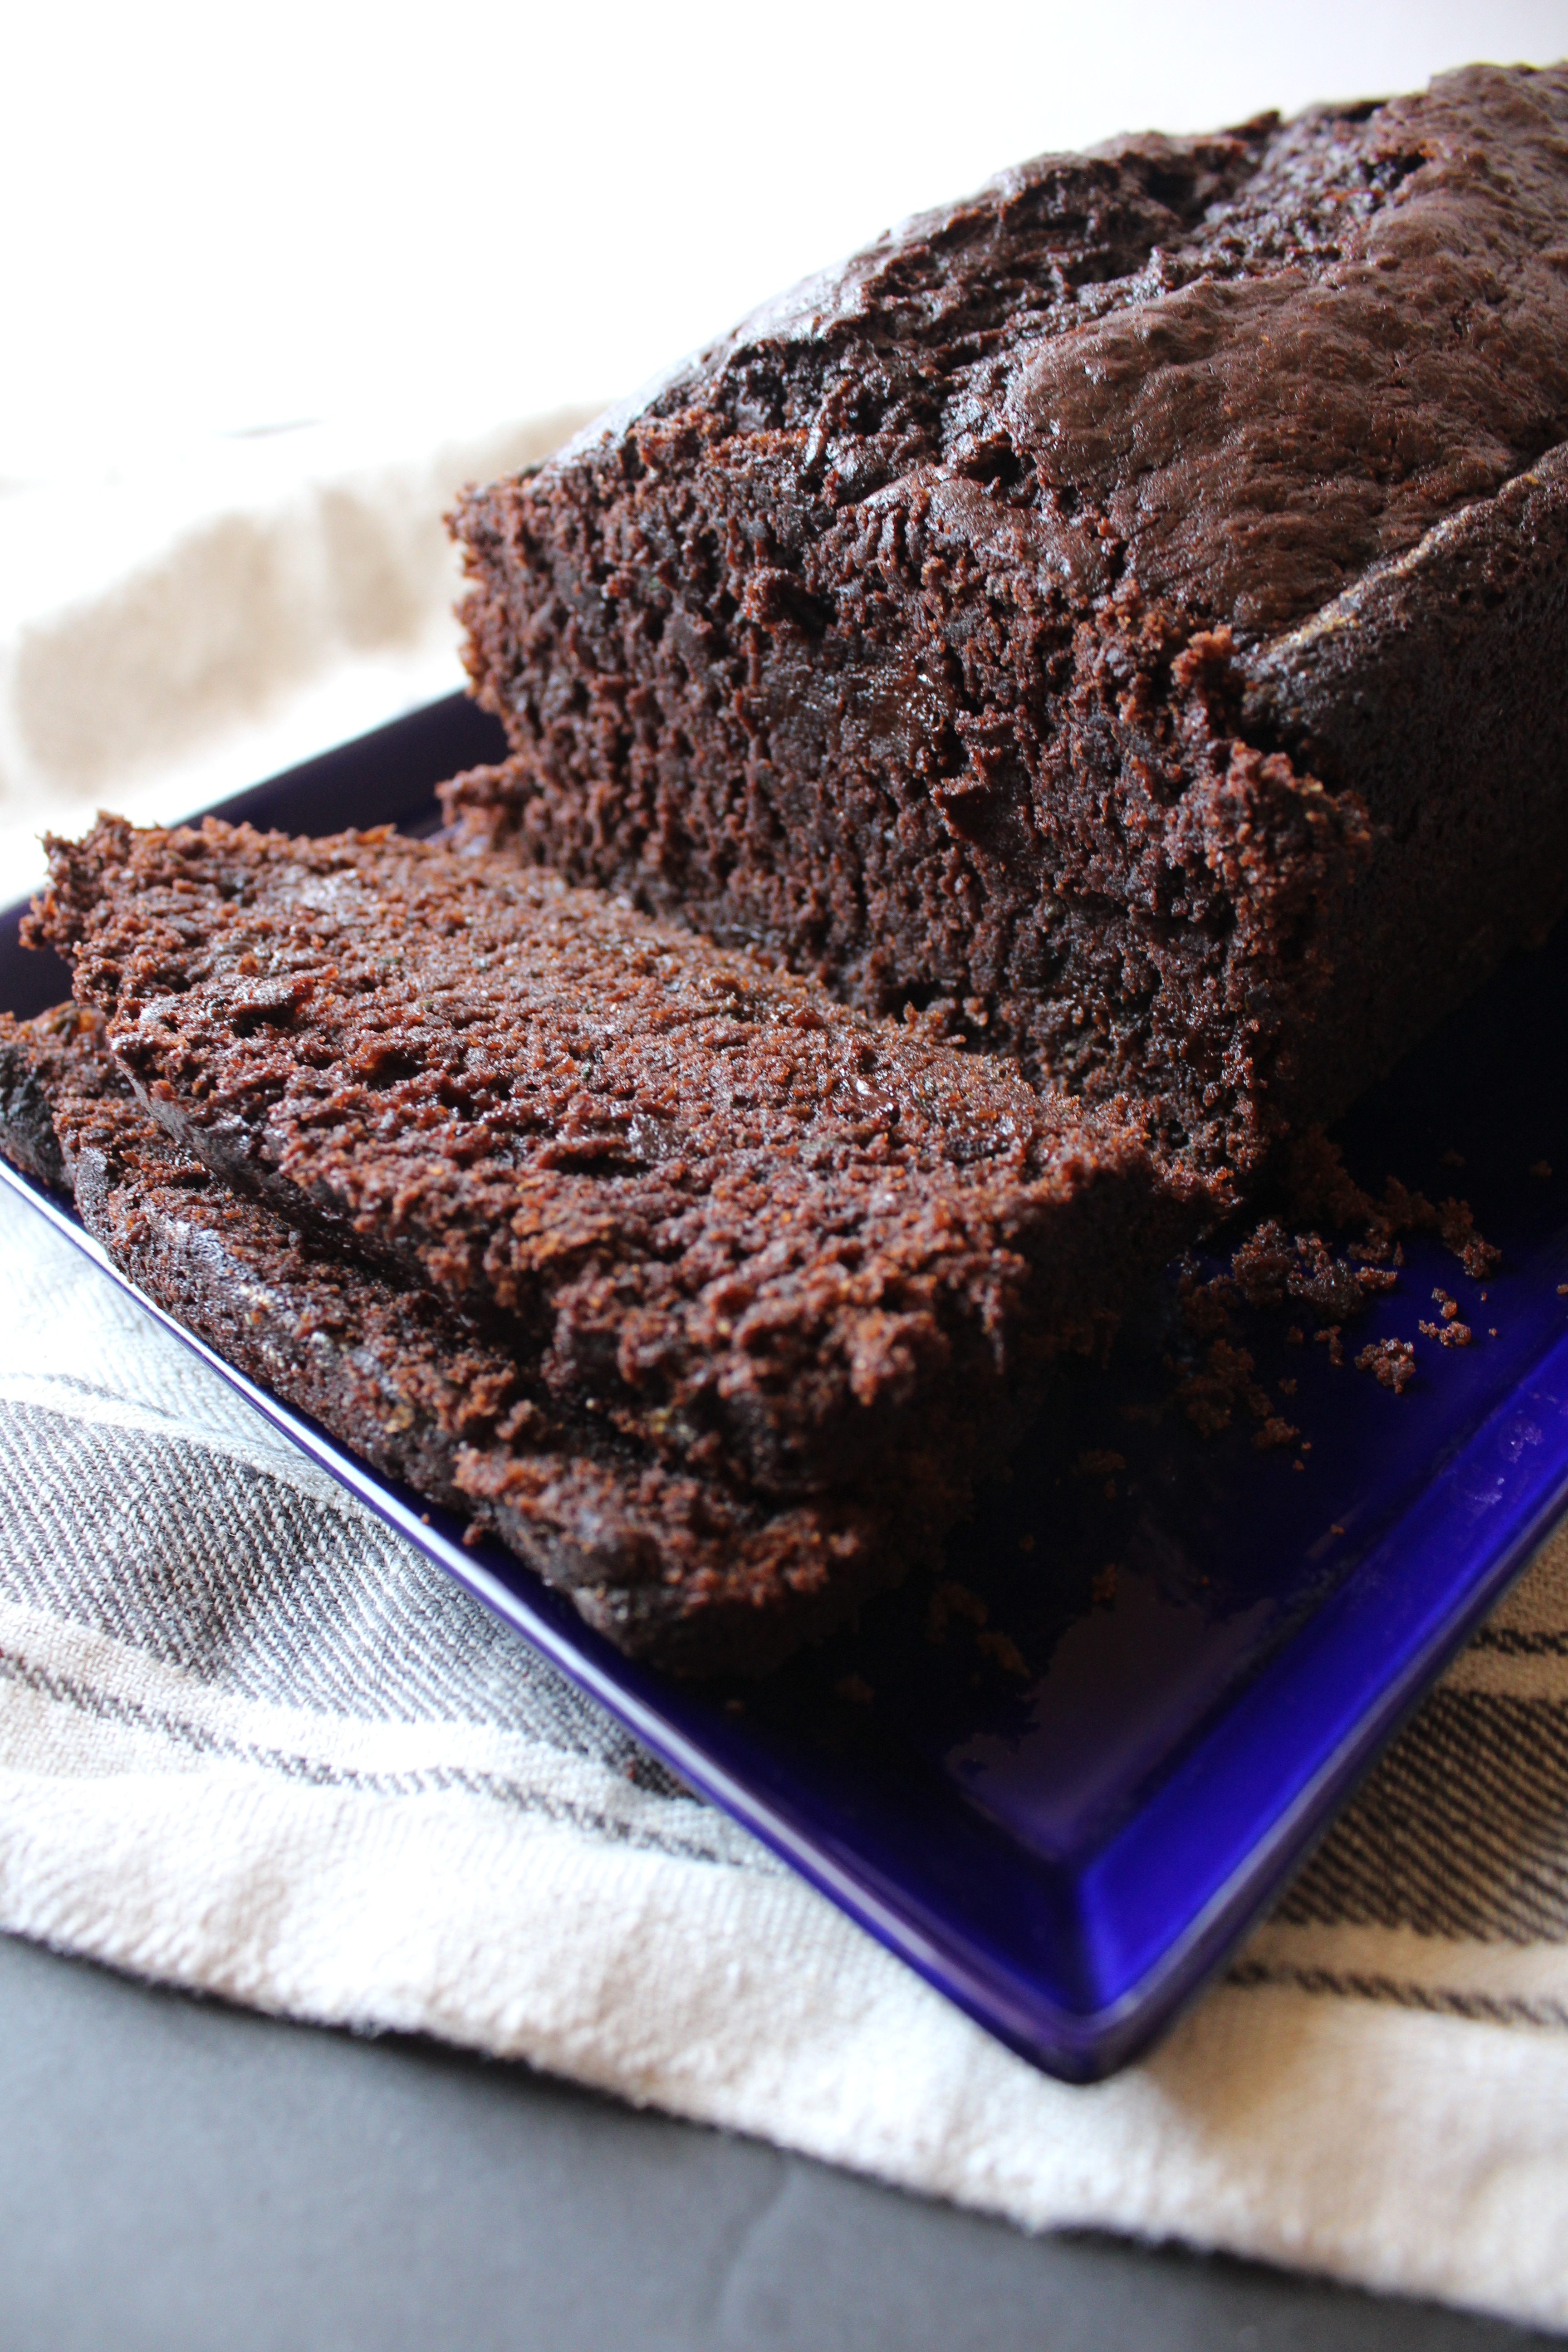
There is no rhyme or reason to this cake. It is neither healthy, nor a proper dessert. It is simply for chocolate lovers. It is a glorious use of a bland, high water content vegetable that lends it’s moisture to the crumb of this perfect snack cake. It’s blandness acts as a perfect palette for all the wonderful cocoa and brown sugar flavor to absorb.
img_9542
I’ve posted about chocolate zucchini cake before. This bread version is a bit heartier with whole wheat flour and almond flour – a little more substance to justify my classification of it as a snacking cake! I wasn’t happy with any of the recipes I found online for chocolate zucchini loaf, so I made my tweaks, including adding chocolate chips, and voila! Perfection.

Ingredients

  • 2 1/2 cups all purpose flour (or 1 cup AP flour/1 cup whole wheat flour, 1/2 cup almond flour)
  • 1/2 cup dutch processed cocoa plus extra for coating chocolate chips(if using natural cocoa, swap the amounts of baking soda and baking powder)
  • 1 tsp baking soda
  • 1 1/2 tsp baking powder
  • 1/2 tsp salt
  • 1/2 cup sugar
  • 1 cup brown sugar
  • 2 eggs
  • 12 tbsp melted butter
  • 1 lb zucchini, grated
  • 1/2 cup semisweet chocolate chips

Directions

  1. Preheat oven to 350 degrees F. Butter and lightly dust a 9inx5in loaf pan with cocoa powder. Stick in the freezer while preparing your ingredients.
  2. Melt butter in a saucepan over medium heat. Turn off heat and allow to cool down.
  3. Wash and cut off one end of zucchini. Grate, not completely finely, but not in huge slivers either. Place a large sieve over a bowl and place grated zucchini there to drain while you prepare the rest of the ingredients.
  4. Combine all the dry ingredients in a large bowl (everything except the eggs, butter and chocolate chips). Whisk to combine, breaking up any large clumps. Make a well in the center and add eggs and butter. Mix with a wooden spoon (Bengali alert: I used my hands to mix this batter!). Add all of the zucchini and stir until combined. In a small bowl combine the chocolate chips with sprinkling of cocoa (maybe 1/4tsp).  Toss to coat the chocolate chips with the cocoa. Add to the batter, gently folding in. Take the loaf pan out of the freezer and add the batter, spreading evenly across the loaf pan. Bake in preheated oven for 1 hour 10 minutes or until a toothpick comes out relatively clean.*
  5. Allow to cool completely before attempting to remove it from the pan.

*It won’t come out completely clean due to the moisture of this loaf. A few crumbs are ok. You just don’t want it to come out with wet batter.

Leave a Comment · Labels: American/Mediterranean, Carb, Dessert, Snacks Tagged: bread, chocolate, loaf, snack cake, zucchini

Chocolate Candy Cupcakes

January 16, 2017

fullsizeoutput_48ea

After a startling reading on the weight scale towards the end of December, I swore off sugar. Just two years prior I worked so hard to lose my baby weight. Inspired by beach body coaches in my network, I vastly cut down sweets, decreased portion sizes, drank tons more water, swapped quinoa for rice in many of my meals, and began to regularly exercise using Fitnessblender, the only exercise I’ve been able to stick to thanks to the fact that I can choose from workouts of different durations and can do it from the convenience of my home. So I lost the 9 pounds of lingering weight, and 8 pounds on top of that.

img_4672

And then I fell off the wagon. Slowly but surely I downward spiraled, picking back up my sweets habits and eating rice and curry without restraint. I kept up with the exercise more or less but it wasn’t enough with my slowing metabolism.

So I decided to stop eating foods with added sugar. It’s just one step, but surely it should help. But of course the universe has to align to make this impossible for me. Shortly after making my resolution, I attended a gingerbread house making playdate where I was SURROUNDED by candy and cake and all kinds of good stuff. Soon after that my daughter’s birthday rolled around and somebody’s gotta do QC and make sure things taste right. Amiright?

img_4685

I did a good job holding off on tasting these, but then I needed a cross section for the blog, so guess where the other half went.

Yup.

fullsizeoutput_48e9

This is a really magical combination for the chocolate lover in your life. It’s reminiscent of the creme filled hostess cupcakes, but made even better with quality cocoa in the cupcake and chocolate in the ganache, homemade salted caramel sauce and delicious candy toppings. Remember we eat with our eyes first, and kids moreso than us. So if they see m&ms, they automatically think it’s a superb cupcake.

Enjoy the quick video tutorial below!

This is an adaptation of Hershey’s Perfectly Chocolate Chocolate cake. Because I used Dutch-process cocoa (which is alkalized, or less acidic than natural cocoa), I upped the amount of baking powder and decreased the amount of baking soda from the original recipe. I also used boiling water instead of hot coffee as many chocolate cake recipes call for, as it made for a way too tender a crumb. Perfect in layer cakes, but for cupcakes, you need something with structure.

Ingredients

  • 2 cups sugar
  • 1 3/4 cups all purpose flour
  • 3/4 cup dutch process cocoa (I use Rodelle)
  • 2 1/2 tsp baking powder
  • 1/2 tsp baking soda
  • 1 tsp salt
  • 2 eggs
  • 1 cup whole milk
  • 1/2 cup vegetable oil
  • 2 tsp vanilla extract
  • 1 cup boiling water

Directions

  1. Preheat oven to 350 degrees F. Line a muffin/cupcake pan with paper liners. You will need 15 in total. My cupcake pan only has room for 12, so I need to make these in 2 batches.
  2. In a large bowl or in the bowl of your stand mixer add the sugar. Place a sifter over the top of the bowl and add flour, cocoa, baking powder and soda. Sift the ingredients into the sugar. Add salt. Stir to combine using the paddle attachment.
  3. In a 4 cup measuring cup or in a medium bowl, measure out the milk and vegetable oil. Add eggs and vanilla and mix well using a fork. With the mixer running on low, slowly drizzle in the wet ingredients into the dry. Stop occasionally to scrape down the sides and bottom of the bowl. Turn the mixer back onto low and slowly drizzle in boiling water. Stop the mixer and scrape down with a spatula to ensure the batter is homogenous.
  4. Using an ice scream scoop, scoop batter into the cupcake liners 2/3 of the way to the top. Bake for 15 to 18 minutes or until a toothpick inserted in the middle comes out clean.
  5. After they cool, hollow out the middle using a small circular cookie cutter. I used the smallest one from this set. I filled it with marshmallow creme using a piping bag and wide tip. I drizzled some salted caramel sauce over them. Then frosted them with chocolate ganache and garnished with chocolate candies.

Leave a Comment · Labels: American/Mediterranean, Carb, Dessert, Food Fun, Recipes Tagged: candy, caramel, chocolate, cupcakes, ganache, marshamallow creme, marshmallow fluff

Chocolate Wafer Cookies

January 5, 2017

fullsizeoutput_47ec
If ever you’ve craved a cookie so intensely chocolately, with little to meddle with it pure chocolate flavor (no nuts, no eggs, and a high cocoa to flour ratio), then this cookie is it.

I first made these about 1 year ago when I made my first ice box cake…for 50 people. I must have made 4 batches. Probably could have made less if I hadn’t been snacking on them along the way.

These cookies mimic the famous Nabisco Chocolate Wafers that most icebox cake recipes call for. For some reason, they’ve been discontinued in store, and are only available online. Every time I attempt to purchase some, that little voice in my head goes “hydrogenated oils…preservatives” then I head to the kitchen to make my own. They are easy to make, hard to mess up, and I always have the ingredients on hand.fullsizeoutput_480c
It’s hard to tell when these cookies are done, since they are so dark. I usually just go by 10 minutes, as the recipe indicates. Since the cocoa is the predominant flavor, quality really matters. And unfortunately, it is one of those slightly fussy recipes in that it requires dutch-processed cocoa (cocoa powder that’s been alkalized, making it less acidic than natural cocoa powder). You could try to use a natural cocoa powder, such as Ghirardelli (I wouldn’t recommend Hershey’s for these), but you may need to increase the baking soda. I haven’t tried it yet, but if you do, please let me know!
img_8480
As these cookies cool, they become crisp, which is why they work so well in icebox cakes, and in this week’s case, ice cream cake. More on that coming soon!

They absorb the moisture from the surrounding medium without getting too soggy. They aren’t as heavy as say a brownie or a chocolate chip cookie, so you can satisfy your chocolate craving with a fraction of the guilt.

Recipe from Cooking Channel.

Ingredients

  • 1/2 cup or 1 stick unsalted butter
  • 3/4 cup granulated sugar
  • 1/2 cup dark brown sugar*
  • 1 tsp vanilla
  • 1 cup flour
  • 3/4 cup Dutch processed cocoa (such as Rodelle)
  • 1/2 tsp baking soda
  • 1/4 tsp salt
  • 1/4 cup whole milk

Directions

  1. In the bowl of your stand mixer, or in a large bowl using a handheld electric mixer, cream together the butter and both sugars for 2 minutes at medium speed. Add vanilla and beat until combined.
  2. In a medium bowl, sift the flour, cocoa, baking soda. Add salt and stir to combine.
    With the mixer running on low, slowly add the dry ingredients to the butter/sugar mixture. Stop to scrape down the sides of the bowl occasionally. Once all the flour’s been added, add the milk and mix until combined.
  3. Lay a piece of plastic wrap on a flat surface. Dump cookie dough directly onto the plastic wrap, in a log-like shape. Wrap up the dough with the plastic wrap and continue to shape into an even-width log. Refrigerate for at least 1 hour.
  4. Preheat oven to 350 degrees F. Score cookie dough with a ruler 1/4in apart. Slice the log into 1/4in thick disks and place disks on a cookie sheet lined with parchment paper. Bake for 7 to 8 minutes. Refrigerate the remaining cookie dough. Then rotate baking sheet and bake for 2 minutes more. Allow to cool for a few minutes before transferring to a wire rack to cool completely.
  5. Continue with remaining cookie dough. Wrap well and store at room temperature.

*I only had light brown sugar in stock, so I added half a tablespoon of molasses to substitute for the dark brown sugar.

Leave a Comment · Labels: American/Mediterranean, Dessert, Recipes Tagged: chocolate, cookie crumbles, cookies, dark chocolate, dessert, easy, egg free, ice cream cake, icebox cake, wafers

Crepes

January 3, 2017

fullsizeoutput_476b
The first time I had crepes was in Paris in 2006. Kids coming home from school were snacking on this conical things wrapped in paper filled with all kinds of chocolately/fruity goodness. My buddy and I did not hesitate. We got ourselves some crepes filled with nutella and slices of banana and our minds were blown. So delicious and, as I’d soon discover, so easy to make, with such simple ingredients?!

Flash forward to 2017 and I’ve made it 34098734287234 times. I’ve filled them with sautéed mushrooms and swiss cheese to serve to guests. With scrambled eggs and spinach for a savory breakfast. Most often though, with nutella/banana or simply with strawberry jam for my sweet-toothed family. It is the THE most requested breakfast item, surpassing pancakes, waffles, french toast, everything. Which works for me since it’s SO EASY and cooks much faster than all those other options.

fullsizeoutput_476a

I’ve pretty much stuck to Alton Brown’s recipe all these years, tweaking it only by adding whole wheat flour and a pinch of salt (it was the only thing missing). For many years I’ve mixed the batter by hand using a whisk, which was a monumental mistake. You end up with lumps of flour in the batter that only go away after the batter sits for a while, hydrating the lumps away. As soon as I started using a blender, I never looked back.

Enjoy this recipe in any sweet/savory permutation you’d like.

Recipe adapted from Alton Brown.

Ingredients

  • 3/4 cup whole milk
  • 1/2 cup water
  • 1 cup all purpose flour (I use half whole wheat flour)
  • a pinch salt
  • 2 eggs
  • 3 tbsp butter, melted

Directions

  1. Melt butter in a small saucepan or in the non-stick skillet. Set aside.
  2. In a blender, add first five ingredients and blend on low speed, gradually increasing the speed to high. Blend for about 20 seconds. Add melted butter and blend once more for 10 seconds.
  3. Heat a 9 or 10in non stick skillet to medium heat. Pour 1/3 cup of the batter into a liquid measuring cup. Lift the pan up slightly above the flame and pour the batter onto the pan, tilting the pan around gently so the batter swirls and spreads evenly across the surface. Return to flame and cook for about a minute or until the sides start to loosen from the pan. Flip and cook for 30 seconds more. Remove from pan and set on plate. Continue with remaining batter, stacking the crepes on a plate.
  4. Serve with nutella, jam, powdered sugar, ,fruit and/or whipped cream.

Leave a Comment · Labels: American/Mediterranean, Breakfast, Carb, Dessert, Recipes Tagged: breakfast, Crepes, easy, french

Royal Icing

December 29, 2016

fullsizeoutput_4712
I just started decorating with royal icing after all these years. Why have I been torturing myself all these years with confectioner’s sugar/milk concoctions that thin too easily, and pipe too painfully?!
fullsizeoutput_4718
Since royal icing is made with egg whites (I use meringue powder so I don’t have to deal with leftover egg yolks), it has a lot of structure from the protein. Pipes wonderfully for borders and outlines and thins easily for flooding.
img_8357
I have been a fan of Sana Sodawalla of SugarBase_ for a while now. Her gorgeous marbled cookies, whimsical cakes, and informative videos are something to aspire to. Since I’ve started baking and cake decorating more, I’ve been creating more content tailored to Instagram. I like how the platforms caters to creatives, offering a very visual space to share our content, with lots of real estate for pictures, and just enough for explanatory text.
fullsizeoutput_4713
I’ve created these cookies after watching her technique on marbling sugar cookies. I got the idea for gold splatter after taking a wonderful mommy and me art class I took with a talented local artist on paper collages.
fullsizeoutput_4711
I don’t know if I’ve done justice to Sana’s beautiful cookies, but I hope you try your own version at home. My go to recipe for royal frosting below.

Recipe courtesy of Toba Garrett of ICE.

Ingredients

  • 1/4 cup meringue powder
  • 1/2 cup water
  • 1 pound confectioner’s sugar, sifted
  • 1/2 tsp lemon juice or extract*

Directions

  1. In the bowl of a stand mixer, or in a large bowl using a hand held electric mixer, use the paddle attachment to combine meringue powder and water at low speed until combined. Increase speed to medium and beat until soft peaks form, about 3 minutes.
  2. Reduce the speed to low and start to add the sugar, one cup at a time, until all of the sugar has been added. Turn the mixer off, scrape down the paddle and sides of the bowl and turn mixer back on to a low speed. Add the lemon juice/extract and increase speed to medium high. Beat for 5 to 7 minutes until you reached the desired level of stiffness. Keep well covered until ready to use. Can be piped, or thinned with small of amounts of water at a time to use for flooding. Will keep for 1 day at room temperature, or 3 days, covered in the refrigerator.

*I prefer lemon extract since the lemon flavor is a lot more pronounced.

Leave a Comment · Labels: American/Mediterranean, Carb, Dessert, Food Fun, Uncategorized Tagged: cookie decorating, cookies, decorating, frosting, icing, royal icing

Cutout Sugar Cookies

December 9, 2016

img_3224
I’ve learned a lot of things the hard way. Like how filling in eyebrows is not for everyone/every situation. Or that low-rise jeans are super impractical for pretty much every situation, especially picking up your backpack from the ground. Or that frosting should not go on a cake you JUST TOOK OUT OF THE OVEN.
fullsizeoutput_43bf
This extends to cut out sugar cookies. So many ill formed, mutilated cookies from the process of transferring from the rolling out surface to the cookie sheet. WHY OH WHY didn’t someone tell me earlier to just roll them out on a parchment paper and then just remove the scraps from around the shapes?! Would’ve saved so much grief.

So even if you have a great cutout sugar cookie recipe. Even if you already knew to chill the dough before rolling it out. if you take away nothing else from this post, I hope this tip will save you some heartache during this holiday cookie baking season. Happy holidays!!

Recipe from Better Homes & Garden 2010 special issue.

Ingredients

  • 3/4 cup butter at room temperature (that’s 1 1/2 sticks)
  • 1 cup granulated sguar
  • 1 tsp baking powder
  • 1/4 tsp salt
  • 2 eggs
  • 1 tsp vanilla
  • 2 1/2 cups all-purpose flour

Directions

  1. In the bowl of your stand mixer, or in a large bowl using a handheld electric mixer, beat butter on medium speed for 30 seconds. Reduce speed and add the sugar, baking powder and salt. When it’s all combined, turn off the mixer, scrape the sides and bottom of the bowl, and turn the mixer on again, this time to low. Add the eggs, one at a time, then the vanilla. Gradually add the flour, stopping the mixer every once in a while to scrape down the sides.
  2. Once the dough has come together, divide in two, place each half on some plastic wrap on a flat surface. Wrap well with the plastic wrap and flatten into disks. Refrigerate for at least 1 hour, preferably 4 hours to let the gluten relax (this makes the cookies tender).
  3. When ready to bake the cookies, preheat the oven to 350 degree F. Roll out parchment paper to the size of your baking sheet. Lightly flour the surface, your hands, and the rolling pin. Roll out the cookie dough from the center, outwards, not back and forth like bread dough. Roll until the dough is 1/4 in thick. Then using your favorite cutters, cut out shapes about 1 in apart. Use a small offset spatula or butterknife to remove the scraps of dough. Save for next batch.
  4. Bake in preheated oven for 7 to 9 minutes. The bottoms should only be very lightly browned. Let cool on sheet for a few minutes before transferring to wire rack to cool completely.

Leave a Comment · Labels: American/Mediterranean, Dessert, Food Fun, Recipes Tagged: cookie decorating, cookies, cutout cookies, holidays, icing, sugar cookies

American Buttercream vs. Swiss Meringue Buttercream

October 19, 2016

American Buttercream: butter, powdered sugar, milk, flavoring
Swiss Meringue Buttercream: egg whites, granulated sugar, butter, flavoring
ab-vs-smb

When I first start baking and cake decorating seriously, there were so many, “I’d never do that.”

  • I’d never compromise on taste. That means no swiss meringue buttercream. No fondant.
  • I’d never waste time on tacky fondant figurines (somewhat holds – I’ll make figurines but only tasteful ones).
  • I’d never make a bad cake (I once made a chocolate cake and forgot to add the sugar).

But I’ve come around on a lot of things. Example: expanding my frosting repertoire to include Swiss Meringue Buttercream. Hailed for being the King of Stability and frowned upon by many for lack of taste. It is not as sweet as the American Buttercream (AB) we are used to, and gets most of its structure from whipped egg whites rather than beaten butter/sugar, so that it’s airy rather than creamy. But man, it is a cake decorator’s dream. Just look at the picture above: the AB is so much more porous. Honestly, when I first thought up the idea for this post, I thought the difference would be much more pronounced. But I guess after frosting and smoothing dozens of cakes, I got the hang of it with both types!

img_7325

Left: American Buttercream Right: Swiss Meringue Buttercream

To make Swiss Meringue Buttercream, you start with heating egg whites and sugar in a double boiler until the sugar dissolves. You then remove it from the heat and whip it in your stand mixer with the whisk attachment until the mixture cools to room temperature and has the consistency of a soft-peak meringue. You then add the butter, a little bit at a time, until it looks like a curdled slosh. Keep beating until it congeals (see picture). The result is a super smooth buttercream that spreads like a dream. And because it has the protein from the egg whites as a base, it won’t just melt in a warm room like butter would. As long as it’s done right. And boy have I done it wrong:

  • I once overheated the sugar/egg white mixture to the point that after 45 minutes of beating it in my KitchenAid it was not cooling it down. During that time my meringue doubled in volume, only to deflate. I still went ahead and added the butter. When after another 45 minutes it wasn’t coming together, I stuck an ice pack to the side of the bowl. It worked – somewhat. The buttercream came together, but it didn’t have the structural characteristics of a proper SMB. The rosettes that I piped with it melted on the way to the venue. It was 100 degrees. My fridge broke that week. A lot of things went wrong that week. =(
  • Another time I added the butter too soon and it wouldn’t come together no matter what I tried.
  • Another time the butter I added was too soft.

You name it, I messed it up in that way.

img_7328

To correct for the less than desired sweetness, I like to add a syrup of some sort at the very end:

  • For caramel SMB: about half a cup of homemade caramel sauce
  • For strawberry SMB: about one cup strawberry syrup or to taste
  • For vanilla SMB: 2-4 tbsp corn syrup (to taste) and 1 tbsp vanilla extract
  • For chocolate SMB: 1 lb semisweet chocolate, melted and cooled slightly

This is the base recipe (from Smitten Kitchen):

Ingredients

  • 4 egg whites
  • 1 cup granulated sugar
  • 26 tbsp unsalted butter, softened to room temp

Directions

  1. In a small saucepan, bring 1 inch of water to simmer over medium low heat. In the bowl of your stand mixer*, combine egg whites with sugar. Whisk until combined. Place over the sauce pan and stir until sugar dissolves (you can feel it with your fingers – mixture should feel smooth).
  2. Remove from heat and fit into stand mixer. With the whisk attachment, beat on medium speed for a few minutes, until mixture cools to room temperature AND doubles in volume. Then add the butter, 1 tbsp at a time. Allow the mixture to run at medium/high speed past the curdling point to the congealing stage. Once it comes together and resembles billowy clouds (your mixer will start to make a different sound), add flavoring. Continue to beat until all the flavoring is incorporated.

*You can make this with a hand-held mixer. Just be prepared for your arm to get tired from holding it up for 10-15 minutes =)

Leave a Comment · Labels: American/Mediterranean, Dessert, Food Fun, Recipes

French Apple Cake (Le Gâteau Aux Pommes)

September 6, 2016

IMG_7159

After weeks of tiers and whipped egg whites and multitudinous trips to Costco – this simple, seasonal cake was just what I needed. My kids couldn’t wait to dig in after seeing cake after cake assembled and shipped out the door.

Warm. Fresh. Topped with whipped cream.

From what I’ve read in her book, Around My French Table, Dorie Greenspan’s goal is to put in writing the methods French cooks and chefs use to elevate everyday ingredients into delicious dishes you’ll crave again and again. The challenge was so many of them rely on instinct, memory, tasting along the way. In this I found a kindred spirit in Dorie – this was exactly what I set out to do when I started this blog. Trying to put into metrics and writing the authentic Bengali foods I ate growing up. Not easy when ingredients are measured in fingers and variable tea cups. But that’s probably where our similarities end.

IMG_7167

The original recipe relies heavily on rum for flavor. I exclude it, double the amount of vanilla, and enjoy a buttery, delicately flavored dessert cake. The other departure is to use a conventional cake pan over a springform pan, which I can never track down the right pieces for or the right size.

Adapted barely from Dorie Greenspan’s Around My French Table, which is chock full of goodies from authentic french desserts (crème brûlée, pâte à choux) to North African inspired dishes (couscous, tagines).

Ingredients

  • 3/4 cup all-purpose flour
  • 3/4 tsp baking powder
  • pinch of salt
  • 4 large apples (preferably different varieties)
  • 2 large eggs
  • 3/4 cup sugar
  • 1 tsp vanilla extract
  • 8 tbsp unsalted butter melted and cooled slightly

Directions

  1. Place a rack in the center of the oven and preheat to 350 degrees F. Grease the bottom and sides of an 8 inch cake pan. Trace and cut out an 8 inch circle on parchment paper to line the bottom with. Grease again with non stick cooking spray or butter.
  2. In a small bowl, whisk together the flour, baking powder and salt.
  3. Peel the apples, cut in half and remove the cores. Dice into 1 inch chunks.
  4. In the bowl of your stand mixer or in a medium sized bowl, whisk the eggs until foamy (medium speed). Add the sugar and continue whisking for another minute. Add the vanilla, reduce the speed to low and add half the flour mixture. Stop the mixer every now and then to scrape down the sides of the bowl. Add half the melted butter, then the remaining flour. Add the last bit of butter and stop the mixer, mixing in the last bit with a spatula. Add the apples and fold into the batter gently.
  5. Pour batter into prepared pan and bake in the preheated oven for 50 to 60 minutes until the top is golden brown and a toothpick inserted into the center comes out clean.
  6. Let cool in the pan. When time to remove, gently loosen from the sides of the pan, invert onto a cake board or paper plate, then invert again onto a cake stand. Serve warm or at room temperature with a dollop of whipped cream.

Leave a Comment · Labels: Dessert

Mango Mousse (Eggless)

June 30, 2016

Summa summa summatiiiiiime. I’m keeping the oven off for this one. I’m keeping my fruit bowl stocked up on glorious mangoes. And I’m eating them whole, skin off, just me and the pulp, with the juices running down my elbows. When I’m not eating them whole, I’m whipping up the most divine desserts with them, from ice cream to pudding to this luscious mousse.

Of course I couldn’t leave well enough alone. Yes, I could’ve blended mango pulp with sugar and folded it into whipped cream. But why do that when adding a bump of flavor is so easy and impactful? I add the juice and zest of half a lime and it works so well to cut the sweetness of the mango and the richness of the cream. It’s a balancing act. And I’ve been obsessed with limes lately. I find the aroma absolutely intoxicating. From virgin mojitos to salad dressings – I’ve been putting them in everything. I also add a splash of vanilla to make it extra special – adding a floral dimension to a fruity dessert.

IMG_0074

There are two schools of thought when it comes to mousse. One includes raw whipped eggs whites. The other is a more simple one, made with just whipped cream. While this was a delicious, easy and no fuss method of making mango mousse, my curiosity will not be satisfied until I try a version with the egg whites. Though I’m not too crazy about consuming raw eggs, for the sake of recipe testing, I will! So keep an eye out for a future post with the egg white inclusive version!

IMG_0072

Ingredients

  • 2 1/2 cups heavy cream
  • 2 cups mango pulp (from about 3 large mangos)
  • 1/2 cup sugar plus 2 tbsp
  • juice and zest of half a lime plus more for garnish
  • 1/2 tsp pure vanilla extract

Directions

  1. If possible, freeze the bowl and whisk attachment of your stand mixer (or bowl/beaters) for about 10 minutes. Cream whips up much faster when cooler. When ready to whip, take out bowl and whisk/beaters from fridge, pour cream into bowl and add 2 tbsp sugar. Start whipping at low speed. As the cream gets thicker, gradually increase speed. When it reaches soft peaks (when it looks billowy and the whisk leaves lines in the cream), remove about 1 cup of the cream for the topping. Keep mixing the rest until you reach stiff peaks. Add in the vanilla and give it a final stir by hand. Set aside.
  2. In a food processor or high power blender, blend the mango puree, 1/2 cup sugar, lime juice and zest until well combined.
  3. Gradually add to the whipped cream, 1/3 of the mango puree at a time, folding into the whipped cream gently. When completely incorporated, pour the mousse into a trifle bowl, or similar bowl with high sides. Top with the whipped cream you set aside earlier. Garnish with extra lime zest.

Leave a Comment · Labels: American/Mediterranean, Bengali, Dessert, Recipes

Eton Mess

June 5, 2016


Eton Mess aka Eat-A-Mess. Named for the school where it was first served – Eton College, presumably in the mess hall. For some reason I am surprised when people aren’t familiar with this dessert. I mean, didn’t everyone watch the episode of Barefoot Contessa when Ina Garten cooked a charity luncheon for Alec Baldwin and the lady from Law and Order?? I mean, she made Alec buy her groceries from a farm stand. CLASSIC INA.

I made this dessert for the first time this week, for a small party I catered for Sukoon Active – a modest athletic wear company. They had their Kickstarter Launch Party and I was there serving up mocktails and small bites. Catering is a lot of work, but so much fun!

Traditionally made with strawberries, Ina adds a twist by making a raspberry compote. I didn’t think I was a fan of raspberry desserts until I tried this. Wow – it is so delicious I sometimes steal a spoonful of the stuff when nobody’s looking. I omitted the Framboise (raspberry liqueur) from the original recipe, and it still came out great. The tartness from the lemon juice, the flavor of the raspberries, and the sweetness of the sugar all play the most amazing balancing act. Add that to whipped cream and crushed meringues, and it’s essentially a play on my pavlova. Nothing beats the textures and flavors of the three ingredients combined. It was definitely a hit at the party!

I copped out when making this dessert a second time. I used the whipped cream from a can because I ran out of heavy cream. Don’t judge!

Recipe adapted from Ina Garten.

Ingredients

  • 4 6oz. packages of raspberries
  • 1 cup plus 3 tbsp sugar
  • 1 tbsp freshly squeezed lemon juice
  • 1 1/2 cups cold heavy cream
  • 1 tsp vanilla extract
  • 1 cup crushed meringues (available at Trader Joe’s and sometimes by the deli section of my local grocery)

Directions

  1. Combine 2 packages raspberries, 1 cup sugar and 1 tbsp lemon juice in a medium saucepan. Crush the berries lightly with a fork and cook over medium high heat until the mixture comes to a boil. Lower the heat and cook for about 10 minutes until the mixture thickens. Turn off the heat and add the remaining two packages raspberries. Fold into the mixture gently then refrigerate until very cold.
  2. In the bowl of your stand mixer or in a large bowl with a handheld mixture, beat cream with 3 tbsp sugar and vanilla until stiff peaks form.
  3. To crush the meringues, place them in a large ziploc bag and close tightly. Bang them with a rolling pin or something similar until you get small pieces.
  4. Layer about 1 tablespoon of the whipped cream, 1 tbsp raspberry compote and 1 tsp crushed meringues in a dessert cup or glass. Top off with whipped cream and enjoy immediately.

1 Comment · Labels: American/Mediterranean, Dessert Tagged: dessert, easy dessert, eton mess, ina garten, meringues, no bake dessert, pavlova, raspberry, sweet, whipped cream

  • Newer Entries
  • 1
  • 2
  • 3
  • 4
  • 5
  • …
  • 7
  • Previous Entries
American, Bangladeshi. Savory, sweet. I don't discriminate and neither should you.

Most recently…

Load More...
Follow on Instagram

Social

Subscribe to Blog via Email

Enter your email address to subscribe to this blog and receive notifications of new posts by email.

Tags

appetizer beef bengali breakfast butter cake caramel chicken chocolate chocolate chips cilantro clean eating coconut comfort food cookies dessert dinner entertaining fall fruit ganache gluten free halal healthy homemade honest chops honest creations iftar italian pasta pastry pistachio quick and easy dinner ramadan recipe side side dish south asian spinach vegan vegetables vegetarian weeknight dinner weeknight meal whipped cream

Theme by 17th Avenue · Powered by WordPress & Genesis