Kitchen3N

Recipes and food fun from Apt 3N

  • About
  • Gallery
  • Recipes

Boneless Short Ribs with Asian BBQ Sauce

December 11, 2014

IMG_3132 How can I explain to you how good these are? Do the pictures do justice to them? Are you drooling on your keyboard? If so, then I’ve done my job. IMG_3149Though I have a confession to make: I’ve never made short ribs before. I’ve never even had them before, you know, as a separate entity. Sure, I’ve eaten them as part of a larger curry, but not like this. IMG_3099 But hooray for internet, right? I checked my cookbooks and could not find anything for boneless ribs. They all had recipes for bone-in ribs, the type that you braise in a casserole. Balsamic braised. Beer braised. Red wine braised. But then, I found this recipe for easy bbq boneless ribs! And though I was grateful for Sunny Anderson’s (easy) cooking technique, I knew I wanted an Asian BBQ type thing, something rich in soy sauce and garlic with a hint of sesame flavor, but not one that was so authentic I needed to make an extra trip to my local Asian grocery. Na’m sayin? IMG_3103 In keeping with halal guidelines, I’ve never had korean or japanese bbq (I doubt any halal establishments exist in NY). But I knew I really wanted to try Korean BBQ short ribs, or Kalbi. The problem is, you need a special cut of short ribs to prepare in that way – called the flanken cut. And if I had thought a little bit in advance, I could have convinced my friends at Honest Chops to hook it up. But I didn’t. And here we are. IMG_3106 For this post, I took a page out of my research days, when, clueless about coding, I’d have to piece together bits from existing code, tweak it according to my data, and try to make some science! So I took a little from a recipe here, a recipe there, and badda bing badda boom. Definitely feel free to swap out the regular soy sauce for low-sodium. I served it here with rice, but I actually liked it better when it was shredded and wrapped in lettuce leaves. The cool, crisp texture and flavor of the lettuce worked perfectly with the slow cooked, soy sauce spiked flavor of the ribs. IMG_3124  I used Sunny’s cooking technique with an adapted version of the Kalbi recipe below (I didn’t have an asian pear, and I wasn’t about to venture out into this torrential rainfall to get some). And I had to add chili flakes. Had to. IMG_3147 I found by the end of the recommended 3 hours, the meat dried out a bit (that didn’t stop me from inhaling them). I did taste it at 2 hours, and it was tender enough. I would recommend for this amount of meat, 2 to 2 1/2 hours. And there is more than enough sauce. I actually used some of the leftover sauce to season some salmon. You can easily do 4 lbs of ribs in it.

For leftovers: shred the beef, mix with some mayo/lemon juice, and fill a pita or other flatbread with it and some lettuce. So good.

Recipe adapted from Food Network: Kalbi, Easy BBQ Short Ribs.

Ingredients

  • About 2 lbs Honest Chops  GRASS FED boneless short ribs
  • 1/2 cup soy sauce
  • 1/2 cup brown sugar
  • 1/4 cup rice wine vinegar
  • 1/4 cup water
  • 2 tbsps garlic and ginger paste
  • 1 tbsp sesame oil
  • 1/2 tsp black pepper
  • a pinch of red chili flakes
  • 1 small red onion, quartered
  • 4 scallions, chopped at a diagonal in half in slices

Directions

  1. Preheat oven to 300 degrees F.
  2. Measure out the first 4 ingredients in a large glass measuring cup. Add garlic and ginger paste, sesame oil, black pepper and chili flakes. Stir to combine.
  3. Add quartered onion into food processor. Process for a few seconds, then slowly drizzle in soy sauce mixture.
  4. Cut the short ribs into 1 1/12 to 2 in thick strips. Lay across a baking dish and drizzle the sauce over all the pieces.
  5. Cover with aluminum and bake for 2 to 2 1/2 hours, turning once half way, then once again 15 minutes before removing from the oven. Garnish with chopped scallions.

2 Comments · Labels: Dinner, Honest Chops, Main, Protein, Recipes Tagged: asian bbq sauce, bbq, boneless ribs, easy, flanken, kalbi, ribs, short ribs, slow cooked

Brisket Burgers

December 5, 2014

IMG_3038For our third installment of HCxK3N (what? you don’t think it’s catchy?), we’re serving up some brisket burgers. Notorious for being overcooked, I’m sharing my experience in cooking these delicious burgers up. Don’t judge the placement of the cheese slice. It’s adjusted below.IMG_3062Just look at that caramelization!

And to give you some background, burgers are to Naureen as hunny is to ____. IMG_3036Pooh. The answer is Winnie the Pooh. Don’t judge my TV selections as of late. I LOVE burgers. But sometimes I wonder if I’m more about the burger fixins than the actual burger. For me the patty is more of a vehicle for the most wonderful combination of sauce, cheese, veggies and bread. I’m probably not supposed to be saying that but regardless I’m going to share with you the secret to keeping your burgers nice and juicy.    IMG_3092The secret’s in the sauce. No it isn’t. I’ll be sharing my not-so-secret sauce recipe below.

It’s in the cooking method. You want to cook it over pretty high heat so you sear the outside and you don’t want to overcook it. The longer it sits over the pan, the more juices that come pouring out. So I found 7 minutes on each side, on a hot cast iron skillet does the trick. This gets the burger to a medium doneness. If you can stomach a rare burger, 4 minutes on each side should do. Well done, 9-10 on each side. If your burger loses some of its juiciness at that point, compensate with sauce (that’s what I do…don’t hate!).

Ingredients

  • 4 1/4 lb Honest Chops Brisket Burgers
  • 4 brioche buns
  • 4 slices swiss or american cheese
  • a few slices of tomato
  • a few slices of red onion
  • a few slivers of pickles
  • some iceberg lettuce leaves
  • 2 tbsp mayo
  • 1 tbsp ketchup
  • a dash of hot sauce or chipotle adobo sauce
  • 1 tsp chopped pickle
  • pinch of salt and pepper

Directions

  1. Preheat a cast iron skillet or a non stick skillet over medium high heat. Season both sides of the burgers with salt and pepper. Add a little grease (veg or olive oil) to the pan. Add 1 or 2 burgers at a time depending on the size of your pan and don’t move until ready to flip (4 min each side for rare, 7 for medium, 9-10 for well done).
  2. When the burgers are done, top with cheese (you can add the cheese in its final stages of cooking, but I hate dealing with the mess of melted cheese) and set aside while assembling the rest of the ingredients.
  3. Warm the brioche buns in the same pan the burgers were cooked in or in your toaster oven.
  4. Make the sauce: combine mayo, ketchup, hot sauce, chopped pickle, salt & pepper in a small bowl. Smear sauce on both sides of the bun. Add burger and layer with whatever ingredients you like, I listed the classic toppers above but feel free to substitute caramelized onions and sautéed mushrooms or avocado and cilantro. The choices are endless!

Leave a Comment · Labels: American/Mediterranean, Dinner, Honest Chops, Main, Protein, Recipes Tagged: all natural, brisket, burgers, halal, honest chops, local, zabihah

Braised Lamb Shoulder

November 27, 2014

IMG_3010Happy Turkey Day everyone! In honor of this national holiday, I’m posting about…lamb. I know, I know – ill timed. But, come this weekend, when you won’t be able to stomach another ounce of turkey or leftover cranberry sauce, you’re going to looking for a hearty, warming meal like this one.IMG_2988 
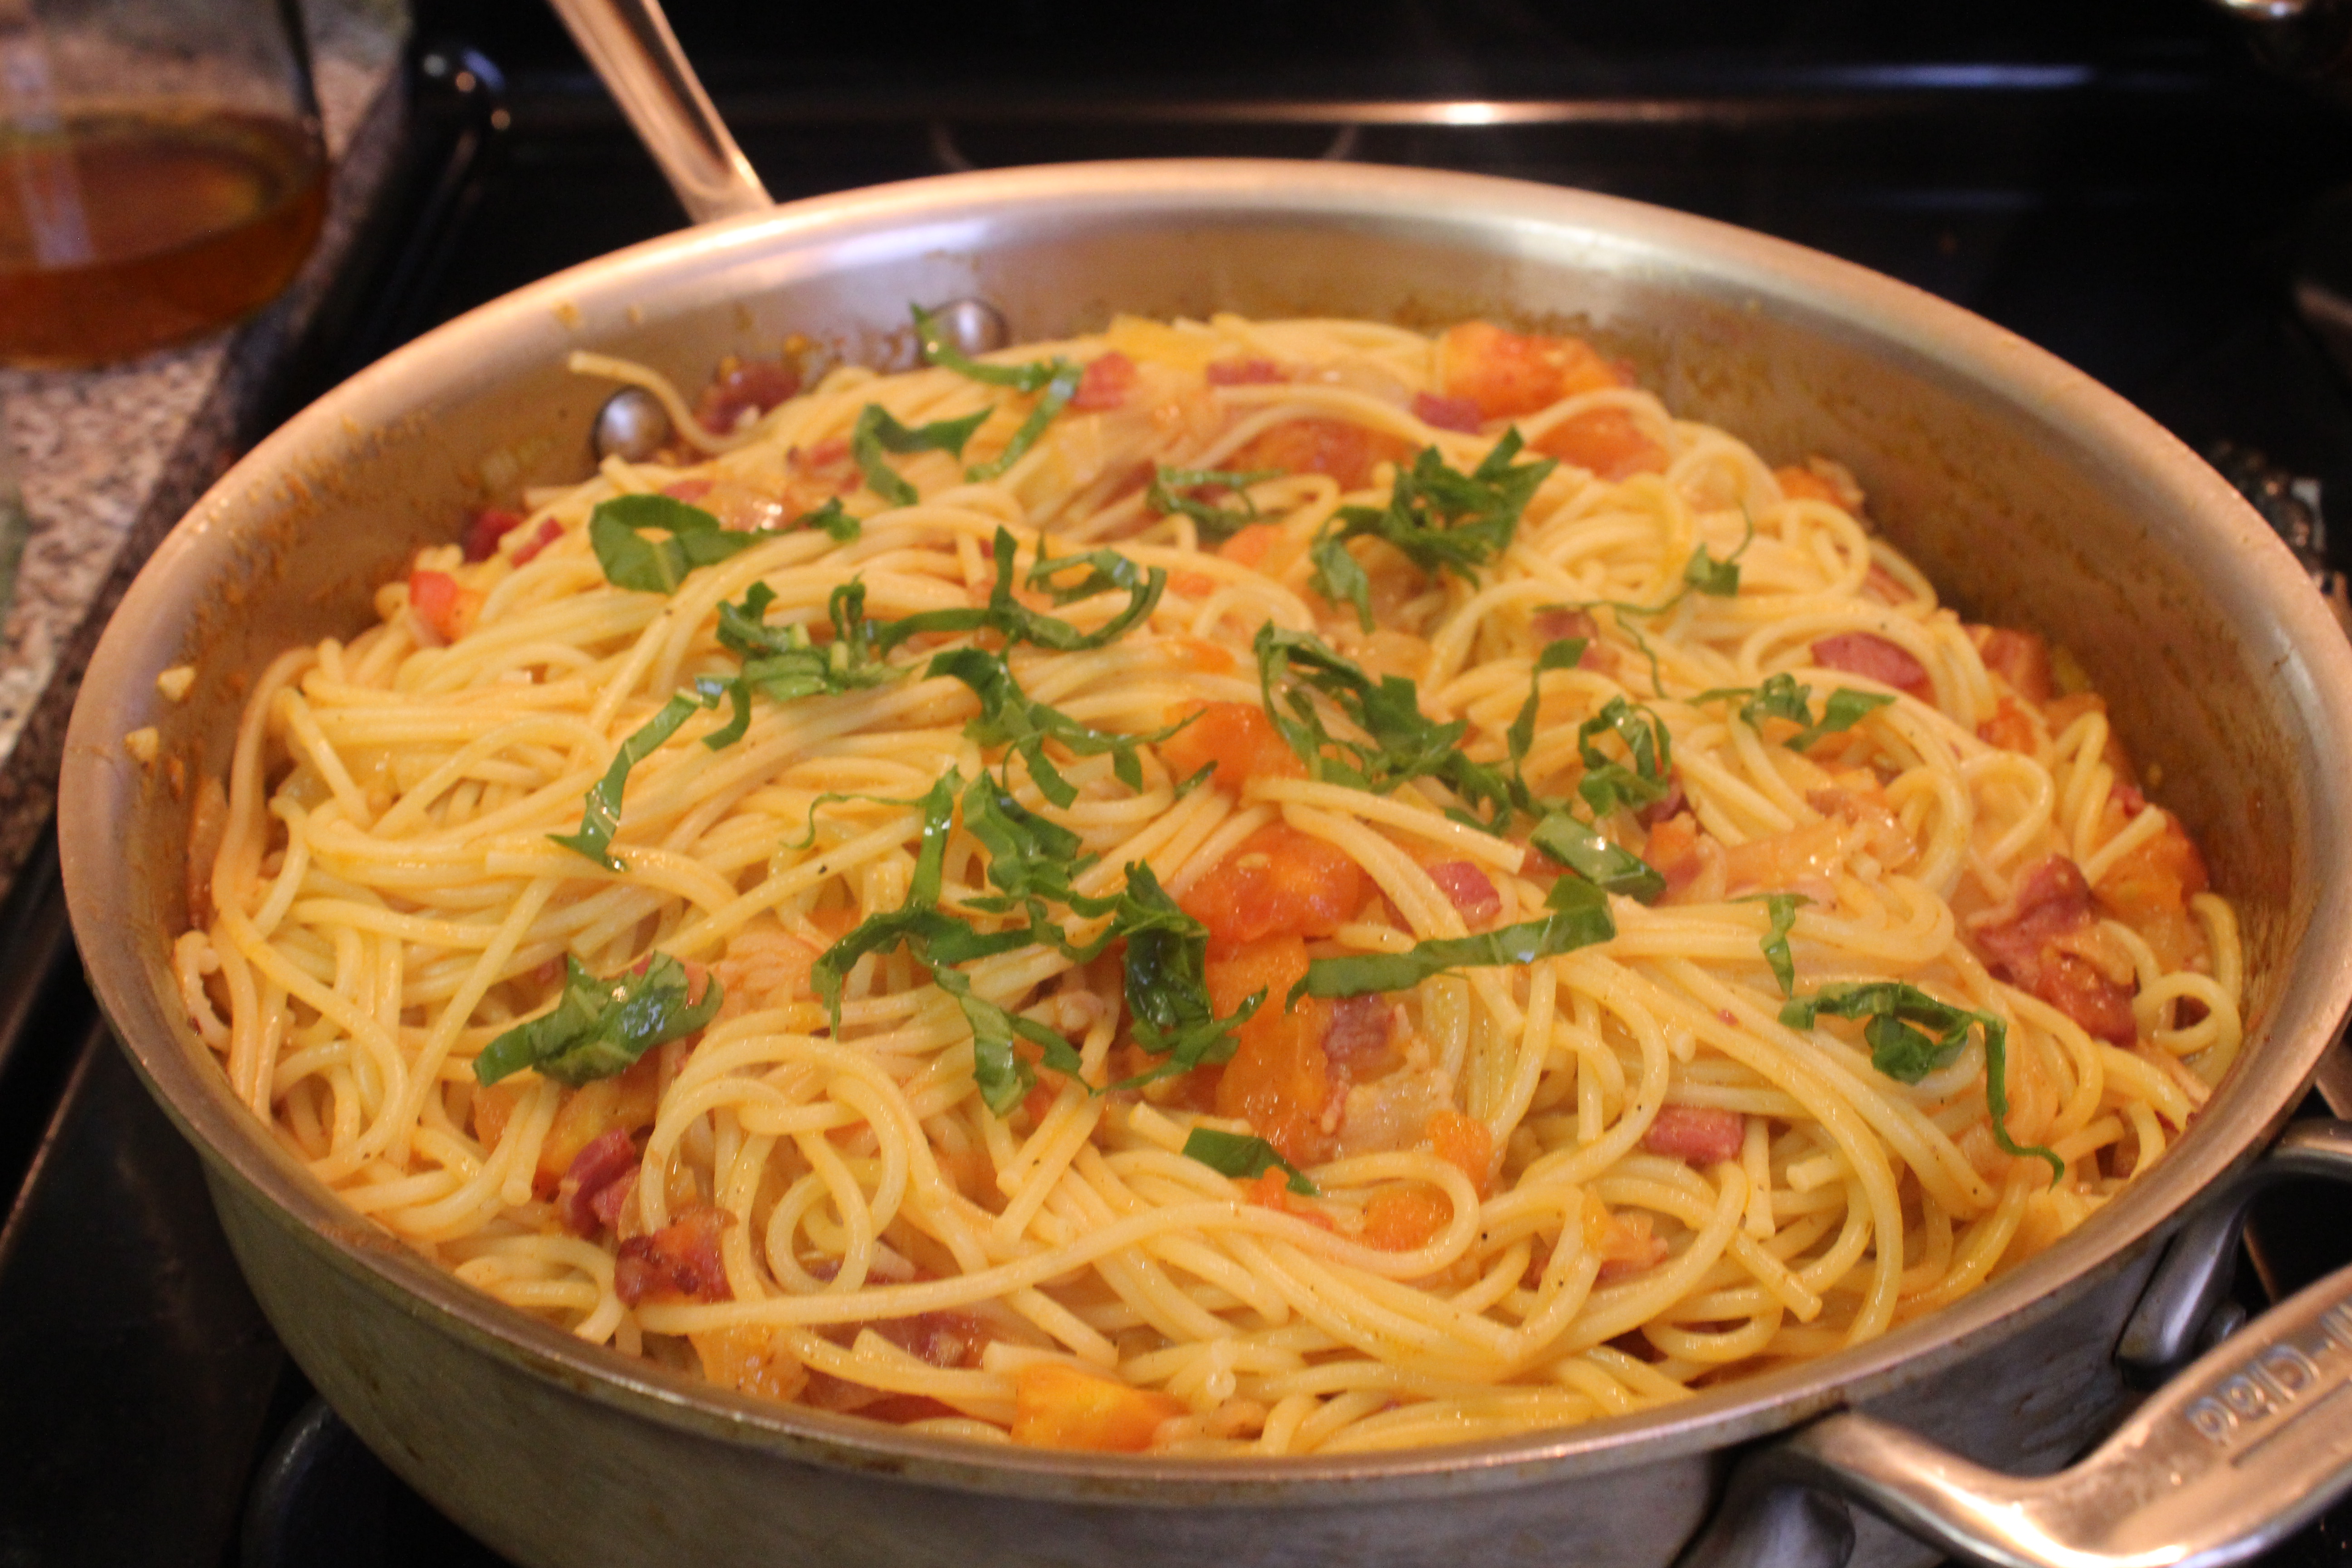
Now, most days are not braise days. Most days are mac and cheese from a box, or spaghetti aglio olio, or chicken curry days. I usually leave the braising of big cuts of meat (lamb shanks, shoulder, or short ribs) to the pros at my favorite Persian or Turkish or Afghan restaurants. But sometimes, you have to pull out the big guns. Visiting relatives. Someone got a raise, or maybe just got a year older. Or, perhaps you’re snowed in. IMG_2997Look at it just getting all cozy in its bed of tomatoes, onions and spices. IMG_2998When the occasion calls for a braise, the long, slow cooking of a piece of meat in order to render all of the fat and break down the muscle fibers to make for a tender, delicious meat, tomatoes and onions are my best friends. Many French or European recipes rely on the acidity of wine to get the job done. My mother and many on the Subcontinent might rely on green papaya as a meat tenderizer (strange, I know, but it works!). IMG_3003So, when deciding how to prepare this awesome lamb shoulder, I noticed most of the recipes in my cookbooks called for about 2 lbs cubed, boneless lamb shoulder (oops). Since this piece came bone-in, I decided to make the most of it! I love bones (it’s the Bengali in me). Since I don’t cook with wine or chicken stock for the most part, I rely on the bones in the meat I prepare to flavor the broth that it cooks in.IMG_3013 I reviewed many different recipes before I went ahead with this one. It’s a conglomerate of all of them (cooking technique based loosely on Andrew Zimmern’s stovetop method, spice mix based on Gourmet’s Ras el Hanout recipe). I used my dutch oven for this – it retains heat really well and the inside of the top cover is lined with bumps that allow the moisture to drip down and baste the meat. Any large pot will do, though. You want to cook until the meat is tender and falling off the bone, but not so long that the meat will dry out (not to worry, there is a fairly large window of time between the two). IMG_3016After a cooking time of 1 1/2 hours, I took the meat out and shred it with a fork. During this time, I took the pot off the heat, and blended all the chunks in the cooking liquid with my immersion belnder to make a satiny smooth sauce. You can do this in your blender, in batches, or leave as is for a more “rustic” look. I left the meat immediately around the bone in tact, for presentation purposes, or for the Fred Flinstone in your family. I served this with couscous cooked in a saffron broth, and vegetables lightly sauteed with garlic and rosemary.

Ingredients

  • 1 tbsp olive oil
  • 1 Honest Chops lamb shoulder (this one was 1 1/2 lbs)
  • 1 large yellow onion, diced
  • 2 tbsp tomato paste
  • 1 tsp salt, plus more to taste
  • 1 tsp coriander powder
  • 1 tsp cumin powder
  • 1/2 tsp turmeric powder
  • 1/2 tsp black pepper
  • 1/2 tsp cinnamon
  • 1/2 tsp cayenne (1/4 tsp if you prefer it mild)
  • 1/4 tsp cardamom powder
  • 1/8 tsp cloves
  • 1 tbsp garlic paste
  • 1 tbsp ginger paste
  • 1 lb tomatoes, quartered (you can use the equivalent amount of crushed/whole tomatoes from a can)
  • 3 cups water

Directions

  1. In a large dutch oven or casserole, heat oil over high heat. Season the lamb shoulder with salt and pepper. Add to the pot. Don’t move until the side that’s down is nice and brown (2-4 minutes depending on heat level). Rotate to the next side, carefully. Repeat until all sides are browned (about 10 minutes). While this happens, dice the onion and assemble the spices. Take the shoulder out of the pan and onto a plate. Set aside.
  2. Add the diced onion to the hot pan, stirring vigorously to get the brown bits off the bottom. When they start to sweat, add tomato paste and ALL of the spices (up to the cloves). Add a splash of water, if necessary to dissolve all the spices and form a nice mush. Once the spices are dissolved and you have a nice onion/spice paste, add garlic, ginger and tomatoes. Stir to combine. Next, add the water, then nestle the meat in. Bring up to a boil.
  3. Reduce heat to a simmer and put the lid on. Simmer for about 1 1/2 hours, rotating the meat every 20 minutes or so to ensure even cooking.
  4. After the 1 1/1 hours is up, remove meat from pot and check for doneness and seasoning (should be fork tender and delicious!). Shred most of the meat with two forks on a cutting board. Remove pot from heat and blend the broth with an immersion blender, or in batches in a conventional blender, or leave as is for a more rustic look. Also check the broth for seasoning. Return to heat and boil over high heat for about 5 minutes, until the sauce thickens. Add the meat back and cook for an additional 5 minutes.
  5. Serve on a bed of couscous or rice, garnished with a sprinkling of fresh parsley.

1 Comment · Labels: American/Mediterranean, Dinner, Honest Chops, Main, Protein, Recipes Tagged: braised lamb, braising, couscous, halal, hearty, honest chops, indian, lamb, lamb shoulder, moroccan, zabihah

Roast Chicken and New Potatoes with Herbed Butter

November 20, 2014

IMG_2954I have an exciting announcement to make! No, I’m not expecting baby number 3 as my mother would so desperately hope for. I am partnering with awesome, organic, halal and quality meat provider Honest Chops! Gone are the days when us strictly zabihah halal eating folks were limited to the options available at our local butchers (God bless them, but good luck if you’re looking for a steak or any other sizable cut of meat). With Honest Chops, not only can you get a great selection of cuts, but you can rest assured the animals are local, were raised humanely without steroids or antibiotics, and are zabihah halal. Some, including the lamb and beef, are even grass fed! YUM! For the next few weeks I’ll be posting a new recipe each week highlighting some of the great cuts of meat they have to offer. I love you guys. I love them. I hope you guys love them as much as I do!IMG_2923 For my first post, I’m offering a turkey alternative for your Thanksgiving spread. I promise, non-turkey poultry is not sacrilege. Plenty of people (ahem, husband) aren’t fond of turkey. Some people do cornish hens, maybe even a large roasted fish (Everybody Loves Raymond, anyone?).  A roast chicken is perfect for a more intimate gathering. The way I do it here, in a cast iron skillet, is wonderfully homey, rustic and easy! No need to get down the giant roasting pan (or purchase one just for this once a year dinner). You just need to ensure your skillet is well seasoned (read: greased). If you don’t have a cast iron skillet, any heavy, large, oven proof pan or casserole will do the trick. IMG_2929 I used an herbed butter to flavor the bird and the surrounding potatoes. It’s got some of the traditional fall flavorings: sage, thyme, orange and lemon zest. But don’t be alarmed by the amount of seasoning – it’s enough for the bird, potatoes, and probably one more roast chicken. You could substitute other root vegetables in lieu or in addition to the potatoes – you just want to ensure it’s cut big enough to withstand the long cooking time. This was a pretty small bird, weighing in at 2.5 lbs. It only took 1 hour at 450 degrees F for the internal temperature at the thigh to reach 165 degrees F. I believe it’s an additional 15 minutes per pound – but your best bet is either a meat thermometer or slicing into the thigh to see if the juices that run are bloody or clear. IMG_2936Just in case you needed a visual for where to place the meat thermometer.IMG_2944 Now there are all these different techniques for ensuring juicy breast meat. Flipping the bird (not that kind!) halfway through the cooking process. Spatchcocking. Dorie Greenspan suggests Joel Rubechon’s technique of cooking the bird on its side, flipping to the other side, then after it’s done, turning it upside down and doing a rain dance (for moisture, of course). Ok, I made up the dance part just to show what lengths some will go to. The fact of the matter is – white meat is white meat. It’s inherently more fibrous than dark meat. But with a bird this size, I doubt you will run into issues with it drying out. I say this after roasting this in one position for the whole time, without any basting. Though, I will say, with the herbed butter spread between the skin and the meat, that ensures a sort of self-basting.  IMG_2952If you don’t have sage, I’d imagine rosemary would work well. Or even tarragon. Something earthy! The last thing you need is some kitchen twine to tie the chicken’s limbs to the body (you don’t want the limbs flapping about, otherwise they’d overcook). With that said – happy eating and start to a holiday season!

Ingredients

  • 1 all-natural whole skin-on chicken 
  • 1 stick of butter, at room temperature
  • 1 orange, zested, cut in quarters
  • 1 lemon, zested, cut in quarters
  • 3 cloves garlic, minced or made into a paste by pushing through a microplane, plus the rest of the head of garlic
  • 1 tbsp finely chopped sage leaves
  • 1 tsp finely chopped thyme leaves
  • 1 tbsp kosher salt (I know this sounds like a lot, but you only use a fraction of the herbed butter for the chicken and vegetables) or to taste
  • 1 tsp black pepper or to taste
  • 1 1/2 lbs new potatoes or yukon gold potatoes, rinsed and scrubbed
  • olive oil

Directions

  1. Preheat oven to 450 degrees Fahrenheit. Rinse the chicken, removing any remaining feather shafts that might remain. Remove giblets and neck, setting aside for stock or curry. Set on a large plate or cutting board and pat dry with a paper towel.
  2. Add butter, orange zest, lemon zest, minced garlic or garlic paste, sage, thyme, salt and pepper into a bowl and mix well. Place chicken, breast side up, and rear cavity facing you. Insert fingers between the skin and breast meat to separate (careful not to tear the skin). Add a spoonful of butter and spread throughout the breast, under the skin. Repeat for other breast. Smear more butter over the skin, over breasts, legs, thighs and wings (though don’t butter the back side, the side that will be in direct contact with the skillet). Stuff the cavity with the remaining garlic head (sliced through the middle like this) and however much of the remaining citrus you can fit (giving the fruit a little squeeze before inserting).
  3. Cut two pieces of kitchen twine: one to wrap the legs together, the other to tie the wings to the body (see picture). Wash hands.
  4. Preheat greased skillet over medium high heat for a few minutes. Add chicken, then potatoes around the chicken. Drizzle olive oil or vegetable oil over the chicken and potatoes to ensure the butter doesn’t burn. Use a pastry brush if necessary. Stick into preheated oven and cook for 1 to 1 1/2 hours, depending on the size of your chicken. A meat thermometer inserted into the thigh (see picture) is the best indicator of doneness (reading should be 165 degrees F). Otherwise, cut a slit into the thigh meat to see if the juice is clear or bloody. If bloody, stick back into the oven for 10 to 15 min more.
  5. When done, leave it out to rest for a few minutes to allow the juices to redistribute. Dot the potatoes with the herbed butter and slice in half for serving. You can serve directly on the skillet, or carve on a cutting board like a champ. I am not a champ so most of my chicken pieces were torn off with my hands with a bit of help from my carving knife for ligaments 😉

As a final note – don’t toss those pan drippings! We’re not gravy crazy around here so I made a quick pasta and peas dish. Simply toss the carcass and remove the vegetables from the pan. Warm it over medium high heat. Add half a pound a cup of frozen peas. Cook for 2-3 minutes. Add cooked long pasta (half a pound of spaghetti or fettucine). Cook until warmed through. Add a sprinkling of grated parmesan.

1 Comment · Labels: American/Mediterranean, Honest Chops, Main, Protein, Recipes Tagged: autumn, cast iron skillet, chicken, earthy, fall, herbed butter, holiday cooking, home cooking, new potatoes, roast chicken, rustic, sage, skillet, thanksgiving, thyme

Homemade Ricotta (and a lasagna, too!)

September 22, 2014

IMG_2763Why on earth would you make your own ricotta? Because it’s delicious that’s why! Also, for these reasons:

  • Unlike homemade chicken stock, you don’t need 98765432 ingredients. You need 4.
  • It doesn’t take 3.5 hours. It takes 0.5 (and you don’t even have to stand watch over it for the majority of that time).
  • You don’t need any special ingredients/equipment (screw cheesecloth! I used a papertowel!)
  • It is awesome over toast (or fruit) with a drizzle of honey and slivered almonds (that is, unless almonds trigger your eczema). Breakfast all week!IMG_2739 Use it to kick your lasagna up a notch! The recipe I’ve used all these years advised defrosting frozen spinach, mixing it with some ricotta, eggs, and seasonings and adding it as a single layer. It was my least favorite layer.  IMG_2743So, this time, I heated up minced garlic and oil in a saucepan/wok. I cooked the spinach in it, seasoned it with salt, pepper and nutmeg, then added it to my homemade ricotta, decreasing the ricotta to spinach ratio quite a bit. No egg. It was divine.  IMG_2747 I didn’t think this process through very thoroughly. I boiled all the lasagna sheets. I just kept adding layers while I had stuffing/noodles. The top layer didn’t receive its due (read: I ran out of sauce). I’m sorry top layer. I still loved your nutty, cheesy contribution. And now I have leftover cooked lasagna noodles in my fridge. Roll ups next week? IMG_2752 Another thing to make with your fresh ricotta – lemon (or in my case lime) ricotta cookies! Not pictured: the tangy, sweet glaze that goes atop these lovelies. And hopefully, your baking powder isn’t out of date, like mine was, and yours more resemble fluffy clouds rather than lemon disks. IMG_2753

For the Ricotta (recipe courtesy of Ina Garten – surprise!)

Ingredients:

  • 4 cups whole milk
  • 2 cups cream
  • 1 tsp salt
  • 3 tbsps white wine vinegar

Directions:

  1. Heat milk, cream and salt in a medium saucepan over medium high heat. Bring to a boil.
  2. Turn off the heat, add vinegar, and stir. Let sit 3-4 minutes while mixture curdles.
  3. Place a mesh sieve over a big (preferably deep) and line it with cheesecloth or a paper towel. Carefully pour mixture in and allow the whey to separate from the curds for 20-25 minutes. Voila! You have ricotta cheese.

For the Lasagna (warning: did not measure – approximations below)

Ingredients:

  • 3/4 lb ground beef
  • olive oil
  • 1/2 large onion, diced small
  • 2 carrots, peeled, diced into about 1/4 in pieces
  • 2 celery sticks, chopped small (if you don’t have carrots or celery, don’t let this stop you from making this meat sauce!! use peppers, or more onions if you need to!)
  • 3 garlic cloves, minced
  • 3/4 tsp dried oregano
  • 1/4 tsp chili flakes
  • salt
  • pepper
  • 1 28 oz can crushed tomato
  • 1 bay leaf
  • 1 tsp sugar
  • about 2/3 box lasagna noodles (about 15 sheets)
  • 16 oz frozen spinach
  • 1 clove of garlic
  • 1/4 tsp nutmeg
  • 1 cup of ricotta cheese
  • about 7-8 oz mozzarella cheese
  • 1 1/2 cups freshly grated parmigiano reggiano (sorry, no shortcuts allowed for this step)

Directions:

  1. For the meat sauce: brown meat in lightly greased skillet or wok over high heat, breaking up the meat and cooking until meat is no longer pink and has a nice crusty exterior. Remove from pan using a slotted spoon. Set aside on a plate. Add a bit more oil, then onions, carrots, and celery. Sauté until translucent (about 5 min). Add garlic, oregano, chili flakes, and about 3/4 tsp each of salt and pepper. Mix to combine. Add crushed tomato, bay leaf, sugar. Stir then cover and reduce heat to low. Let simmer for about 20 min, stirring occasionally. At the end of 20 min, turn off heat and check for seasoning (it should taste GOOD – if not, add 1/4 tsp more salt). Set aside.
  2. In a medium skillet/wok, heat 1 tbsp oil or butter over medium high heat. Add 1 clove of garlic, minced. After about 30 seconds, add frozen spinach. Stir to break down clumps of spinach. Add about 1/2 tsp salt and pepper and 1/4 tsp nutmeg. Cook down until spinach is warmed through and flavorful (4-5 min). Set aside.
  3. Bring a large pot of water to boil. Add a tbsp of salt and lasagna noodles and cook according to package directions (6-8 min). Drain, then drizzle with oil to keep from sticking. Set aside.
  4. Assemble the darn thing: preheat oven to 375 degrees Fahrenheit. Add 1/3 of meat sauce to the bottom of a casserole or lasagna dish. Add one layer of lasagna noodles (3 of the traditional barilla noodles). Then add 1/2 of the ricotta/spinach mixture. Top with 3 more noodles. Then add another third of the meat sauce – spreading to distribute evenly.  Top with half of the mozzarella cheese (shredded or sliced). Top with 3 more lasagna noodles. Add remaining spinach/ricotta mixture. Add 3 more noodles. Top with remaining meat sauce. Add 3 final noodles. Top with remaining mozzarella cheese and grated parmesan.
  5. Cover with aluminum foil and bake in preheated oven for 35 minutes. Uncover, then stick back in the oven for 10 more minutes. It should be bubbly and the parmesan should just be starting to brown. Let cool before slicing unless you want messy, gooey pieces like the one pictured here =).


Leave a Comment · Labels: American/Mediterranean, Carb, Dessert, Main, Protein, Recipes Tagged: beef, bolognese, cheesy, comfort food, freezer friendly, ground beef, homemade ricotta, italian, lasagna, lime cookies, meal planning, meat sauce, ricotta, ricotta lemon cookies, spinach

Zesty Grilled Chicken with Cilantro Yogurt Sauce

September 4, 2014

IMG_2670 I’ve lusted after many versions of Tequila Lime chicken for ages but never got around to finding a good substitute for tequila (we don’t imbibe or cook with booze around here – except for teeny tiny amounts of vanilla extract or almond extract). I’ve thought about agave syrup, among other things, and thought some more. All that thinking got me nowhere until I watched Pioneer Woman make her tequila lime chicken the other day. Enough is enough. It’s time to give those chicken breasts in the freezer some cilantro/lime lovin’ (is that weird?). IMG_2675 Now I still haven’t found a good substitute for tequila, but I definitely compensated for the flavor in other ways. Along with super fruity EVOO, lime juice, salt and pepper, I added a touch of garlic and honey to the marinade. These days, I always add a bit of sweetness to chicken marinades. It seems to round out all the flavors. And the sauce just takes it over the top. It’s my go to sauce for dressing up any meat or fish. I don’t exactly measure things out these days, so I will attempt to provide the most accurate measurements I can! You really should taste as you go along though. If the flavor falls flat, add salt. If the tang of the yogurt overpowers, add a little bit more garlic. If it’s too pale green, add some more cilantro. If it’s not spicy enough, well you know what to do.

And since I find chicken breasts to be kind of bland, I cut them pretty thin. In this case, getting 6 cutlets from 2 chicken breasts. More surface area = more flavor. Trust me – I know my stuff. Hah!  IMG_2684I served this alongside another PW inspired dish: perfect potato salad. I swapped out pickles for capers. Reduced the mayo and added some cilantro yogurt sauce. Nixed the mustard. I just loved the idea of hardboiled eggs with my potato. And what’s best – my kids ate it! Sweet, sweet victory. You’d be suprised (or if you’re a parent, not surprised) that despite all the effort I put in the kitchen, their favorite food is mac and cheese from a box.

Sorry the pictures are out of focus – I was warding off two hyperactive toddlers while taking them. Good news though: my gorillapod is in the mail! Hopefully that means crisp pictures from here on out!

Ingredients:

For the marinade:

  • juice from 2 limes
  • 3 tbsp extra virgin olive oil
  • 1 heaping tsp salt
  • 1/2 tsp black pepper
  • 1 garlic clove, peeled and minced or mushed through a microplane
  • 1 tbsp honey or agave syrup
  • 2 chicken breasts, sliced across to form 6 cutlets

For the cilantro  yogurt sauce:

  • 1 cup yogurt
  • 2 cups cilantro (loosely packed)
  • 1 large clove of garlic or 2 small
  • 1 green chili
  • 1/4 tsp salt or taste

Directions:

  1. For the sauce: add all the ingredients into a food processor and blend until smooth.
  2. For the marinade: combine the first 6 ingredients in a bowl or large ziploc bag. Add the chicken and marinade at least 2 hours, or overnight.
  3. Heat a grill pan over high heat. For at least 2 minutes. Make sure it is screaming hot. There will be smoke when the chicken hits – that’s ok. It’s part of the process. Spray the grill pan with non stick cooking spray and grill the cutlets for 3 minutes on each side. Arrange them on a platter and tent with aluminum foil to let the meat rest. Serve with cilantro yogurt sauce.

Leave a Comment · Labels: American/Mediterranean, Bengali, Main, Protein, Recipes Tagged: chicken, chutney, cilantro, garlic, grilled chicken, healthy, lime dressing, marinade, weeknight, yogurt, yogurt sauce, zesty

Salsa all’Amatriciana

July 10, 2014

IMG_2587It’s Ramadan. The days are long. Brain cells hardly get enough glucose to function throughout the day. You would think after breaking our fasts in the evening, we get a second wind and can be productive. Not the case here. Usually after iftar, my husband and I try to make the most of the 20 or minutes we have together post-kids-bedtime and pre-taraweeh (nightly prayer). Yet even after he leaves for the masjid, I find myself completely unable to do ANYTHING productive. That includes the dishes. I don’t know why this year’s fasts has left my brain and body completely depleted (any md’s/rn’s/nutrionists feel free to chime in). IMG_2538But my dear friend Amreen has been requesting this recipe from the very first time I made it for her back in college. And I, being the jerk friend that I am, have neglected to share it until now. So, on Friday, with bacon, tomatoes and sidekick Moury in hand, whipped up this old favorite.  IMG_2546This recipe is actually from my very first cookbook purchase in high school: Giada’s Everyday Italian. I know I’m always singing Ina’s praises and yes, her show really informed my current culinary outlook. But it all started with Everyday Italian. From Giada, I learned how to make my very first marinara sauce. Shrimp Fra Diavolo. Balsamic Roasted Chicken. Eggplant Caponata. Favorites that I use time and again – and they all come from this book. I can’t say as much for her follow up cookbooks, but this is definitely one I can vouch for. IMG_2557Any Roman reading this will gasp at my bastardization of their beloved Amatriciana sauce – a pancetta/onion/garlic/tomato sauce  except with halal beef bacon in place of the pancetta. I’m sorry! This is just the best we can do! The fat from the bacon balances well with the sweetness/acidity of the tomatoes. So you neither feel like you’re eating a really greasy pesto, nor a flat lined marinara (let’s face it, marinara just isn’t that exciting unless doctored up with some crushed red chili flakes). 
IMG_2576My old, and I mean old (seriously, friends for 13 years now?), friend Moury was with me in the kitchen. And contrary to our last cooking experience, I wasn’t a total tyrant. She took all these photographs for you guys. And since I haven’t been doing any day time eating, these are the only photographs I could manage for this post. IMG_2586So, bacon and pasta lovers rejoice! The perfect marriage of the two is in this dish.

Recipe from Giada De Laurentiis’ Everyday Italian

Ingredients

  • 2 tbsp olive oil
  • 6 ounces pancetta or slab bacon, diced
  • 1 yellow onion, finely chopped
  • 2 garlic cloves (I used 3), minced
  • pinch of dried crushed red pepper flakes (I would go with a generous pinch)
  • 1 (28 oz) can tomato purée (I used just over 1.5 lbs fresh tomatoes, blanched then peeled)
  • 1/2 tsp salt plus more to taste
  • 1/2 tsp black pepper plus more to taste
  • 1/2 cup grated Pecorino (I had none, so I just added some julienned basil)

Directions

  1. In a large, heavy skillet heat the oil over medium high heat. Add the bacon or pancetta and cook until the fat is rendered – about 8 minutes. Add the onion and cook for an additional 5 min. Add garlic and red pepper flakes and cook until fragrant, about 30 seconds.
  2. Add the tomatoes, salt and pepper and reduce the heat to medium-low. Allow the sauce to cook, uncovered for 15 minutes. Stir in the cheese (if you have) and salt and pepper to taste.
  3. Serve with 1 pound of cooked pasta (spaghetti or bucatini).

1 Comment · Labels: American/Mediterranean, Carb, Main, Recipes Tagged: all'amatriciana, bacon, bucatini, carbs, italian, pancetta, pasta, pecorino, pecorino romano, quick and easy, red chili flakes, roman, spaghetti, tomato sauce, tomatoes, weeknight meal

Spinach Purée with Quinoa (Saag ar Quinoa)

April 25, 2014

IMG_2426I did it! I conquered the quinoa! I thought about ways to desi-fy it since practically anything cooked in a curry sauce in this house gets consumed in minutes. Since I had this bag of frozen spinach in the fridge, I thought about doing a take on the classic palak paneer, replacing the protein in the form of paneer (cheese) with quinoa.

IMG_2421 Before you cringe at the thought of sullying your favorite buttery, cheesy spinach dish with healthy food, keep in mind  – it passed my taste test! In fact as I ate it throughout the week (the hubby helped – though the kids did not), and even went on to make French green lentils with the leftover vegetable stock, I really started acquiring a taste for these plant based proteins. When I had chicken after about two weeks, the poultry smell actually bothered me! Not to say I’m going vegan on you guys. No no no no. IMG_2422As I experiment with South Asian flavors and new ingredients, I’m excited to share some of the things I’ve been whipping up. On a side note: apparently the casual and sometimes excessive usage of the word “excited” or “exciting” is a uniquely American colloquialism. I found this out while reading the supremely entertaining and insightful novel Americanah about two Nigerians, following their lives in their home country and abroad. It reminds me a bit of The Brief and Wondrous Life of Oscar Wao, about a chubby Dominican kid growing up in the states. Both these novels do such a great job of relating the immigrant experience, part universal, part relative to their specific ethnic group. They overshadow most novels in that genre (recall the overly saccharine images of the Mama Ganguli making her holiday cards or the tired “behind the veil” stereotypes offered by Hosseini).IMG_2432 I digress. I used tricolor quinoa for a nice balance of nutty and earthy flavors. The main difference between this preparation and past failed attempts at quinoa was SALT AND PEPPER. After cooking in the low sodium vegetable broth, it was OK. After seasoning to taste, I was like, “I could get used to this.” And the spinach puree, though not plated very well here, was amazing. Pair it with any of your favorite proteins (salmon, grilled chicken breast, etc.). I added a dollop of yogurt to balance the deep seated flavor, but you can add sour cream, creme fraiche or nothing at all!

Ingredients

  • 1 cup quinoa, rinsed
  • 2 cups vegetable broth
  • 2 tbsp light olive or vegetable oil
  • a pinch of cumin seeds
  • a pinch pach forom (optional)
  • 1/2 yellow onion, diced
  • 2 cloves garlic, minced
  • 1 12oz bag frozen spinach
  • 2 green chilis
  • 1/8 tsp ginger powder (or raw ginger, minced)
  • 1 bay leaf
  • 3/4 tsp kosher salt
  • 2 tbsp water

Directions

  1. In a small saucepan, bring the quinoa and vegetable broth (or chicken stock) to a boil. Let simmer for 10 to 15 minutes until the ring pops out of the quinoa. When it’s done, season with kosher salt and pepper (about 3/4 tsp and 1/2 tsp respectively). Set aside
  2. In a large skillet, heat the oil over medium high heat. Add the cumin seeds and pach forom, if using, and let it warm through until fragrant, about 60 seconds. Add onions and saute until translucent (about 4 min). Add garlic and chilis. Stir to combine. Then add the frozen spinach, breaking up clumps with your wooden spoon. When it’s manageable, add the remaining ingredients. Let simmer, covered, for 5-7 min.
  3. Remove one of the green chilis and a bay leaf. You can always add the second chili to the puree if you like it hotter. Carefully add the spinach mixture to a blender and blend, covered, until smooth. Add water as necessary to thin it out. WARNING: (In case you are as inexperienced with the blender as I am)I made mine a bit too thin by attempting to blend it with the “Smoothie” function. “Ice Crush” did a much better job, but it was too late, I added the extra water already.
  4. Serve on top of the quinoa, adding yogurt as desired.


Leave a Comment · Labels: Bengali, Main, Protein, Recipes, Veg Tagged: budget friendly, desi, gluten free, greens, healthy, meat free, palak, quick and easy dinner, quinoa, saag, south asian, spicy, spinach, tj's tricolor quinoa, tricolor quinoa, vegan, vegetables, vegetarian, weeknight meal

Easy Fried Rice

March 10, 2014

IMG_6406 Ever since I started cooking for myself, my taste for takeout has rapidly declined (pizza and sushi exempt). Take chinese takeout for example: when I was a kid, it was the ultimate treat. My Friday lunch if I used my allowance wisely. I’m not sure what you know about Bengali moms, but they are pretty militant in their meal regiment. Rice, vegetable saute/bhorta, some kind of protein curried, and daal. That is what you have for dinner, every night. Without fail. Every bengali kid who grew up here knows the struggle to have something different on the table (first world problems, I know). And the retorts that follow: “Eh? Pizza? How is that any kind of food? What with all that cheese…and they wonder why American kids are so fat!”. This is usually said as one or more uncles are stuffing their faces with beef or goat curry and are working away at a Mt Everest sized mound of rice on their plate.

Anywho, takeout became less of a treat as I started making things like fried rice, fried chicken or tacos at home. The takeout versions just seemed laden with MSG, salt and grease. I used to be a little incredulous of Rachel Ray always insisting that the food you cook at home is so much better than takeout because you control what goes in there. But once you wean your taste buds of those noxiously high amounts of salt and fat, you can appreciate well made food. Food that someone didn’t just throw salt and fat at to make taste good. Rather, food that took time and thought to cook. Tasting along the way to make sure everything came together at the end.

IMG_6411Not to say that this recipe doesn’t include oil or sodium. I make mine with light olive oil (as opposed to extra virgin) and soy sauce, along with fresh garlic, ginger powder, and a generous serving of sriracha afterwards. It’s very versatile though: use any leftover meat you may have. And it’s quick and easy enough for a weeknight meal. You can use any combination of vegetables you like, as long as there are some root vegetables (onions, carrot, celery, etc.) along with corn, peas or even zucchini. For the protein, you can substitute eggs, small cubes of beef, shrimp or even tofu. And the cilantro is optional (I would put cilantro on everything if I could).

Ingredients

  • 1 cup short grain rice
  • 3 tbsp olive oil or vegetable oil
  • 1 1/2 cups mixed root vegetables, chopped small, comparable to the size of peas (I used onions, carrots and green peppers)
  • 2 cloves garlic, minced
  • 1/4 tsp ginger powder
  • 2 tbsps soy sauce
  • a pinch of red pepper flakes (optional)
  • 1 cup cooked chicken, cubed (if using left over curried chicken, rinse under water to get rid of the spices)
  • 1/4 cup frozen peas
  • 1/4 cup frozen corn
  • a handful of cilantro, chopped

Directions

  1. In a small saucepan or pot, rinse the rice with cold water. Then add water to cover (the water should cover the rice by at least an inch). Bring to a boil over high heat. Reduce heat to medium while preparing the vegetables.
  2. In a wok or large skillet, heat the oil over medium high heat. Add the vegetables and let them soften (about 5 minutes depending on how big you cut them). Add garlic, ginger, soy sauce and red pepper flakes. Reduce heat to medium.
  3. Working quickly, and keeping an eye on your vegetables so they don’t burn, drain the rice in a colander. Add to vegetables. Add chicken and frozen vegetables. Combine over medium heat. Be sure to break up any big chunks of rice (short grain rice is very starchy). Cook until frozen vegetables are heated through. Top with cilantro and taste for seasoning.
  4. Serve with Sriracha or any hot sauce of your liking.

Leave a Comment · Labels: Carb, Dinner, Main, Recipes Tagged: asian, budget friendly, chinese, easy meal, fried rice, frozen vegetables, meat, quick and easy dinner, quick meal, rice, sriracha, vegetables, weeknight meal

Coconut Egg Curry (Deem Bhuna)

February 26, 2014

IMG_2326This weekend was a welcome respite from the bitter cold of the past few months. Temperatures soared to the 50s (watch out LA, we’re catching up). I refused to wear socks…despite that fact that all the snow hadn’t fully melted. We took it all in. Enjoyed our walks instead of rushing from building to car to store then back.

But now the week has begun and and with it, freezing temps. So you can imagine my efforts to avoid multiple trips to the store. I’m pulling out all the stops to use up pantry ingredients. And I know how my readers love a CHEAP, QUICK and DELICIOUS weeknight meal.IMG_2322This doesn’t look like your usual curry (for lack of liquid). This type of dish is called a bhuna: where the liquids are allowed to evaporate for the most part, leaving a concentrated flavor enhanced usually by a large amount of caramelized onions. Most Bengalis would leave a dish like this for special occasions, typically shunning the high amount of cholesterol by the egg and coconut milk combination. Except now, according to recent studies, the cholesterol/fat found in both is good for you (but perhaps not for South Asian populations??). Who knows what to believe anymore with studies constantly disproving what we thought to be true for so long. I’m going to go with my usual wisdom: enjoy in moderation!

Ingredients

  • 6 eggs
  • 1/4 cup olive oil or vegetable oil
  • 1 medium onion, thinly sliced
  • 1 12 oz can coconut milk
  • 3 cloves garlic, minced
  • 1/4 tsp ground ginger
  • 3/4 tsp cumin
  • 3/4 tsp coriander
  • a pinch of turmeric (optional)
  • 1 bay leaf
  • 2 green chilis (or more if you like)
  • 1 tsp salt (or to taste
  • 1/2 tsp black pepper (or white pepper for a more mild heat)

Directions

  1. Place the eggs gently into a small saucepan and add enough water to cover the eggs. Bring to a boil over hight heat, then put the lid on and turn off the heat. Let sit for 6 minutes. Then run under cold water to help cool down enough to peel. PEELING TIP: crack on the counter and roll around. That helps loosen the shell.
  2. In a small nonstick saute pan, heat a tablespoon of oil over high heat. While it heats, toss the eggs with a pinch of turmeric and salt. Once hot, add the peeled eggs and let it sear on one side, after 30 seconds or so, stir to brown the flip side (do the best you can with this). Remove from heat.
  3. In a large saute pan, heat the remaining oil over medium high heat. Add the onions and saute until they are brown around the edges (8 to 10 minutes). Add the coconut milk, garlic, ginger, cumin, coriander, turmeric (if using), bay leaf, chilis, salt and pepper.  Let it simmer over a medium heat for about 5 minutes. Add the eggs, toss to combine, and check for seasoning.

VARIATIONS

Simple bhuna: ditch the coconut milk for water. Increase turmeric to 1/2 tsp.

Tomato and cilantro: use 1 cup water instead of coconut milk and add 1 tomato, diced. Garnish with 1/4 cup chopped cilantro.

Korma: Ditch the turmeric. Use milk or half and half in lieu of coconut milk. Garnish with raisins and slivered almonds.


1 Comment · Labels: Bengali, Main, Protein, Recipes Tagged: bengali, cheap, coconut curry sauce, coconut milk, curry, deem bhuna, egg, egg curry, eggs, gluten free, low budget, vegan, vegetarian, weeknight meal

  • Newer Entries
  • 1
  • 2
  • 3
  • 4
  • Previous Entries
American, Bangladeshi. Savory, sweet. I don't discriminate and neither should you.

Most recently…

Load More...
Follow on Instagram

Social

Subscribe to Blog via Email

Enter your email address to subscribe to this blog and receive notifications of new posts by email.

Tags

appetizer beef bengali breakfast butter cake caramel chicken chocolate chocolate chips cilantro clean eating coconut comfort food cookies dessert dinner entertaining fall fruit ganache gluten free halal healthy homemade honest chops honest creations iftar italian pasta pastry pistachio quick and easy dinner ramadan recipe side side dish south asian spinach vegan vegetables vegetarian weeknight dinner weeknight meal whipped cream

Theme by 17th Avenue · Powered by WordPress & Genesis