Kitchen3N

Recipes and food fun from Apt 3N

  • About
  • Gallery
  • Recipes

#Baesic Roasted Salmon and Veggies

January 6, 2018

fullsizeoutput_6cd2
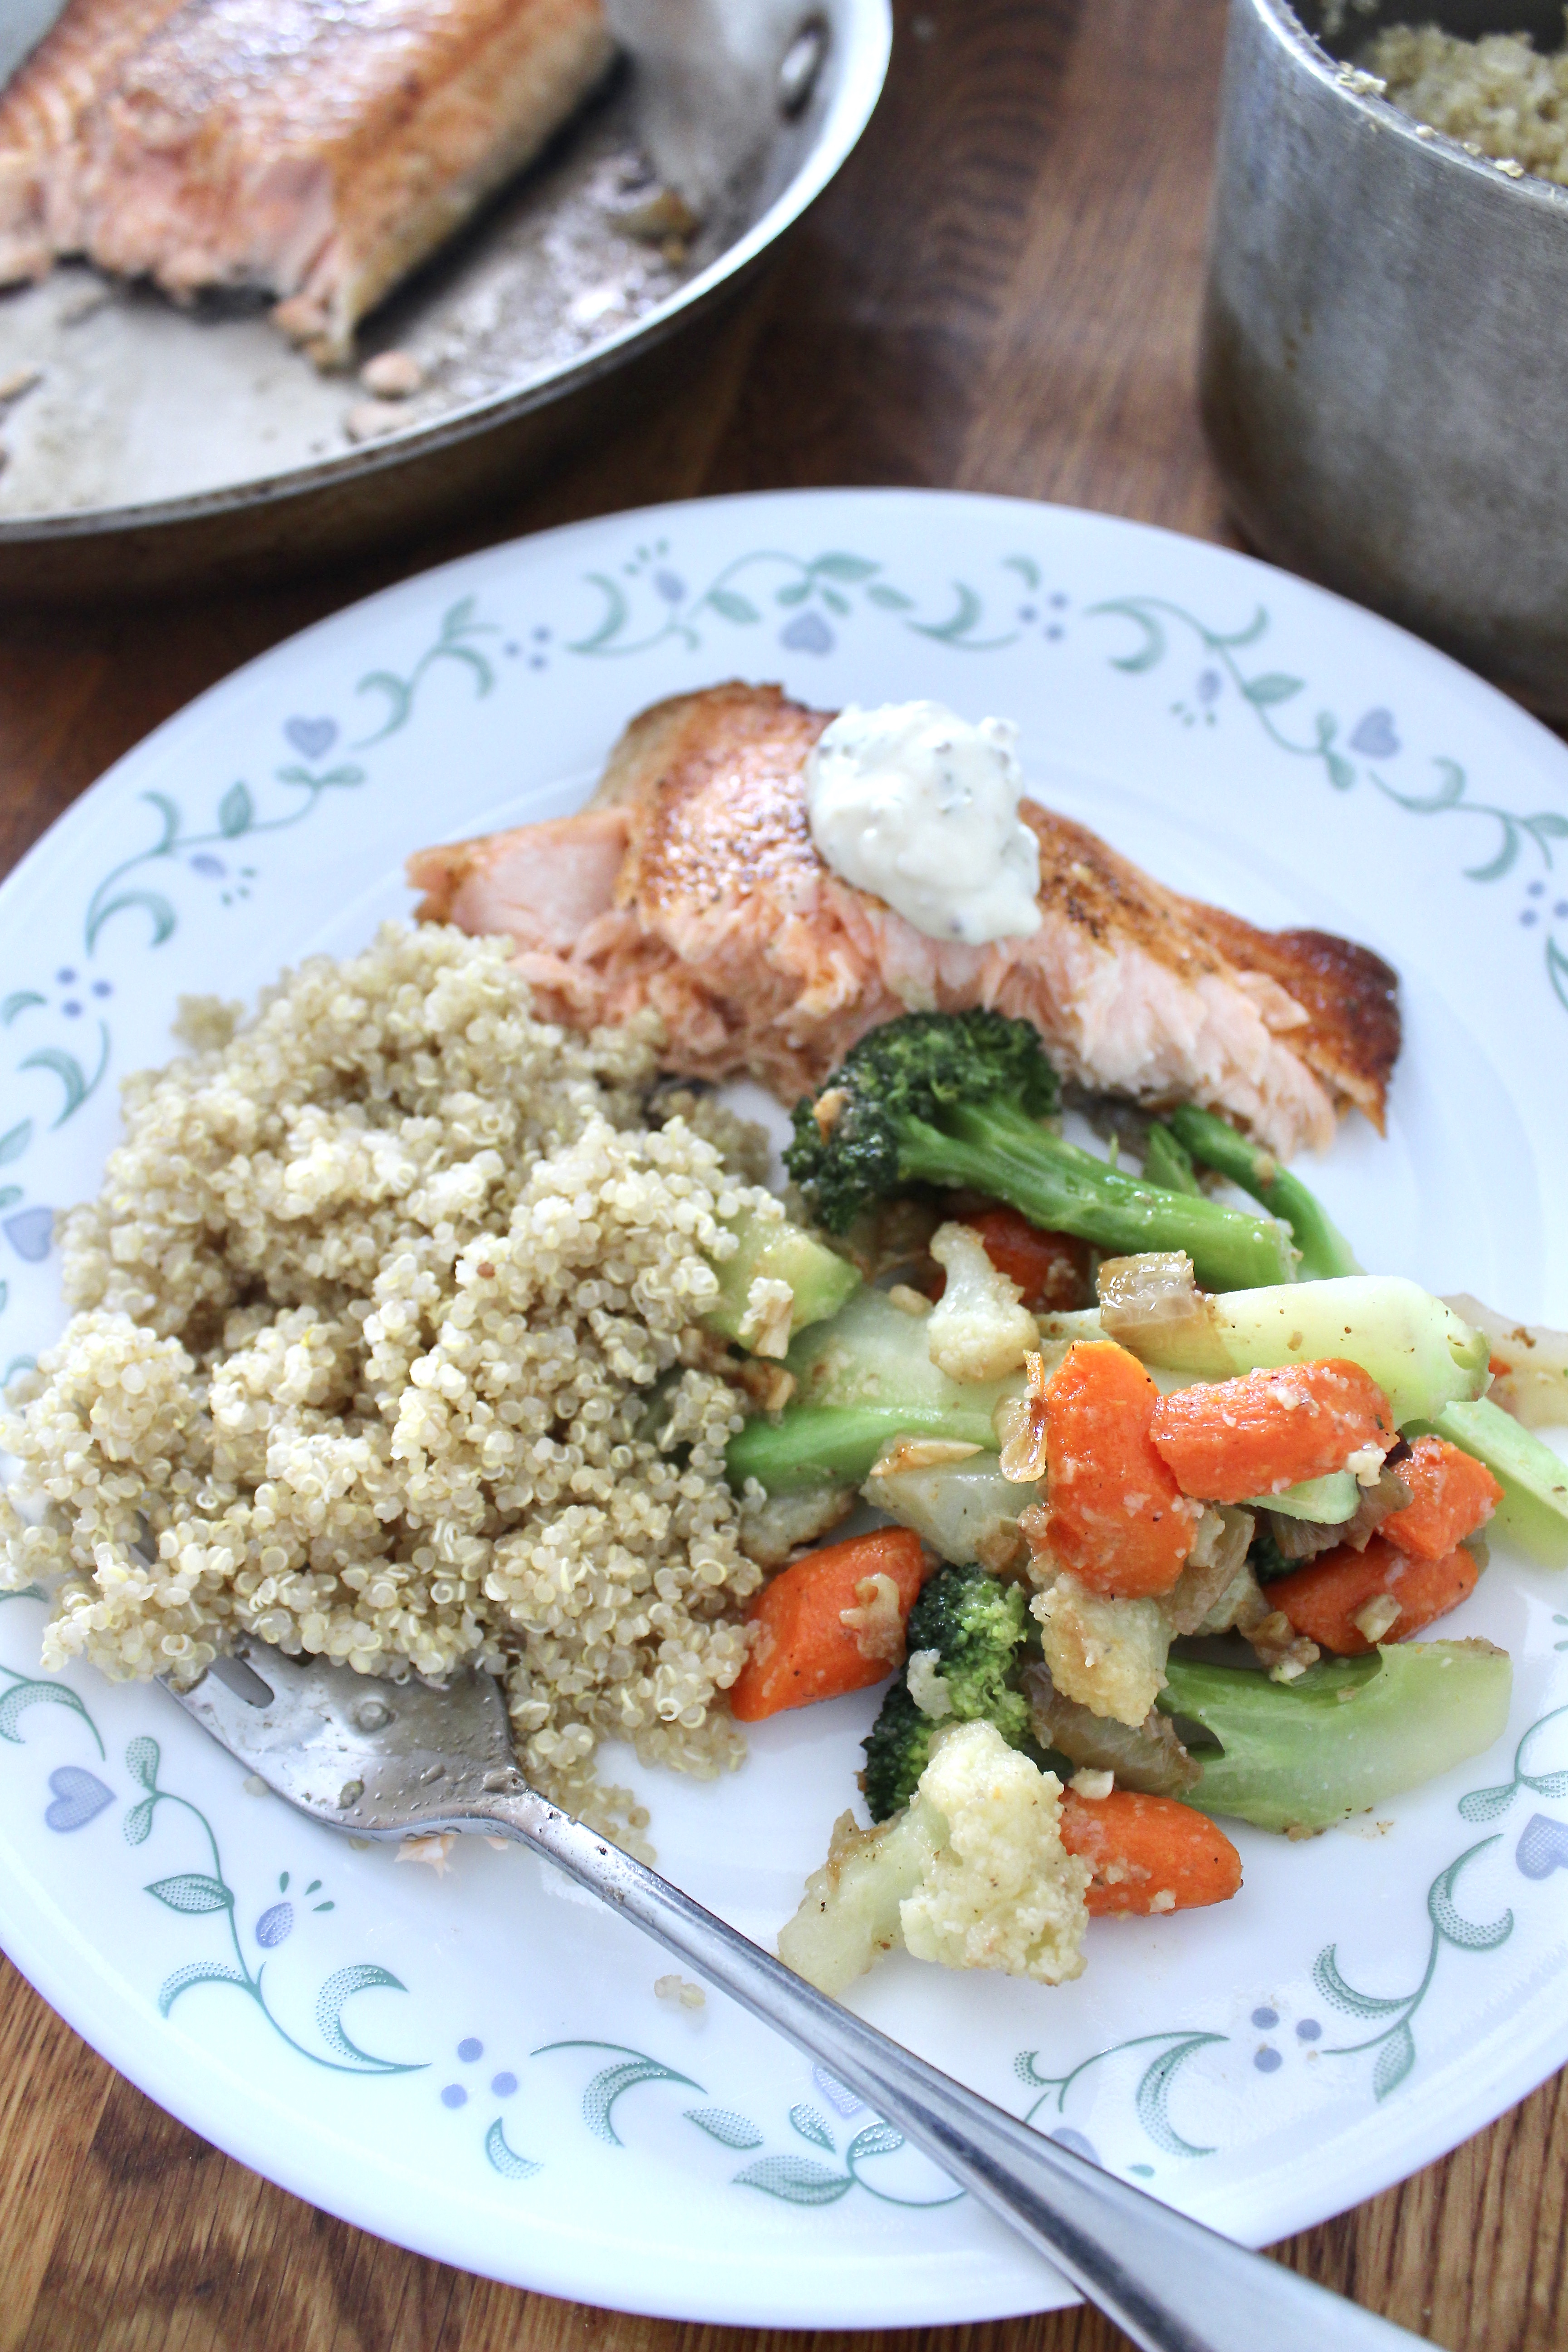
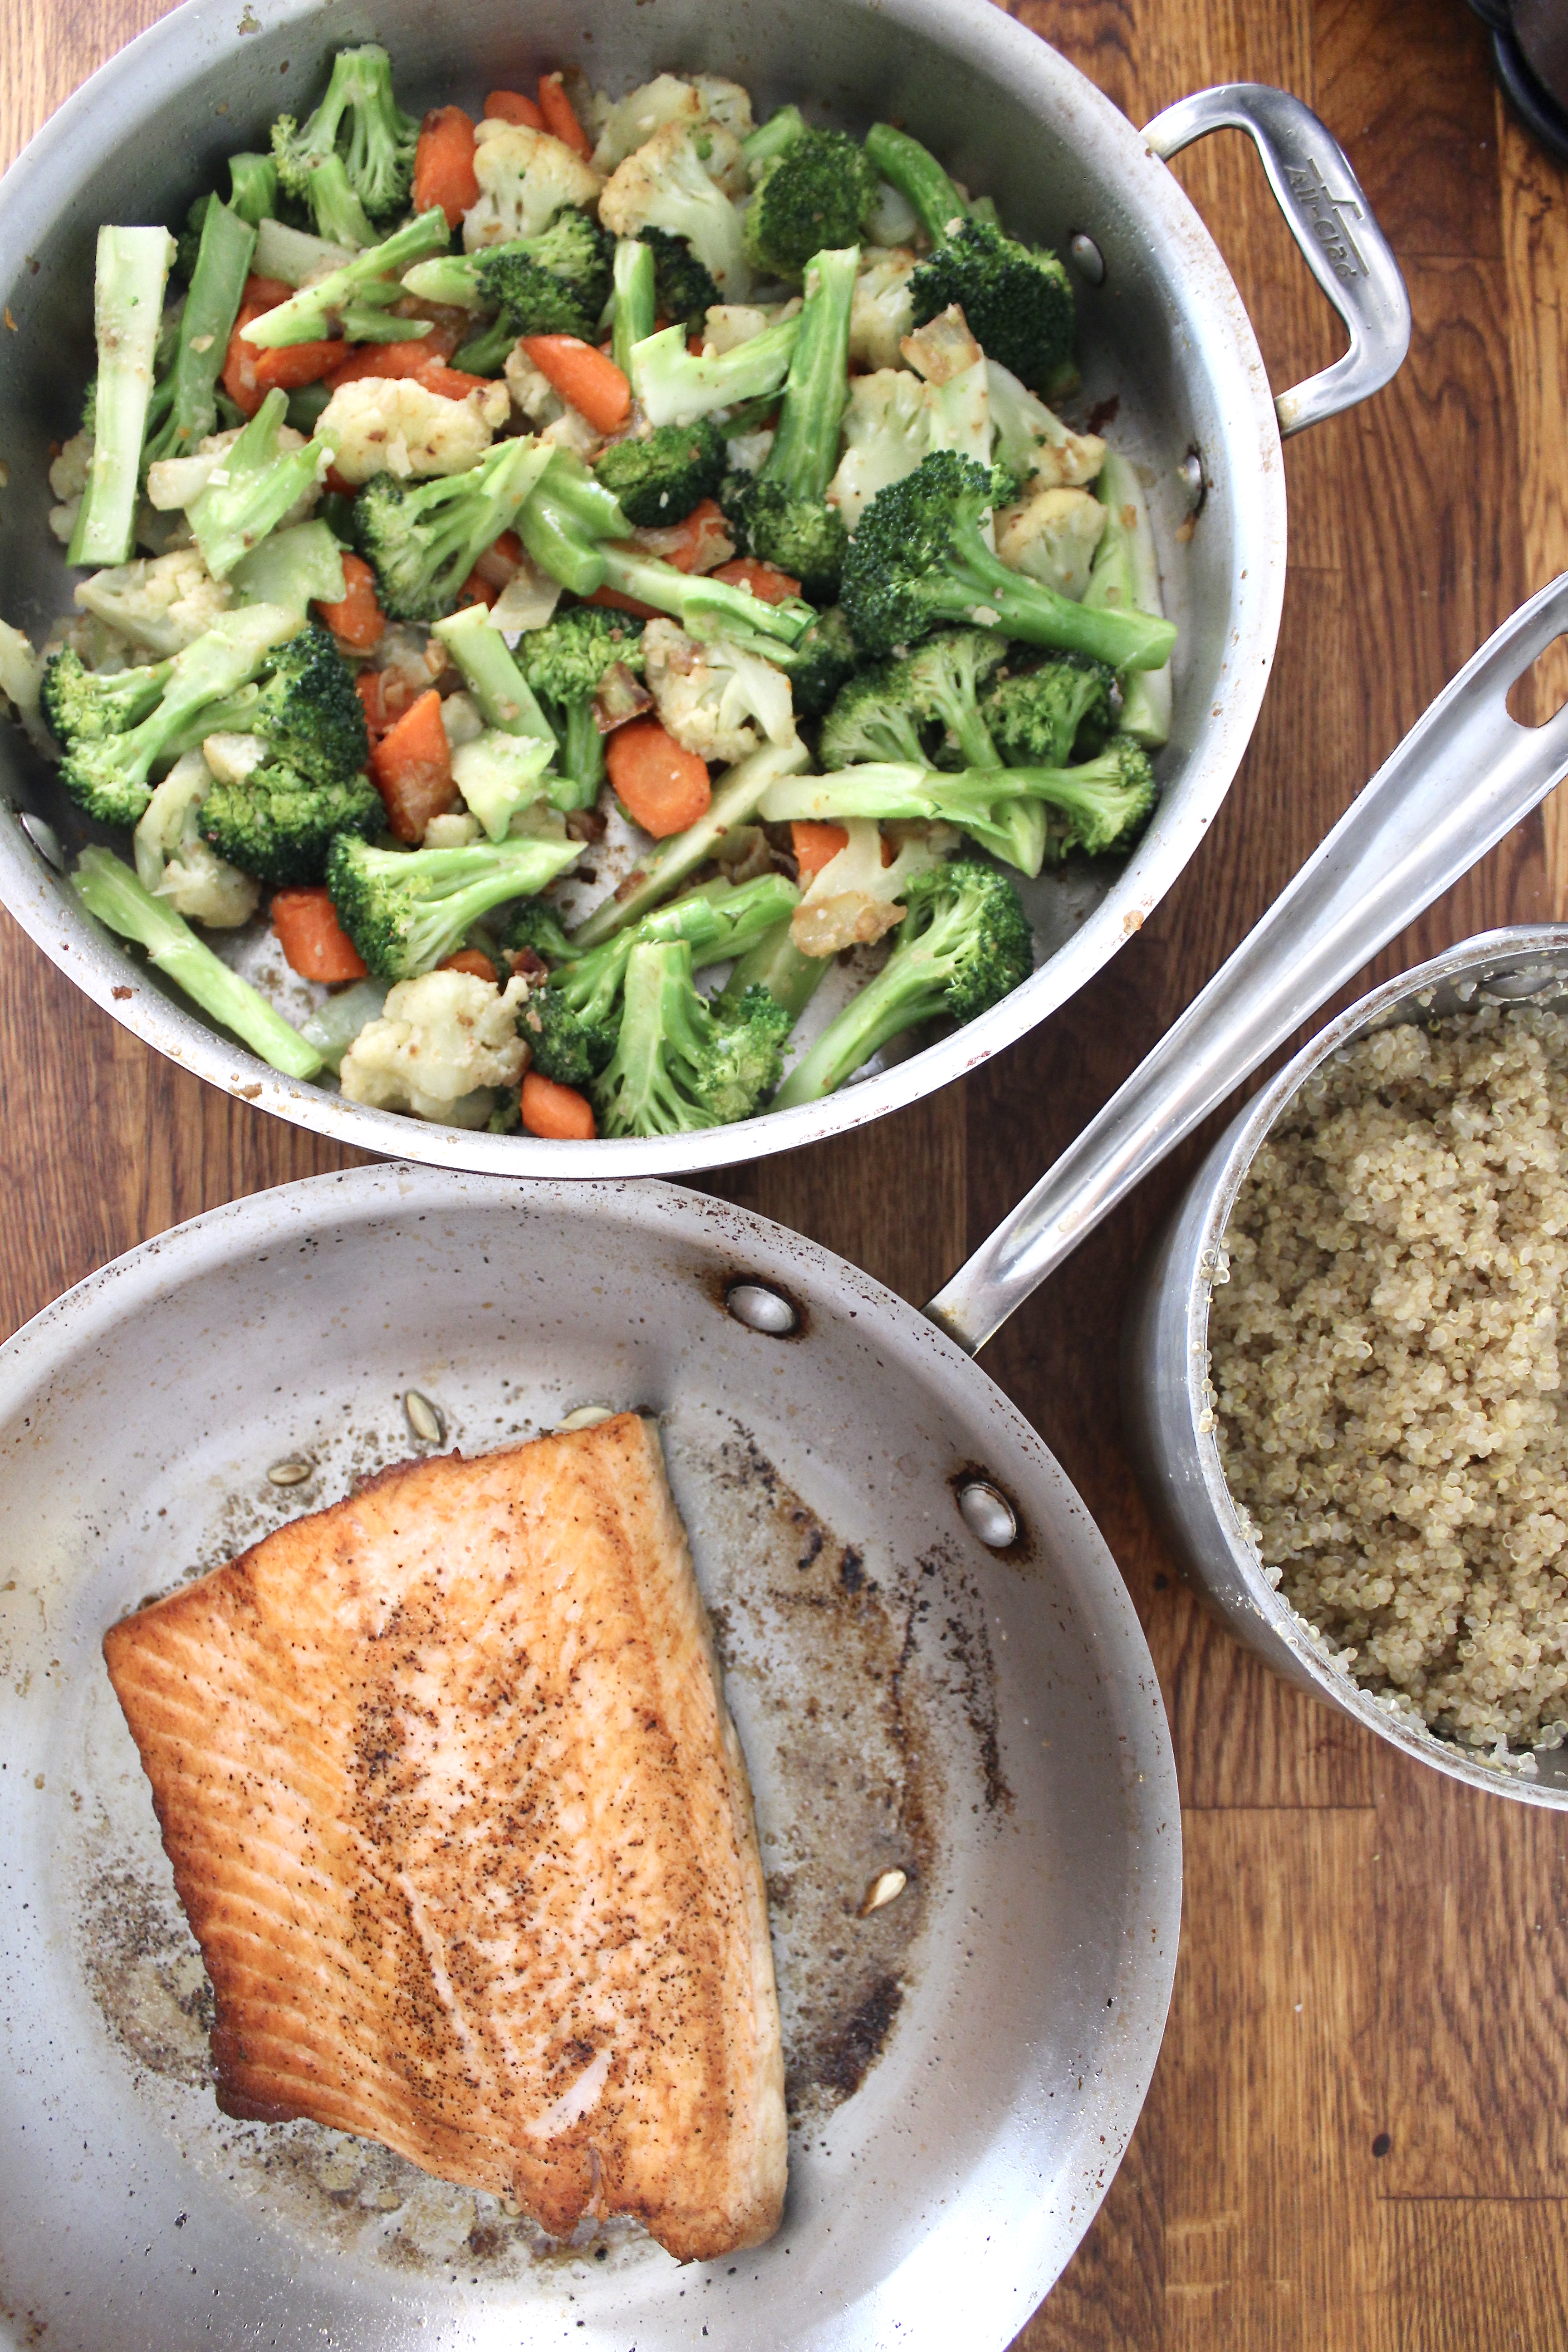
It’s January and I know many of us are trying to find ways to eat healthy. I’ve had a little extra time on my hands so I’ve been coming up with different ways to eat healthy/less meat/fewer carbs. Not exactly low fat though. Kale caesar salad. Chana dal with veggies and coconut milk. Tomato soup. Today I whipped up this salmon and mixed vegetable sauté. Follow along for inspo on my Instagram!
fullsizeoutput_6cd0
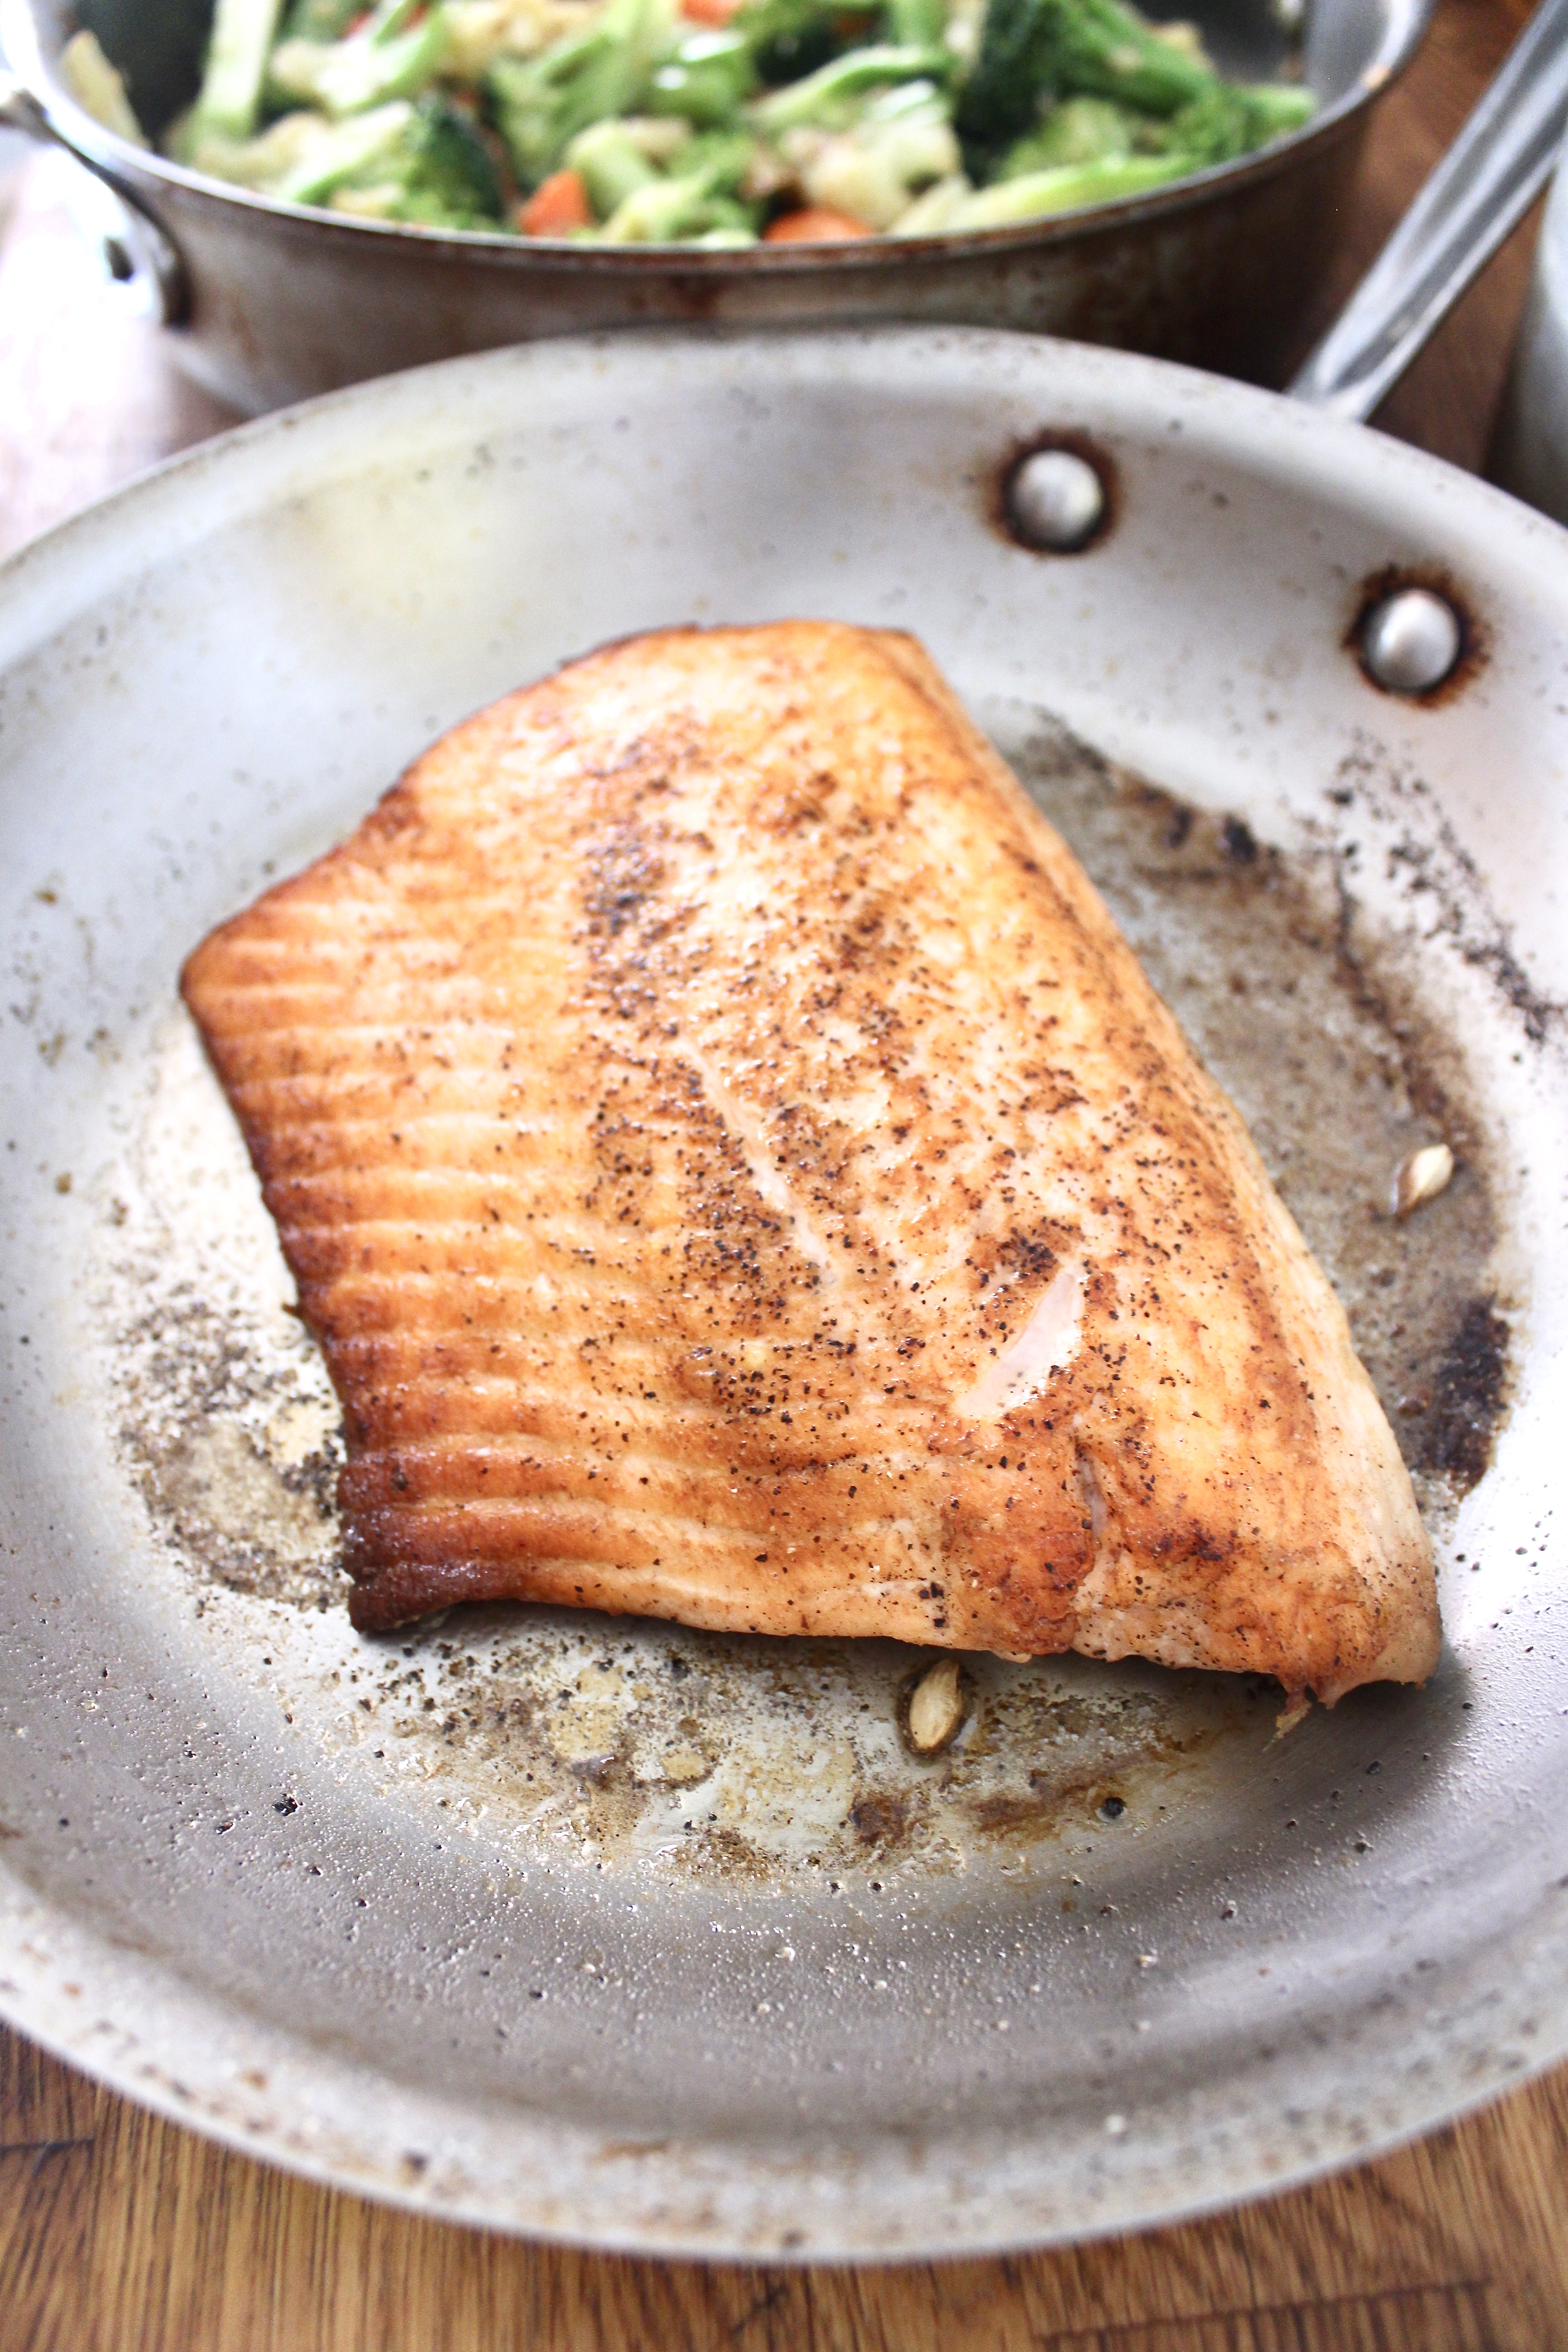
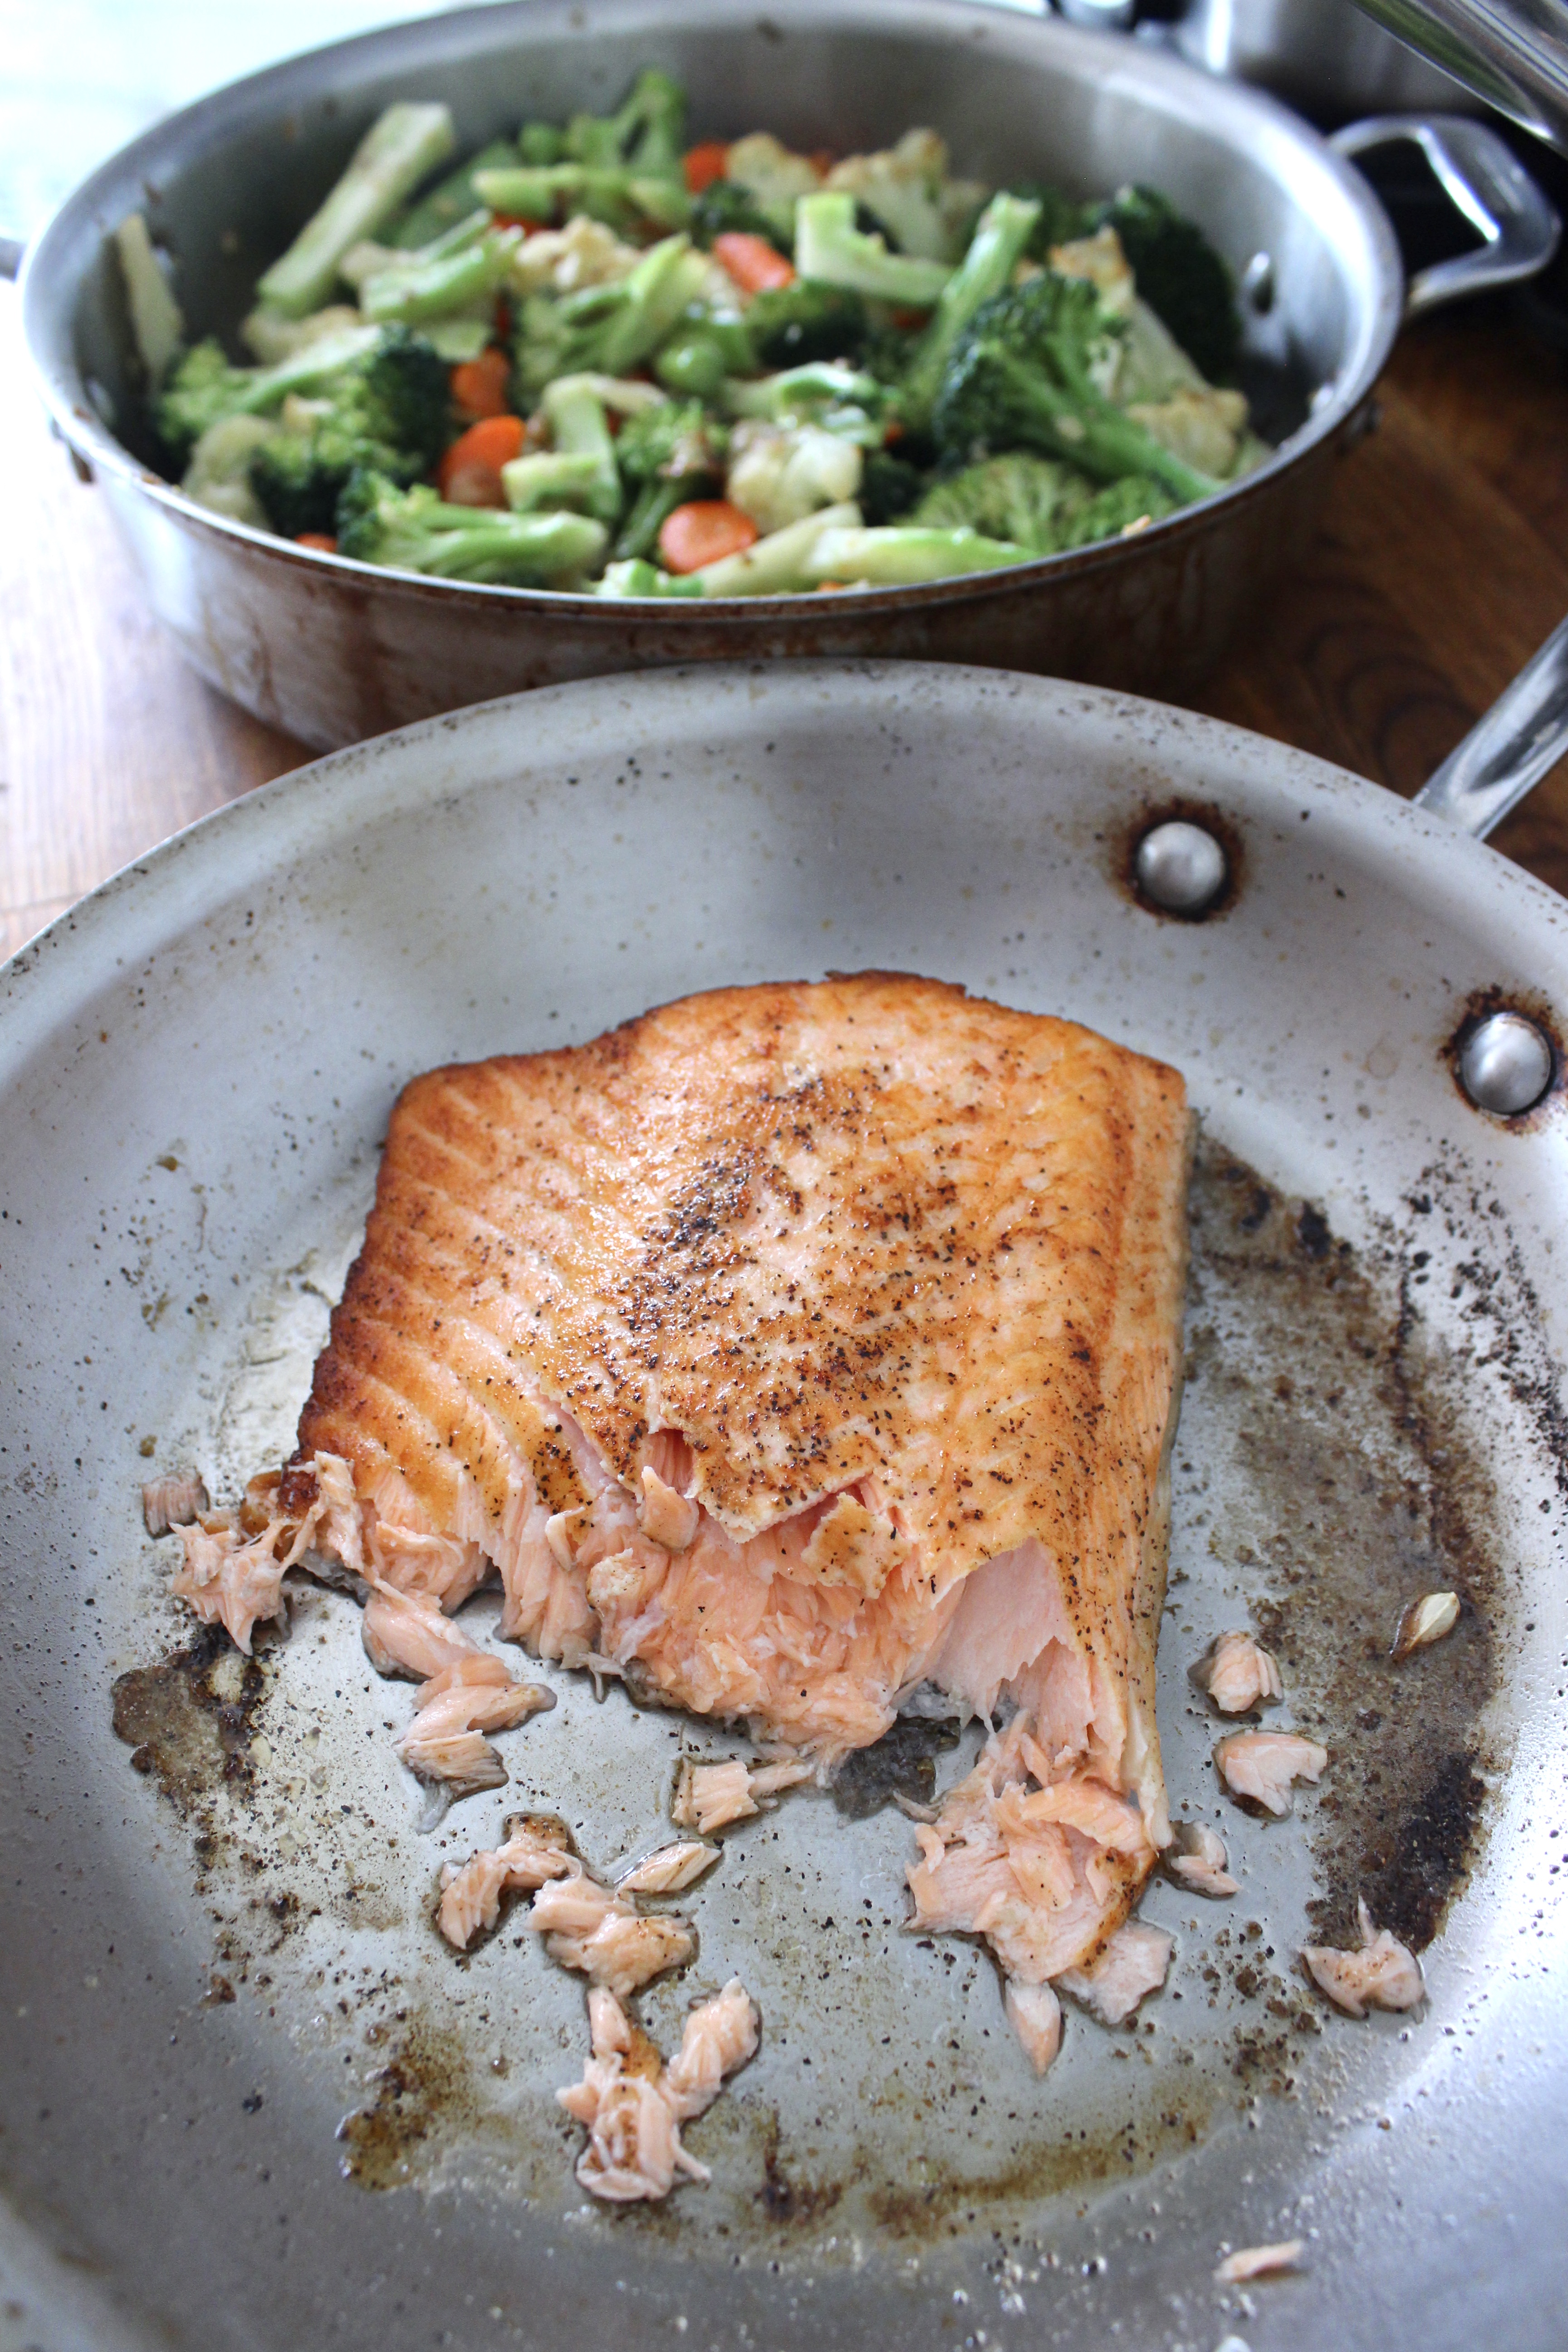
I’m calling this my #baesic salmon because even though it’s a basic way to cook it, it’s bae in my recipe book. I’ve tried cooking salmon just on the the stovetop, and it just burns on the outside before cooking through on the inside. If you lower the heat too much you don’t get the nice crust. This way, if you sear it on the stovetop, finish it off the oven, you get the best of both worlds. I wasn’t sure if it would be done actually, but when I dug into it, it was juuuuuuust slightly pink and rare in the middle. If you prefer it cooked well through, leave in for 2 more minutes.
fullsizeoutput_6cd3
I know we all tryin’ to eat more nutritious food, less meat, fewer carbs. And I know salmon isn’t exactly the best option either. It’s overfished, not sustainable. But I for one need to change things up from beans, lentils and eggs. We still do chicken once a week or so. Red meat once a month maybe. Baby steps.
fullsizeoutput_6cd1

Ingredients

For the mixed vegetable sauté:

  • 3 tbsp olive oil
  • 5 organic carrots (they’re smaller, so if using big carrots, use 3-4)
  • 1/2 large onion or 1 medium onion
  • salt and pepper to taste
  • 3 cloves garlic, minced
  • 12 oz cauliflower florets, or from 1 head of cauliflower
  • 12 oz broccoli florets, or from 1 large head of broccoli (I had two small heads of broccoli)
  • 2 tbsp unsalted butter
  • more salt and pepper to taste

For the salmon

  • 2tbsp olive oil
  • 2tbsp unsalted butter
  • 12 oz salmon fillet
  • salt and pepper
  • a squeeze of lemon

Directions

  1. For the vegetable sauté: heat up oil in a large pan over medium-high heat. Add carrots, saute for 2-3 minutes, then add onions. Season with salt and pepper. Cook for 2-3 minutes more. Add the garlic, then broccoli and cauliflower florets. Add butter and more salt and pepper. If the veggies are starting to brown too easily on the bottom, reduce heat to medium. Continue cooking, stirring occasionally until veggies are crisp tender, 10-15 more minutes. Taste for seasoning.
  2. For the salmon: Preheat oven to 350F. Score the skin side of the salmon – about 3 slits diagonally. Season both sides with salt and pepper. Melt butter and olive oil in at least a 9in round french or other ovenproof skillet. When bubbling stops, add the salmon, skin side down. Don’t touch it for at least 2 minutes. When there’s a nice crust, it’ll lift off easily. Flip over carefully, minimizing splatter of hot oil, using two spatulas if necessary. And cook for an additional 2 minutes. Then insert in preheated oven for 7-8 minutes.
  3. Remove from heat, finish with a squeeze of lemon and let rest for a few minutes before serving. Serve alongside steamed quinoa or brown rice.

2 Comments · Labels: American/Mediterranean, Main, Protein, Recipes, Side, Veg Tagged: clean eating, easy recipe, fish, healthy, mixed veggies, pescetarian, roasted, salmon, saute, stir fry, vegetarian, weeknight cooking

Coconut Layer Cake

December 29, 2017

fullsizeoutput_6cc1
This cake was kind of born 2 and half years ago when I was tasked with feeding 100 people with a coconut cake. “Can it have pineapple filling?” my dear friend Jaf asked. YES, YES IT CAN!
fullsizeoutput_6cc0
This cake is a delicious, crowd pleasing hit in its original version, but with this pineapple filling, it takes it over the edge. It’s kind of retro, but the fruitiness balances out the richness and creaminess from the buttercream.
fullsizeoutput_6cba
It’s a little fussy, yes, with the beating of egg whites and the careful folding in, but the payout is worth it. It’s the lightest, fluffiest, sweetest, nuttiest, flavorfullest cake you’ll ever have. Ever.
fullsizeoutput_6cb9
A retro cake deserves a retro look, so feel free to frost this simply, with swooshes of buttercream and toasted (and cooled) coconut flakes.
img_0857
I’ve piped some old school borders here with Wilton’s open star tip and some silver dragee accents.
img_0865
I haven’t tinkered with the original recipe at all, except that I bake them in 8in cake pans as opposed to 9in. I like the look of taller cakes, but if 9in is all you have, feel free to use those, just decrease the bake time by a few minutes.
fullsizeoutput_6cb8
Cake recipe adapted from Taste of Home. Pineapple filling recipe from Genius Kitchen.

Ingredients

For the cake:

  • 5 eggs, yolks separated from whites
  • 2 cups sugar
  • 1/2 cup (1 stick) unsalted butter, room temperature
  • 1/2 cup vegetable oil
  • 1 tsp coconut extract
  • 1/2 tsp vanilla extract
  • 1/4 tsp almond extract
  • 2 1/4 cups cake flour
  • 1 tsp baking powder
  • 1/2 tsp baking soda
  • 1/4 tsp salt
  • 1 cup buttermilk, room temperature
  • 2 cups flaked coconut (I like Baker’s brand for this)
  • 1/4 tsp cream of tartar

For the filling:

  • 1/2 tsp kosher salt
  • 1/2 cup plus 2 tbsp granulated sugar
  • 3 tbsp corn starch
  • 1 20oz can crushed pineapple in its juices
  • 3 tbsp butter

For the buttercream

  • 1 cup butter, room temperature
  • 4 oz cream cheese, room temperature
  • 4 to 5 cups confectioner’s sugar, to taste
  • 1 tsp coconut extract
  • 1 tsp vanilla extract
  • 1-2tbsp whole milk

Directions

  1. Preheat oven to 325 degrees F. Grease 3 8in cake pans with non stick cooking spray. Place over a large sheet of parchment paper and draw circles around the circumference of each pan. Cut out each circle and place at the bottom of each pan. Spray parchment circles with non stick spray.
  2. In the bowl of stand mixer or in a large bowl with an electric hand mixer, beat butter with 1 cup of sugar on medium low. After about 2 minutes, when butter and sugar is pale and fluffy, add oil and remaining sugar. When well combined, add egg yolks, one at a time. Stop occasionally to scrape down the bowl. Add coconut, vanilla and almond extracts. Stop the mixer.
  3. For the dry ingredients: sift the flour, baking powder, and baking soda. Add salt and combine with a whisk. Add 1/3 of the dry ingredients to the batter, then 1/2 of the buttermilk. Add second third of dry ingredients then remaining buttermilk. Add remaining dry ingredients and flaked coconut. Mix on low until just combined.
  4. In a large bowl, combine egg whites and cream of tartar. Mix on low, increasing to high, for about 4-5 minutes until beaters come out of the egg whites with stiff peaks.
    Add 1/3 of beaten egg whites to the batter to loosen it up. Add half of remaining egg whites to batter and fold in with spatula, cutting down the middle, then scraping against the bowl and folding up and over the batter. Rotate the bowl slightly and continue until you can no longer see egg white. Add remaining egg white and fold until just combined.
  5. Divide equally between 3 cake pans and bake in preheated oven for 25-30 minutes or until a toothpick inserted comes out clean. Let cool.*
  6. For the filling: in a small to medium saucepan combine salt, sugar, cornstarch. Whisk with preferably a flat whisk until combined. Add crushed pineapple and stir to combine. Turn on the heat to medium high. Bring to a boil, stirring occasionally, for about 5 minutes until no longer milky white in appearance. When thickened, remove from heat and stir in butter. Turn out onto a plate to cool.
  7. For the frosting: beat butter with cream cheese with the paddle attachment of your stand mixer, or in a large bowl with handheld electric mixer. Sift 4 cups sugar into a bowl. Add a little bit of sugar into the butter and cream cheese until well combined. After adding 4 cups of sugar, beat until light and fluffy. Add vanilla and coconut extracts. Scrape down the bowl occasionally. Taste the frosting. If desired, add final cup of sugar, sifted. Add milk as needed to thin out frosting. Give a final beat until it looks like buttercream.
  8. Fill a large piping bag with buttercream and snip off 1/2in tip. Place a small amount of frosting onto a 10in round cake board. Place first cake layer onto cake board. Pipe a dam around the circumference of the cake layer. Spoon 2-3tbsp pineapple filling onto cake. Smooth it out. Place second layer, press down slightly. Repeat and decorate as desired.

*I usually invert onto 8in round cake boards lined with plastic wrap and freeze until reach to decorate. These cakes are super tender and work best for decorating when frozen solid.

Leave a Comment · Labels: American/Mediterranean, Dessert, Recipes Tagged: baking, cake, coconut, coconut cake, dessert, genius kitchen, home baking, homemade, homemade dessert, pineapple filling, taste of home

Chocolate Candy Cupcakes

January 16, 2017

fullsizeoutput_48ea

After a startling reading on the weight scale towards the end of December, I swore off sugar. Just two years prior I worked so hard to lose my baby weight. Inspired by beach body coaches in my network, I vastly cut down sweets, decreased portion sizes, drank tons more water, swapped quinoa for rice in many of my meals, and began to regularly exercise using Fitnessblender, the only exercise I’ve been able to stick to thanks to the fact that I can choose from workouts of different durations and can do it from the convenience of my home. So I lost the 9 pounds of lingering weight, and 8 pounds on top of that.

img_4672

And then I fell off the wagon. Slowly but surely I downward spiraled, picking back up my sweets habits and eating rice and curry without restraint. I kept up with the exercise more or less but it wasn’t enough with my slowing metabolism.

So I decided to stop eating foods with added sugar. It’s just one step, but surely it should help. But of course the universe has to align to make this impossible for me. Shortly after making my resolution, I attended a gingerbread house making playdate where I was SURROUNDED by candy and cake and all kinds of good stuff. Soon after that my daughter’s birthday rolled around and somebody’s gotta do QC and make sure things taste right. Amiright?

img_4685

I did a good job holding off on tasting these, but then I needed a cross section for the blog, so guess where the other half went.

Yup.

fullsizeoutput_48e9

This is a really magical combination for the chocolate lover in your life. It’s reminiscent of the creme filled hostess cupcakes, but made even better with quality cocoa in the cupcake and chocolate in the ganache, homemade salted caramel sauce and delicious candy toppings. Remember we eat with our eyes first, and kids moreso than us. So if they see m&ms, they automatically think it’s a superb cupcake.

Enjoy the quick video tutorial below!

This is an adaptation of Hershey’s Perfectly Chocolate Chocolate cake. Because I used Dutch-process cocoa (which is alkalized, or less acidic than natural cocoa), I upped the amount of baking powder and decreased the amount of baking soda from the original recipe. I also used boiling water instead of hot coffee as many chocolate cake recipes call for, as it made for a way too tender a crumb. Perfect in layer cakes, but for cupcakes, you need something with structure.

Ingredients

  • 2 cups sugar
  • 1 3/4 cups all purpose flour
  • 3/4 cup dutch process cocoa (I use Rodelle)
  • 2 1/2 tsp baking powder
  • 1/2 tsp baking soda
  • 1 tsp salt
  • 2 eggs
  • 1 cup whole milk
  • 1/2 cup vegetable oil
  • 2 tsp vanilla extract
  • 1 cup boiling water

Directions

  1. Preheat oven to 350 degrees F. Line a muffin/cupcake pan with paper liners. You will need 15 in total. My cupcake pan only has room for 12, so I need to make these in 2 batches.
  2. In a large bowl or in the bowl of your stand mixer add the sugar. Place a sifter over the top of the bowl and add flour, cocoa, baking powder and soda. Sift the ingredients into the sugar. Add salt. Stir to combine using the paddle attachment.
  3. In a 4 cup measuring cup or in a medium bowl, measure out the milk and vegetable oil. Add eggs and vanilla and mix well using a fork. With the mixer running on low, slowly drizzle in the wet ingredients into the dry. Stop occasionally to scrape down the sides and bottom of the bowl. Turn the mixer back onto low and slowly drizzle in boiling water. Stop the mixer and scrape down with a spatula to ensure the batter is homogenous.
  4. Using an ice scream scoop, scoop batter into the cupcake liners 2/3 of the way to the top. Bake for 15 to 18 minutes or until a toothpick inserted in the middle comes out clean.
  5. After they cool, hollow out the middle using a small circular cookie cutter. I used the smallest one from this set. I filled it with marshmallow creme using a piping bag and wide tip. I drizzled some salted caramel sauce over them. Then frosted them with chocolate ganache and garnished with chocolate candies.

Leave a Comment · Labels: American/Mediterranean, Carb, Dessert, Food Fun, Recipes Tagged: candy, caramel, chocolate, cupcakes, ganache, marshamallow creme, marshmallow fluff

Cauliflower Stir Fry

January 10, 2017

fullsizeoutput_4831

I had to make something vegetarian after my husband made me watch HBO’s Vice the other day. This particular episode was on the industrialization of the meat industry and man was it terrifying. The ghastly amounts of meat we eat day in day out. How the farm-to-table movement is essentially our savior if we want to reap the rewards of our earth in any sort of sustainable fashion. Scary stuff! But we can do our part by 1) supporting businesses like Honest Chops and local farmers market vendors that only source from sustainable farms and 2) eating less meat. There’s a world of protein out there (eggs! chickpeas! tofu!) explore!
fullsizeoutput_4834

If you’ve been trying to to eat less meat, or just eat/cook more vegetables at home, I’ve summarized some pointers for cooking veggies below. Luckily for you I’ve made so many mistakes when cooking veggies throughout the years I have some words of wisdom to impart, especially when dealing with cauliflower:

  • Don’t waste. I use the outer leaves as well as the florets. It’s often discarded in American cooking shows, but why the heck wouldn’t you eat it?I just toss the tough inner core, and finely chop the rest. Time consuming, but a worthwhile endeavor.
  • Dicing it into tiny tiny pieces is major key. Cauliflower can be bland, so the best way to ensure it absorbs as much flavor as possible, is by dicing it super small, increasing its surface area.
  • Sequence is also key. Once you start cooking vegetables regularly, you get a sense for which ones take longer to cook than others. Root vegetables like carrots, potatoes and turnips always take longest. Then onions, peppers and cruciferous veggies (broccoli, cabbage, cauliflower, collard greens, kale, etc.). Finally, your tender greens (zucchini, spinach, peas).
  • Garlic is your best friend. With some veggie dishes like spinach or broccoli/mushroom stir fry, I’ll fry the garlic in the oil so it the flavor of the garlic diffuses through the dish. I only do this for quick cooking vegetables. If you try to do this in a dish like this, or potato hash, the garlic will simply burn. Thus I add it after the vegetables have had an initial cooking period.
  • anchovy paste is also a fun way to flavor your vegetables. It’s salty and nutty when dissolved in oil. A fun trick I learned in Italy.

img_8551

The same guidance I gave for the garlic goes for the mustard seeds. Many recipes will say to first heat mustard seeds or pach phoron (Bengali 5 spice) in oil until they start to pop. Once again, because the total cook time for a stir fry with veggies in this quantity can go over 20 minutes, I wanted to avoid burning any of the elements.
img_8555
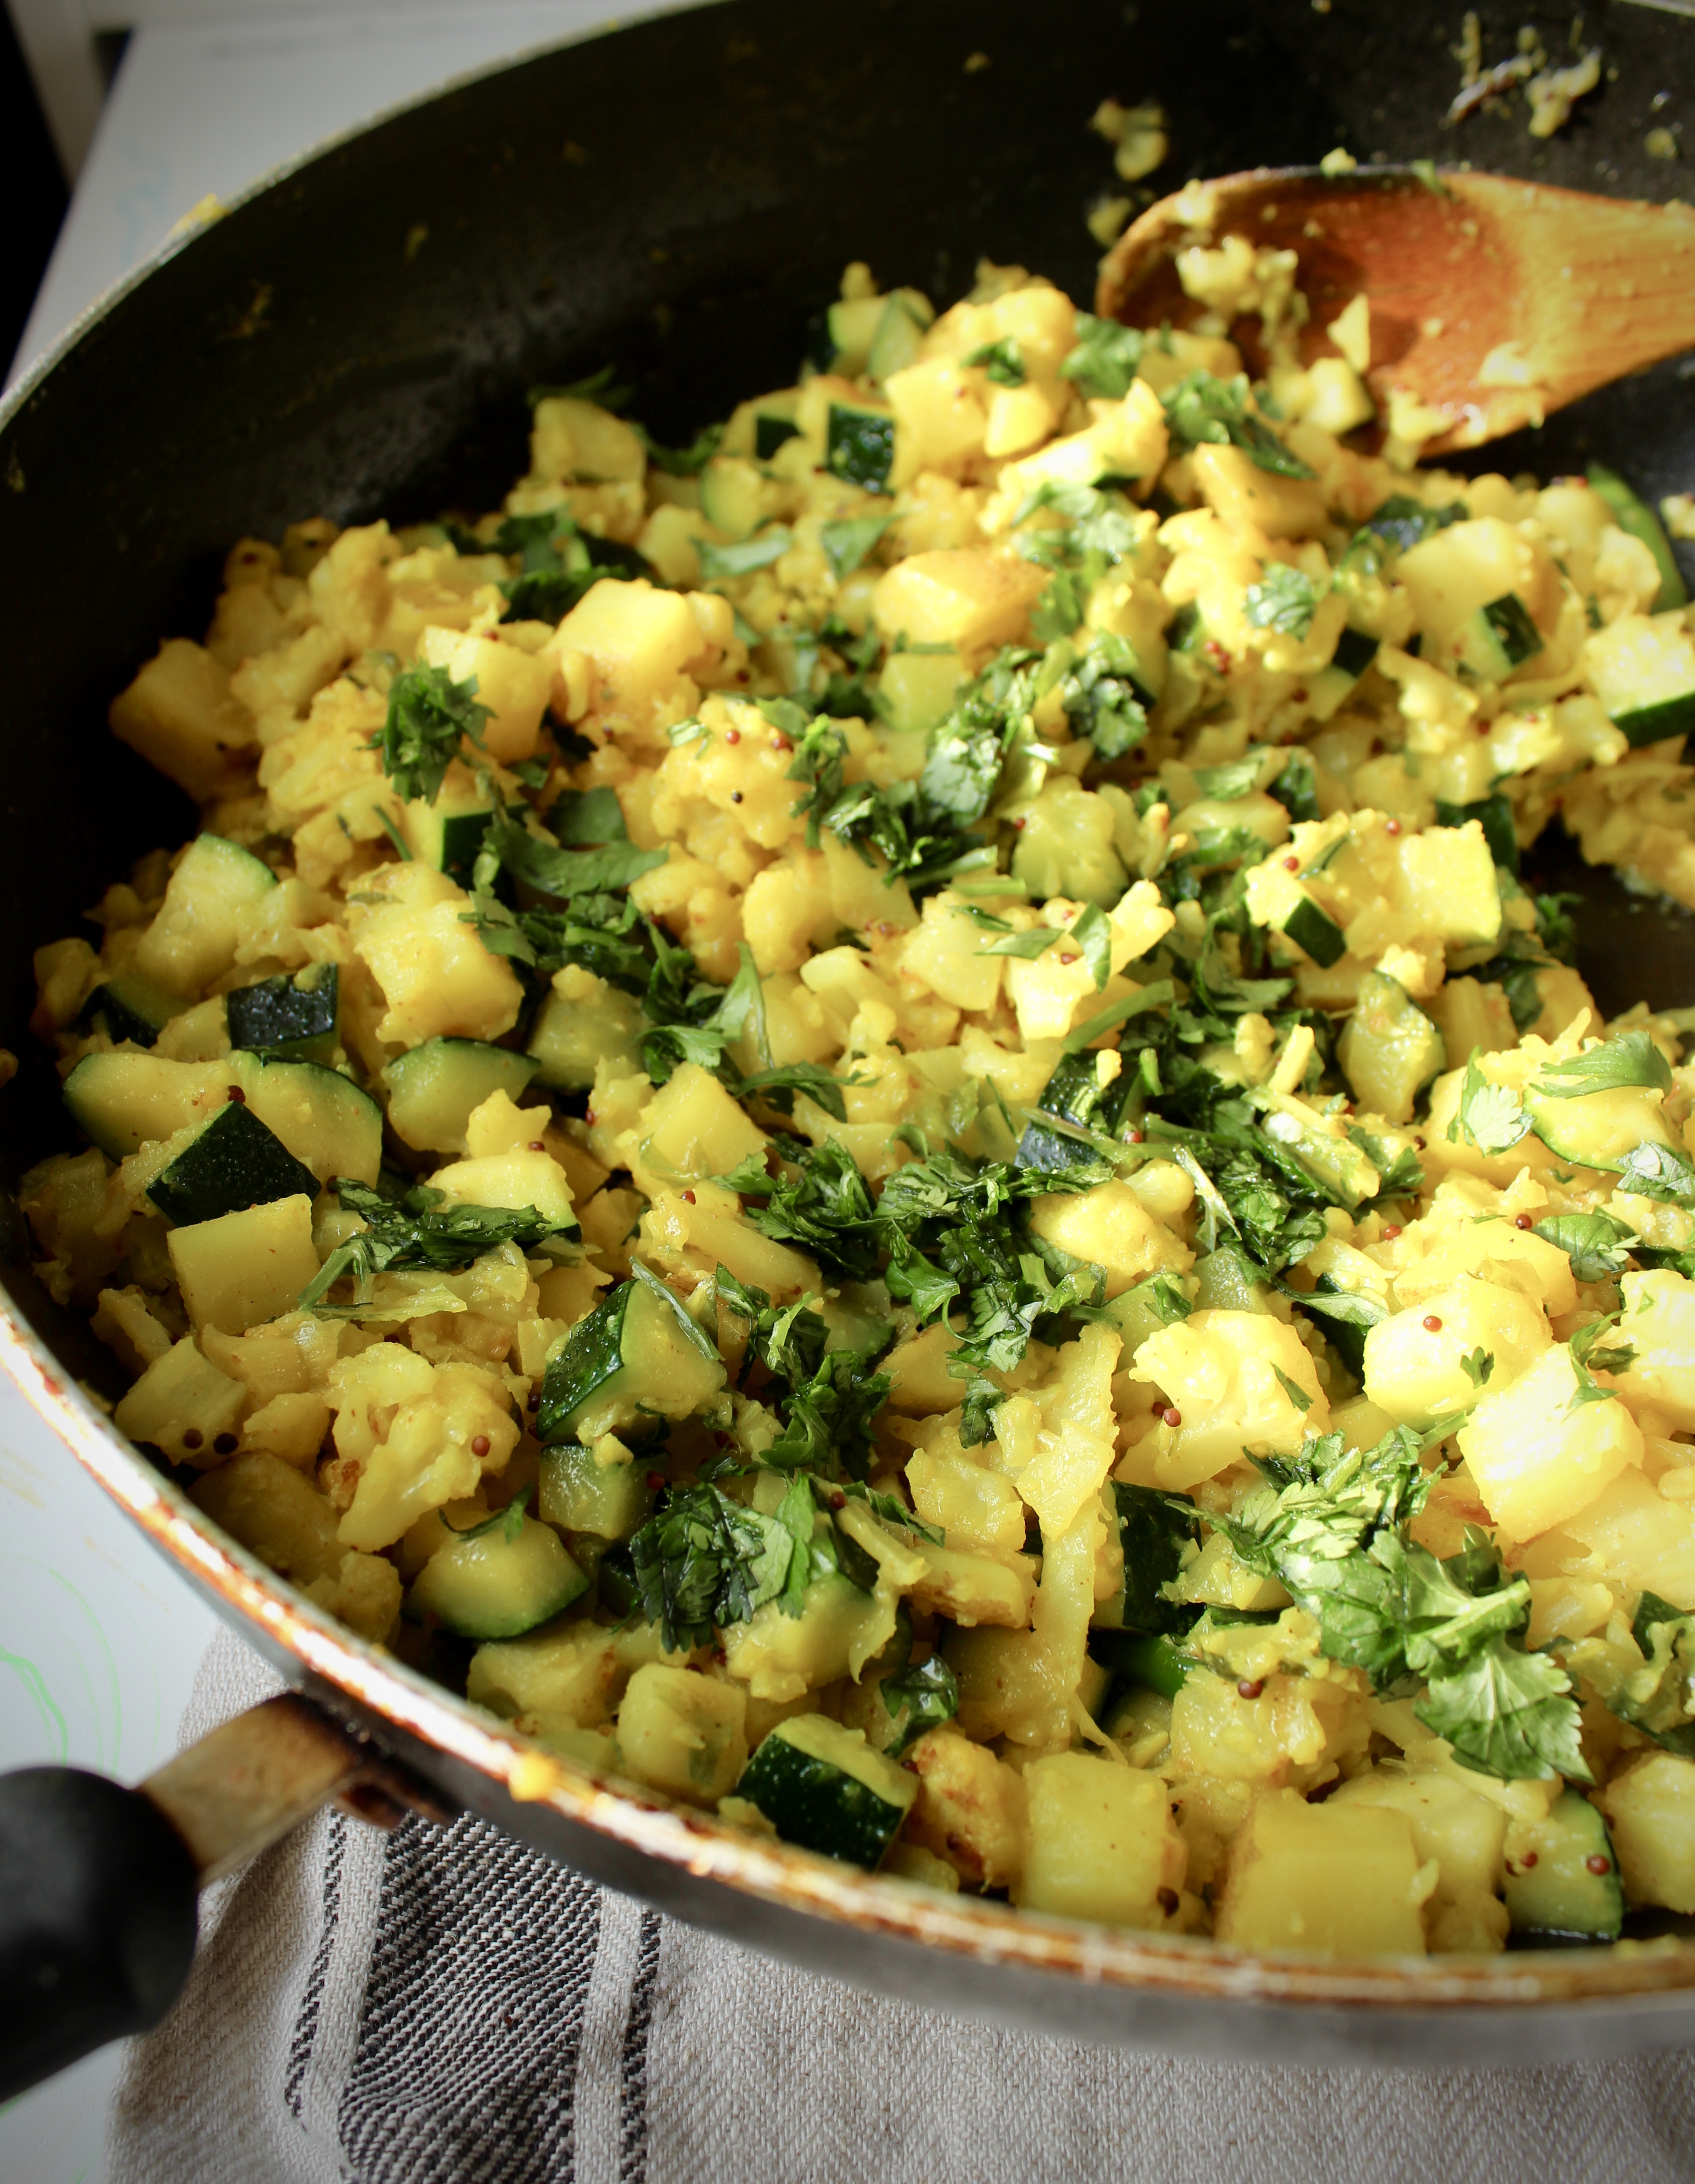
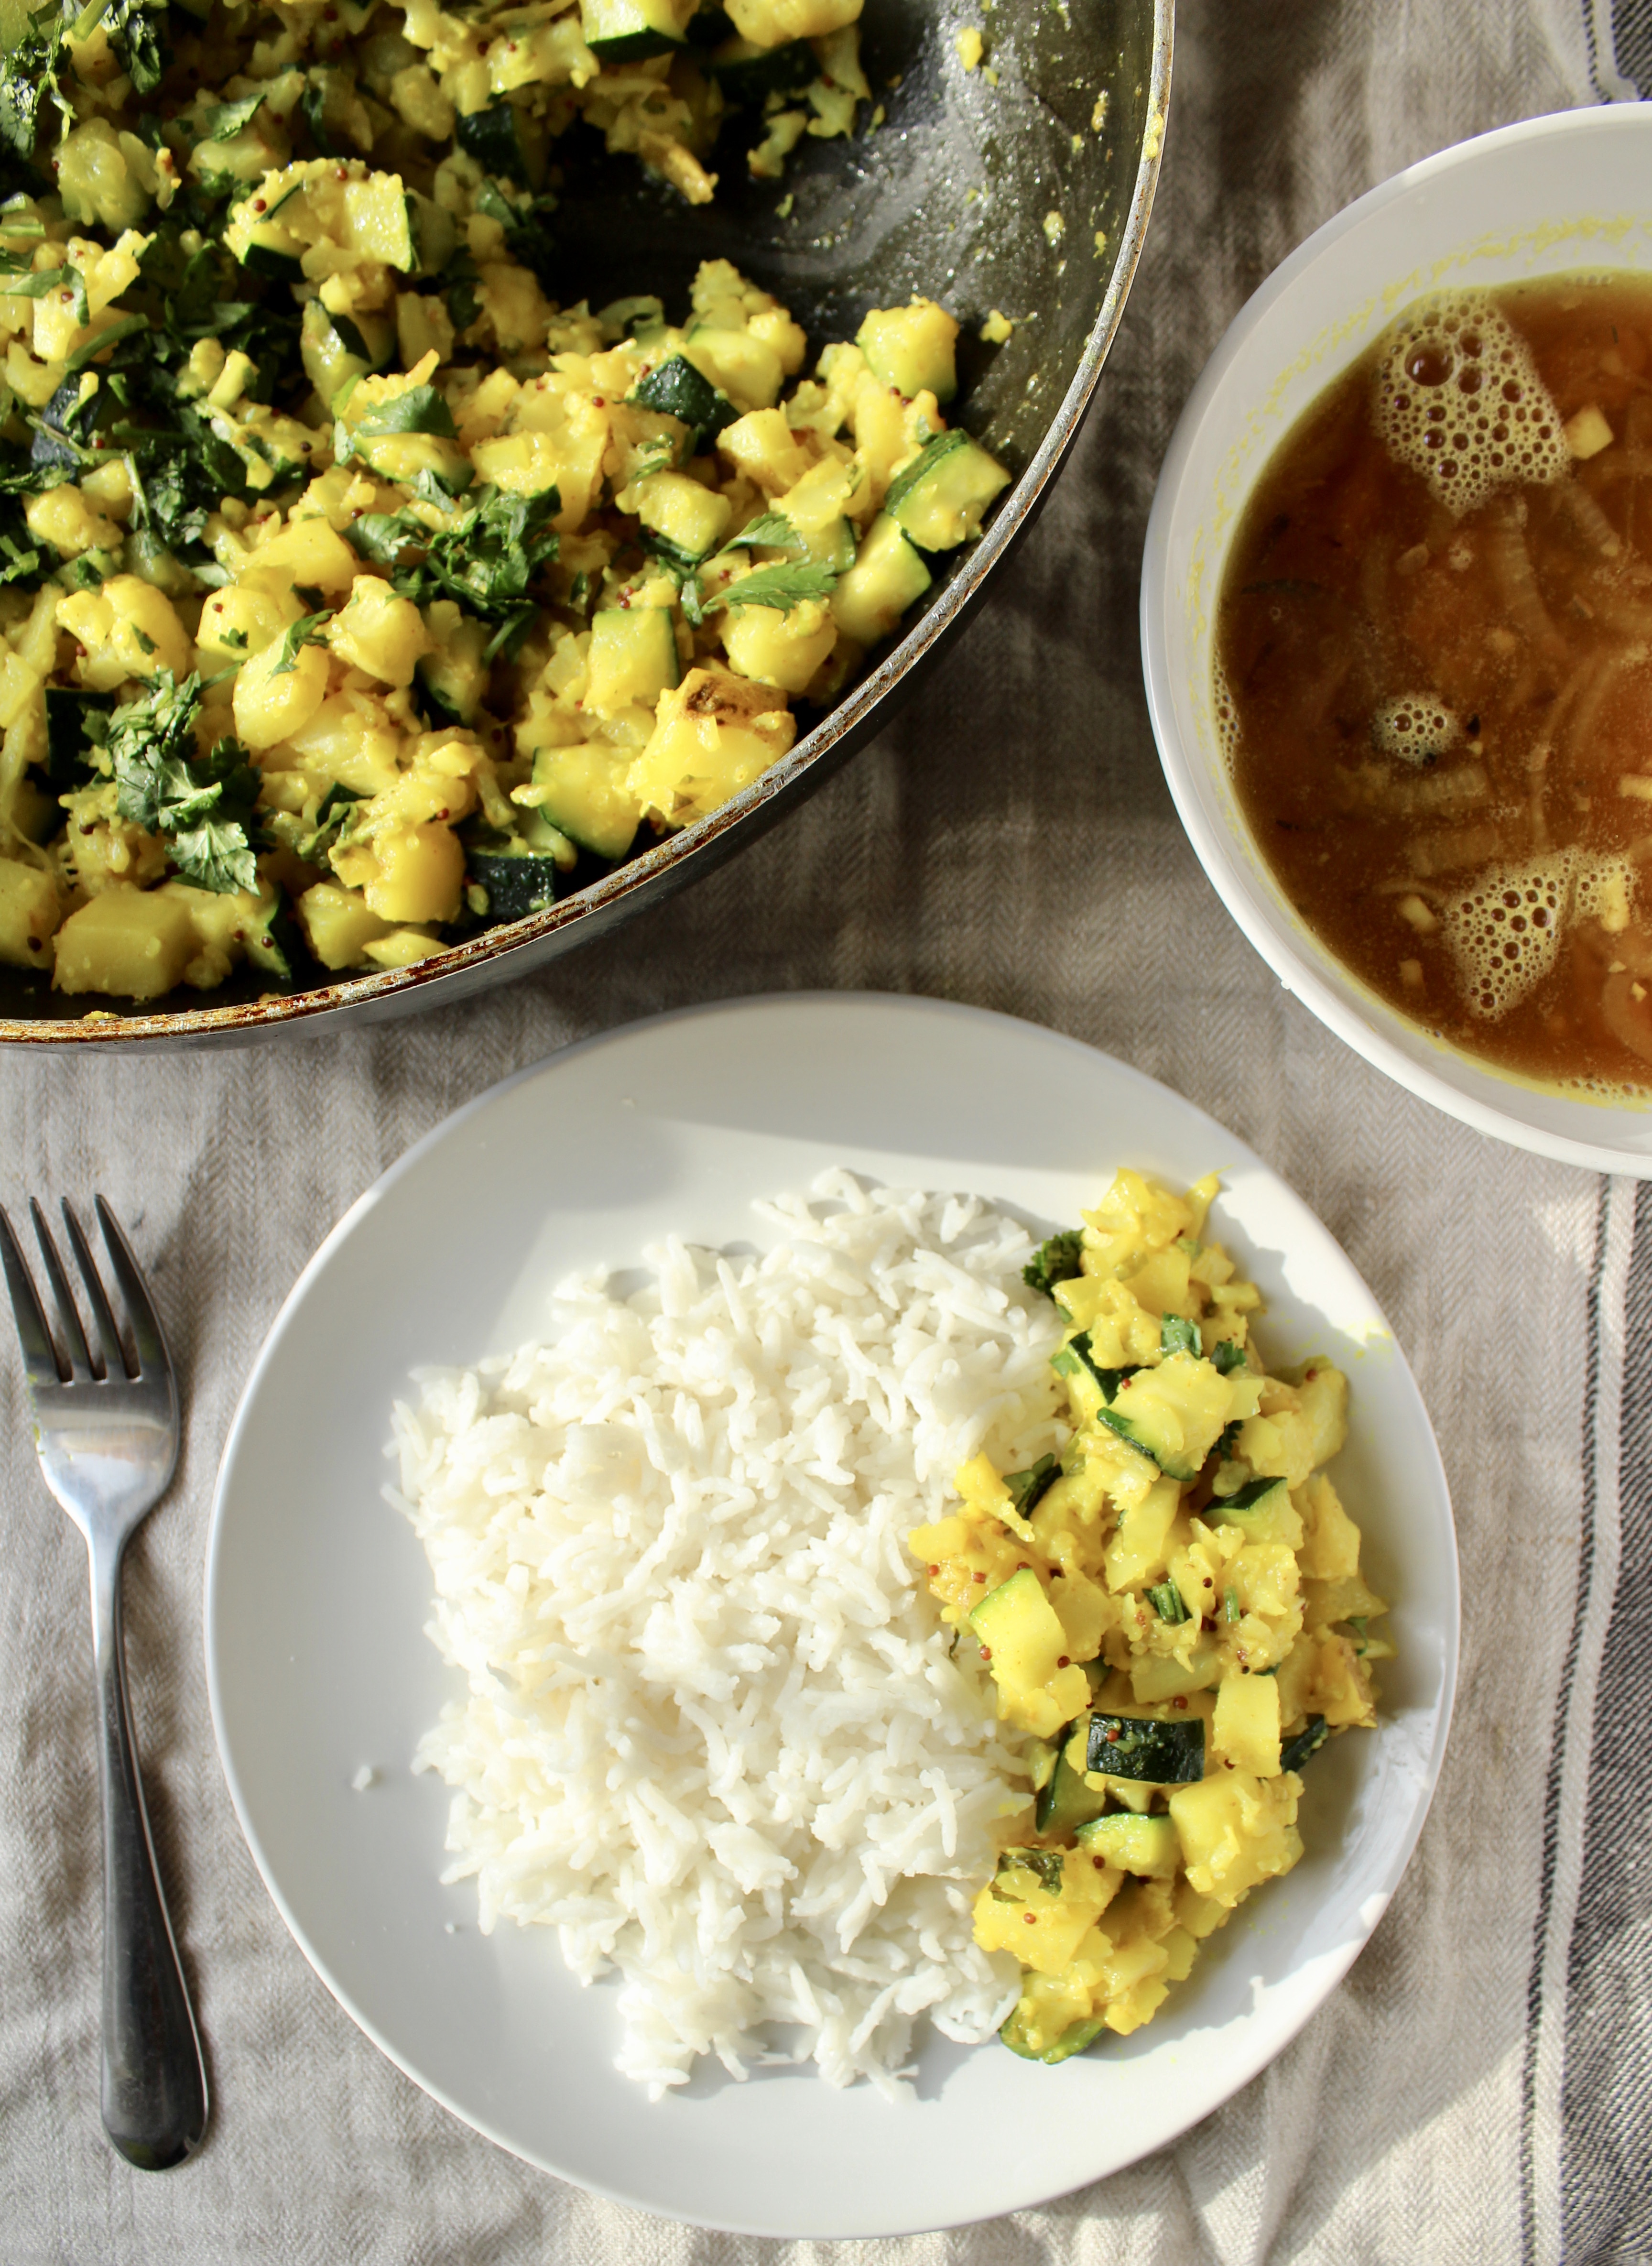
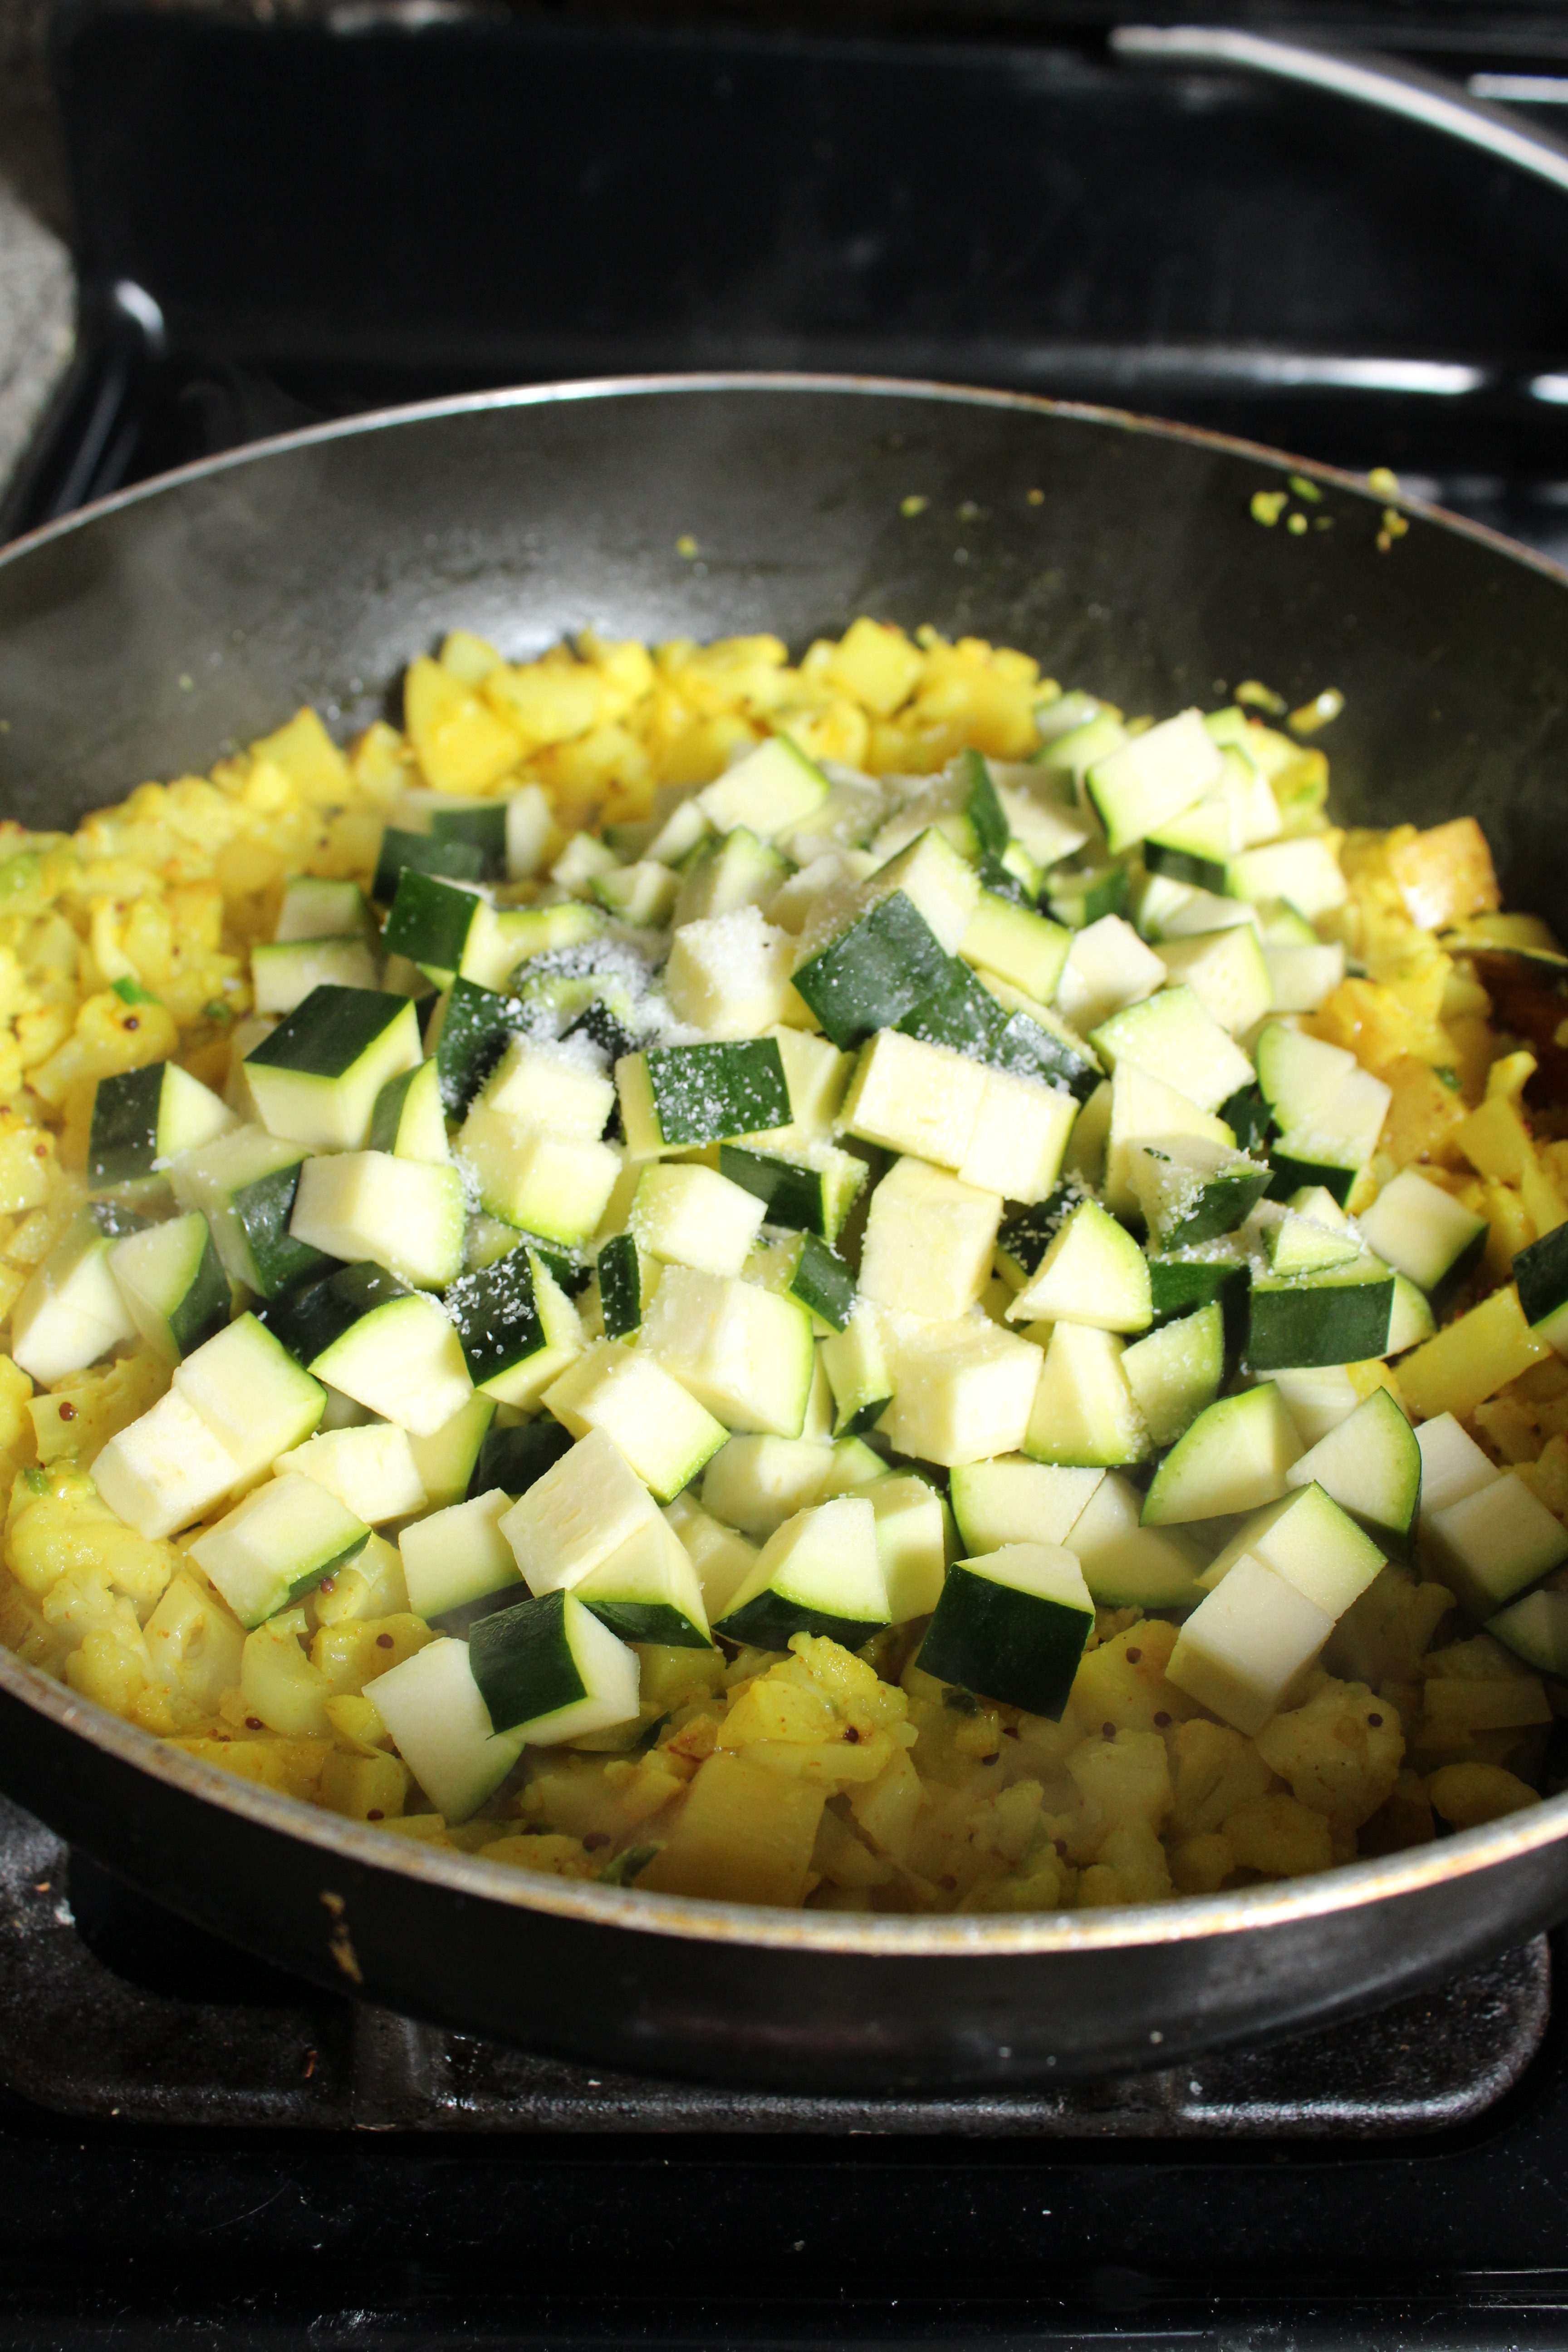
Hope you enjoy this Bengali staple and add it to your Meatless Monday menu. The zucchini at the end can be swapped out for many other vegetables. Growing up my mom would always keep a bag of frozen mixed vegetables, to add to a stir fry like this and really stretch a buck.
fullsizeoutput_4832

Serve with rice, daal, and any other protein of choice.

Ingredients

  • 1/4 cup olive oil
  • 1 large potato, diced small
  • 1 head cauliflower, diced small
  • 1 tsp mustard seeds
  • 4 cloves garlic, minced
  • 2 tsp salt
  • 1 tsp turmeric
  • 2 zucchini, diced small
  • 2-4 green chilis, split down the middle
  • 1/2 cup chopped cilantro, finely chopped

Directions

  1. In a large wok, heat oil over medium high heat. Add the potatoes in a single layer, then the cauliflower on top of them. Allow to cook for 2-3 minutes without stirring.
  2. After the potatoes have started to cook, stir to evenly distribute the cauliflower and potato, and add the mustard seeds, garlic, salt and turmeric. Depending on whether you like it spicy or not, add the chilis at this stage as well. Stir to combine and cook for 10-12 minutes, stirring occasionally.
  3. Add the zucchini and continue to cook. If you like your feed less spicy, add your chilis now. Cook for an additional 7-8 minutes or until all the vegetables are tender. Take care to moderate the heat, and move the vegetables from the bottom of the wok to the top, so nothing browns excessively and all the veggies cook slowly.
  4. Add the cilantro in the last minute of cooking. Taste for seasoning. I used a total of 2 3/4 tsp salt when I made this dish. Serve with white or brown rice.

Leave a Comment · Labels: Recipes, Side, Veg Tagged: bengali, bhaji, cauliflower, healthy, meatless monday, side dish, vegan, vegetarian

Chocolate Wafer Cookies

January 5, 2017

fullsizeoutput_47ec
If ever you’ve craved a cookie so intensely chocolately, with little to meddle with it pure chocolate flavor (no nuts, no eggs, and a high cocoa to flour ratio), then this cookie is it.

I first made these about 1 year ago when I made my first ice box cake…for 50 people. I must have made 4 batches. Probably could have made less if I hadn’t been snacking on them along the way.

These cookies mimic the famous Nabisco Chocolate Wafers that most icebox cake recipes call for. For some reason, they’ve been discontinued in store, and are only available online. Every time I attempt to purchase some, that little voice in my head goes “hydrogenated oils…preservatives” then I head to the kitchen to make my own. They are easy to make, hard to mess up, and I always have the ingredients on hand.fullsizeoutput_480c
It’s hard to tell when these cookies are done, since they are so dark. I usually just go by 10 minutes, as the recipe indicates. Since the cocoa is the predominant flavor, quality really matters. And unfortunately, it is one of those slightly fussy recipes in that it requires dutch-processed cocoa (cocoa powder that’s been alkalized, making it less acidic than natural cocoa powder). You could try to use a natural cocoa powder, such as Ghirardelli (I wouldn’t recommend Hershey’s for these), but you may need to increase the baking soda. I haven’t tried it yet, but if you do, please let me know!
img_8480
As these cookies cool, they become crisp, which is why they work so well in icebox cakes, and in this week’s case, ice cream cake. More on that coming soon!

They absorb the moisture from the surrounding medium without getting too soggy. They aren’t as heavy as say a brownie or a chocolate chip cookie, so you can satisfy your chocolate craving with a fraction of the guilt.

Recipe from Cooking Channel.

Ingredients

  • 1/2 cup or 1 stick unsalted butter
  • 3/4 cup granulated sugar
  • 1/2 cup dark brown sugar*
  • 1 tsp vanilla
  • 1 cup flour
  • 3/4 cup Dutch processed cocoa (such as Rodelle)
  • 1/2 tsp baking soda
  • 1/4 tsp salt
  • 1/4 cup whole milk

Directions

  1. In the bowl of your stand mixer, or in a large bowl using a handheld electric mixer, cream together the butter and both sugars for 2 minutes at medium speed. Add vanilla and beat until combined.
  2. In a medium bowl, sift the flour, cocoa, baking soda. Add salt and stir to combine.
    With the mixer running on low, slowly add the dry ingredients to the butter/sugar mixture. Stop to scrape down the sides of the bowl occasionally. Once all the flour’s been added, add the milk and mix until combined.
  3. Lay a piece of plastic wrap on a flat surface. Dump cookie dough directly onto the plastic wrap, in a log-like shape. Wrap up the dough with the plastic wrap and continue to shape into an even-width log. Refrigerate for at least 1 hour.
  4. Preheat oven to 350 degrees F. Score cookie dough with a ruler 1/4in apart. Slice the log into 1/4in thick disks and place disks on a cookie sheet lined with parchment paper. Bake for 7 to 8 minutes. Refrigerate the remaining cookie dough. Then rotate baking sheet and bake for 2 minutes more. Allow to cool for a few minutes before transferring to a wire rack to cool completely.
  5. Continue with remaining cookie dough. Wrap well and store at room temperature.

*I only had light brown sugar in stock, so I added half a tablespoon of molasses to substitute for the dark brown sugar.

Leave a Comment · Labels: American/Mediterranean, Dessert, Recipes Tagged: chocolate, cookie crumbles, cookies, dark chocolate, dessert, easy, egg free, ice cream cake, icebox cake, wafers

Crepes

January 3, 2017

fullsizeoutput_476b
The first time I had crepes was in Paris in 2006. Kids coming home from school were snacking on this conical things wrapped in paper filled with all kinds of chocolately/fruity goodness. My buddy and I did not hesitate. We got ourselves some crepes filled with nutella and slices of banana and our minds were blown. So delicious and, as I’d soon discover, so easy to make, with such simple ingredients?!

Flash forward to 2017 and I’ve made it 34098734287234 times. I’ve filled them with sautéed mushrooms and swiss cheese to serve to guests. With scrambled eggs and spinach for a savory breakfast. Most often though, with nutella/banana or simply with strawberry jam for my sweet-toothed family. It is the THE most requested breakfast item, surpassing pancakes, waffles, french toast, everything. Which works for me since it’s SO EASY and cooks much faster than all those other options.

fullsizeoutput_476a

I’ve pretty much stuck to Alton Brown’s recipe all these years, tweaking it only by adding whole wheat flour and a pinch of salt (it was the only thing missing). For many years I’ve mixed the batter by hand using a whisk, which was a monumental mistake. You end up with lumps of flour in the batter that only go away after the batter sits for a while, hydrating the lumps away. As soon as I started using a blender, I never looked back.

Enjoy this recipe in any sweet/savory permutation you’d like.

Recipe adapted from Alton Brown.

Ingredients

  • 3/4 cup whole milk
  • 1/2 cup water
  • 1 cup all purpose flour (I use half whole wheat flour)
  • a pinch salt
  • 2 eggs
  • 3 tbsp butter, melted

Directions

  1. Melt butter in a small saucepan or in the non-stick skillet. Set aside.
  2. In a blender, add first five ingredients and blend on low speed, gradually increasing the speed to high. Blend for about 20 seconds. Add melted butter and blend once more for 10 seconds.
  3. Heat a 9 or 10in non stick skillet to medium heat. Pour 1/3 cup of the batter into a liquid measuring cup. Lift the pan up slightly above the flame and pour the batter onto the pan, tilting the pan around gently so the batter swirls and spreads evenly across the surface. Return to flame and cook for about a minute or until the sides start to loosen from the pan. Flip and cook for 30 seconds more. Remove from pan and set on plate. Continue with remaining batter, stacking the crepes on a plate.
  4. Serve with nutella, jam, powdered sugar, ,fruit and/or whipped cream.

Leave a Comment · Labels: American/Mediterranean, Breakfast, Carb, Dessert, Recipes Tagged: breakfast, Crepes, easy, french

Cutout Sugar Cookies

December 9, 2016

img_3224
I’ve learned a lot of things the hard way. Like how filling in eyebrows is not for everyone/every situation. Or that low-rise jeans are super impractical for pretty much every situation, especially picking up your backpack from the ground. Or that frosting should not go on a cake you JUST TOOK OUT OF THE OVEN.
fullsizeoutput_43bf
This extends to cut out sugar cookies. So many ill formed, mutilated cookies from the process of transferring from the rolling out surface to the cookie sheet. WHY OH WHY didn’t someone tell me earlier to just roll them out on a parchment paper and then just remove the scraps from around the shapes?! Would’ve saved so much grief.

So even if you have a great cutout sugar cookie recipe. Even if you already knew to chill the dough before rolling it out. if you take away nothing else from this post, I hope this tip will save you some heartache during this holiday cookie baking season. Happy holidays!!

Recipe from Better Homes & Garden 2010 special issue.

Ingredients

  • 3/4 cup butter at room temperature (that’s 1 1/2 sticks)
  • 1 cup granulated sguar
  • 1 tsp baking powder
  • 1/4 tsp salt
  • 2 eggs
  • 1 tsp vanilla
  • 2 1/2 cups all-purpose flour

Directions

  1. In the bowl of your stand mixer, or in a large bowl using a handheld electric mixer, beat butter on medium speed for 30 seconds. Reduce speed and add the sugar, baking powder and salt. When it’s all combined, turn off the mixer, scrape the sides and bottom of the bowl, and turn the mixer on again, this time to low. Add the eggs, one at a time, then the vanilla. Gradually add the flour, stopping the mixer every once in a while to scrape down the sides.
  2. Once the dough has come together, divide in two, place each half on some plastic wrap on a flat surface. Wrap well with the plastic wrap and flatten into disks. Refrigerate for at least 1 hour, preferably 4 hours to let the gluten relax (this makes the cookies tender).
  3. When ready to bake the cookies, preheat the oven to 350 degree F. Roll out parchment paper to the size of your baking sheet. Lightly flour the surface, your hands, and the rolling pin. Roll out the cookie dough from the center, outwards, not back and forth like bread dough. Roll until the dough is 1/4 in thick. Then using your favorite cutters, cut out shapes about 1 in apart. Use a small offset spatula or butterknife to remove the scraps of dough. Save for next batch.
  4. Bake in preheated oven for 7 to 9 minutes. The bottoms should only be very lightly browned. Let cool on sheet for a few minutes before transferring to wire rack to cool completely.

Leave a Comment · Labels: American/Mediterranean, Dessert, Food Fun, Recipes Tagged: cookie decorating, cookies, cutout cookies, holidays, icing, sugar cookies

Umami Vegetable Soup

December 1, 2016

fullsizeoutput_4378

If you follow my Snap or Instastories, you saw me make pull this soup together last night. I’ve been looking to finish up all the vegetables and herbs that I bought as a part of my Thanksgiving groceries, herbs that I don’t use very much apart from that day (sage, thyme, rosemary). In the version I made last night, I threw in the last of my turkey leftovers, but it didn’t add much to the soup, so the version here is without meat, and it’s delicious!

There is So. Much. Umami aka The 5th Flavor. From the rehydrated porcini mushroom stock, to the mushrooms, to the soy sauce. Hence the name. I didn’t want to just call it mushroom soup! There’s so much more! And then tang from the Ume Plum Vinegar – my FAVORITE ingredient these days to add flavor to pretty much anything. It just gives a nice fresh zip to foods, without overpowering like most vinegars.

fullsizeoutput_4379

My vegetables were on the smaller side: the carrots, celery, even the size of the mushroom package. So 8 cups liquid in total worked for me. Currently the soup can feed 4 adults. If you want to stretch the recipe to feed 6 comfortably, use larger carrots, celery and onion. Add another potato and 2 cups liquid – either stock or water.

Can easily be made vegan by using all oil, no butter, and water instead of chicken or turkey stock.

Ingredients

  • 4 average dried porcini mushrooms
  • 4 cups boiling water
  • 2 tbsp olive oil
  • 2 tbsp butter
  • 2 carrots, diced small
  • 2 celery stalks, diced small
  • 1 small onion, diced small
  • 1 clove garlic, finely minced
  • 8 oz or 1 standard package cremini (baby bella) mushrooms, thinly sliced
  • 4 sprigs fresh thyme
  • 1 bay leaf
  • 1 tsp soy sauce
  • salt and pepper
  • 3 tsp ume plum vinegar
  • 1 large russet potato, cut into cubes
  • 4 cups chicken/turkey stock or water
  • 1/4 cup finely chopped parsley

Directions

  1. In a large glass measuring glass or bowl, place dried porcini mushrooms. Add hot water and allow to hydrate until ready for use.
  2. In a large stock pot, melt butter and oil over medium high heat. Add onion, celery and carrot. Cook 4-5 minutes until soft. Add mushrooms and garlic. Cook together for another 2-3 minutes. Tie the thyme and bay leaf together with kitchen string. Add to the vegetables. Add salt and pepper to taste (I added about 1 tsp salt and half tsp pepper) and stir. Then place a wire mesh sieve over the pot and add the porcini stock, straining out the rehydrated porcinis (their flavor can be strong). Also add the vinegar and stock/water. Stir to combine.
  3. Cover, raise the heat to bring to a boil, then reduce heat so it simmers for 15 minutes. When the potatoes have cooked through the soup is done. Add parsley, adjust seasoning, and serve.

Leave a Comment · Labels: American/Mediterranean, Recipes, Side, Veg Tagged: clean eating, eat clean, healthy, mushroom, recipe, soup, umami, vegan, vegetarian, winter

Turkey Korma

November 28, 2016

fullsizeoutput_430f
I woke up the morning after Thanksgiving like I imagine a runner feels the morning after a race: like I got hit by a truck.
fullsizeoutput_430c
A whole week of groceries, prep, planning culminating in an evening with loved ones and good food. It was EXHAUSTING and I was happy to do it.
fullsizeoutput_430a
But even after the last doggy bag was packed, we had quite a bit of turkey left over. It’s been our breakfast, lunch and dinner. Then last night, I recalled my friend Biny of #binyskitchen saying how she’d use her leftovers for turkey pot pies. Now, pot pies don’t fly here, but South Asian flavors do. I thought I’d cook some of the leftover turkey in a cream sauce with spices and frozen peas (to make it the slightest bit healthy) and the gang inhaled it!
img_8015
So here’s how I created it. Don’t be intimidated by the long list of ingredients. If you ever want to make South Asian food at home, you need these in stock. Fine to use a “garam masala” mix if you don’t have the last 5 spices. I wouldn’t use a curry powder to sub the first few spices, as that has turmeric and chili powder and would change the flavor of the korma.
fullsizeoutput_4308
What is korma? Any meat/seafood/veggie dish cooked in a cream or yogurt or nut paste sauce. Simmered with warm spices (not the spicy spices) and slightly sweet. Chicken korma was my favorite dish growing up, but only reserved for special occasions, like Eid or birthdays.
img_8029
img_8031
fullsizeoutput_4310
Hope you enjoy this recipe!

Ingredients

  • 1/2 onion, diced
  • 1 tbsp ghee or butter
  • 1/2 tsp ground cumin
  • 1/2 tsp ground coriander
  • 1 tsp garlic/ginger paste*
  • 1 cup turkey/chicken broth or water
  • 2-3 cups cubed turkey breast
  • 1 cup frozen peas
  • 1/8 tsp nutmeg
  • 1/8 tsp clove
  • 1/8 tsp cardamom
  • 1/4 tsp cinnamon
  • 1/4 tsp black pepper
  • 1/2 tsp sugar
  • 1/2 tsp salt
  • 3/4 cup milk
  • 1/4 cup half & half

Directions

  1. In a large saute pan, heat ghee or butter over medium high heat and add onions. Cook until onions are translucent and lightly browned around the edges. Add the cumin, coriander and garlic/ginger paste. Stir, then slowly add the broth or water. Scrape all the browned bits from the bottom of the pan and allow mixture to simmer for 2-3 minutes.
  2. Add the turkey, peas and remaining spices. Stir to combine then add the milk and half and half. Let simmer for 5 minutes.
  3. Remove from heat and serve with rice or quinoa.

*You can sub garlic/ginger paste with 1 clove of garlic AND a small (maybe 1/2inch) piece of ginger minced or pressed through a zester.

Leave a Comment · Labels: Bengali, Dinner, Recipes Tagged: cream sauce, dinner, peas, quick and easy, simmer sauce, thanksgiving leftovers, turkey, weeknight, weeknight cooking

American Buttercream vs. Swiss Meringue Buttercream

October 19, 2016

American Buttercream: butter, powdered sugar, milk, flavoring
Swiss Meringue Buttercream: egg whites, granulated sugar, butter, flavoring
ab-vs-smb

When I first start baking and cake decorating seriously, there were so many, “I’d never do that.”

  • I’d never compromise on taste. That means no swiss meringue buttercream. No fondant.
  • I’d never waste time on tacky fondant figurines (somewhat holds – I’ll make figurines but only tasteful ones).
  • I’d never make a bad cake (I once made a chocolate cake and forgot to add the sugar).

But I’ve come around on a lot of things. Example: expanding my frosting repertoire to include Swiss Meringue Buttercream. Hailed for being the King of Stability and frowned upon by many for lack of taste. It is not as sweet as the American Buttercream (AB) we are used to, and gets most of its structure from whipped egg whites rather than beaten butter/sugar, so that it’s airy rather than creamy. But man, it is a cake decorator’s dream. Just look at the picture above: the AB is so much more porous. Honestly, when I first thought up the idea for this post, I thought the difference would be much more pronounced. But I guess after frosting and smoothing dozens of cakes, I got the hang of it with both types!

img_7325

Left: American Buttercream Right: Swiss Meringue Buttercream

To make Swiss Meringue Buttercream, you start with heating egg whites and sugar in a double boiler until the sugar dissolves. You then remove it from the heat and whip it in your stand mixer with the whisk attachment until the mixture cools to room temperature and has the consistency of a soft-peak meringue. You then add the butter, a little bit at a time, until it looks like a curdled slosh. Keep beating until it congeals (see picture). The result is a super smooth buttercream that spreads like a dream. And because it has the protein from the egg whites as a base, it won’t just melt in a warm room like butter would. As long as it’s done right. And boy have I done it wrong:

  • I once overheated the sugar/egg white mixture to the point that after 45 minutes of beating it in my KitchenAid it was not cooling it down. During that time my meringue doubled in volume, only to deflate. I still went ahead and added the butter. When after another 45 minutes it wasn’t coming together, I stuck an ice pack to the side of the bowl. It worked – somewhat. The buttercream came together, but it didn’t have the structural characteristics of a proper SMB. The rosettes that I piped with it melted on the way to the venue. It was 100 degrees. My fridge broke that week. A lot of things went wrong that week. =(
  • Another time I added the butter too soon and it wouldn’t come together no matter what I tried.
  • Another time the butter I added was too soft.

You name it, I messed it up in that way.

img_7328

To correct for the less than desired sweetness, I like to add a syrup of some sort at the very end:

  • For caramel SMB: about half a cup of homemade caramel sauce
  • For strawberry SMB: about one cup strawberry syrup or to taste
  • For vanilla SMB: 2-4 tbsp corn syrup (to taste) and 1 tbsp vanilla extract
  • For chocolate SMB: 1 lb semisweet chocolate, melted and cooled slightly

This is the base recipe (from Smitten Kitchen):

Ingredients

  • 4 egg whites
  • 1 cup granulated sugar
  • 26 tbsp unsalted butter, softened to room temp

Directions

  1. In a small saucepan, bring 1 inch of water to simmer over medium low heat. In the bowl of your stand mixer*, combine egg whites with sugar. Whisk until combined. Place over the sauce pan and stir until sugar dissolves (you can feel it with your fingers – mixture should feel smooth).
  2. Remove from heat and fit into stand mixer. With the whisk attachment, beat on medium speed for a few minutes, until mixture cools to room temperature AND doubles in volume. Then add the butter, 1 tbsp at a time. Allow the mixture to run at medium/high speed past the curdling point to the congealing stage. Once it comes together and resembles billowy clouds (your mixer will start to make a different sound), add flavoring. Continue to beat until all the flavoring is incorporated.

*You can make this with a hand-held mixer. Just be prepared for your arm to get tired from holding it up for 10-15 minutes =)

Leave a Comment · Labels: American/Mediterranean, Dessert, Food Fun, Recipes

  • Newer Entries
  • 1
  • 2
  • 3
  • 4
  • …
  • 12
  • Previous Entries
American, Bangladeshi. Savory, sweet. I don't discriminate and neither should you.

Most recently…

Load More...
Follow on Instagram

Social

Subscribe to Blog via Email

Enter your email address to subscribe to this blog and receive notifications of new posts by email.

Tags

appetizer beef bengali breakfast butter cake caramel chicken chocolate chocolate chips cilantro clean eating coconut comfort food cookies dessert dinner entertaining fall fruit ganache gluten free halal healthy homemade honest chops honest creations iftar italian pasta pastry pistachio quick and easy dinner ramadan recipe side side dish south asian spinach vegan vegetables vegetarian weeknight dinner weeknight meal whipped cream

Theme by 17th Avenue · Powered by WordPress & Genesis