Kitchen3N

Recipes and food fun from Apt 3N

  • About
  • Gallery
  • Recipes

Salsa all’Amatriciana

July 10, 2014

IMG_2587It’s Ramadan. The days are long. Brain cells hardly get enough glucose to function throughout the day. You would think after breaking our fasts in the evening, we get a second wind and can be productive. Not the case here. Usually after iftar, my husband and I try to make the most of the 20 or minutes we have together post-kids-bedtime and pre-taraweeh (nightly prayer). Yet even after he leaves for the masjid, I find myself completely unable to do ANYTHING productive. That includes the dishes. I don’t know why this year’s fasts has left my brain and body completely depleted (any md’s/rn’s/nutrionists feel free to chime in). IMG_2538But my dear friend Amreen has been requesting this recipe from the very first time I made it for her back in college. And I, being the jerk friend that I am, have neglected to share it until now. So, on Friday, with bacon, tomatoes and sidekick Moury in hand, whipped up this old favorite.  IMG_2546This recipe is actually from my very first cookbook purchase in high school: Giada’s Everyday Italian. I know I’m always singing Ina’s praises and yes, her show really informed my current culinary outlook. But it all started with Everyday Italian. From Giada, I learned how to make my very first marinara sauce. Shrimp Fra Diavolo. Balsamic Roasted Chicken. Eggplant Caponata. Favorites that I use time and again – and they all come from this book. I can’t say as much for her follow up cookbooks, but this is definitely one I can vouch for. IMG_2557Any Roman reading this will gasp at my bastardization of their beloved Amatriciana sauce – a pancetta/onion/garlic/tomato sauce  except with halal beef bacon in place of the pancetta. I’m sorry! This is just the best we can do! The fat from the bacon balances well with the sweetness/acidity of the tomatoes. So you neither feel like you’re eating a really greasy pesto, nor a flat lined marinara (let’s face it, marinara just isn’t that exciting unless doctored up with some crushed red chili flakes). 
IMG_2576
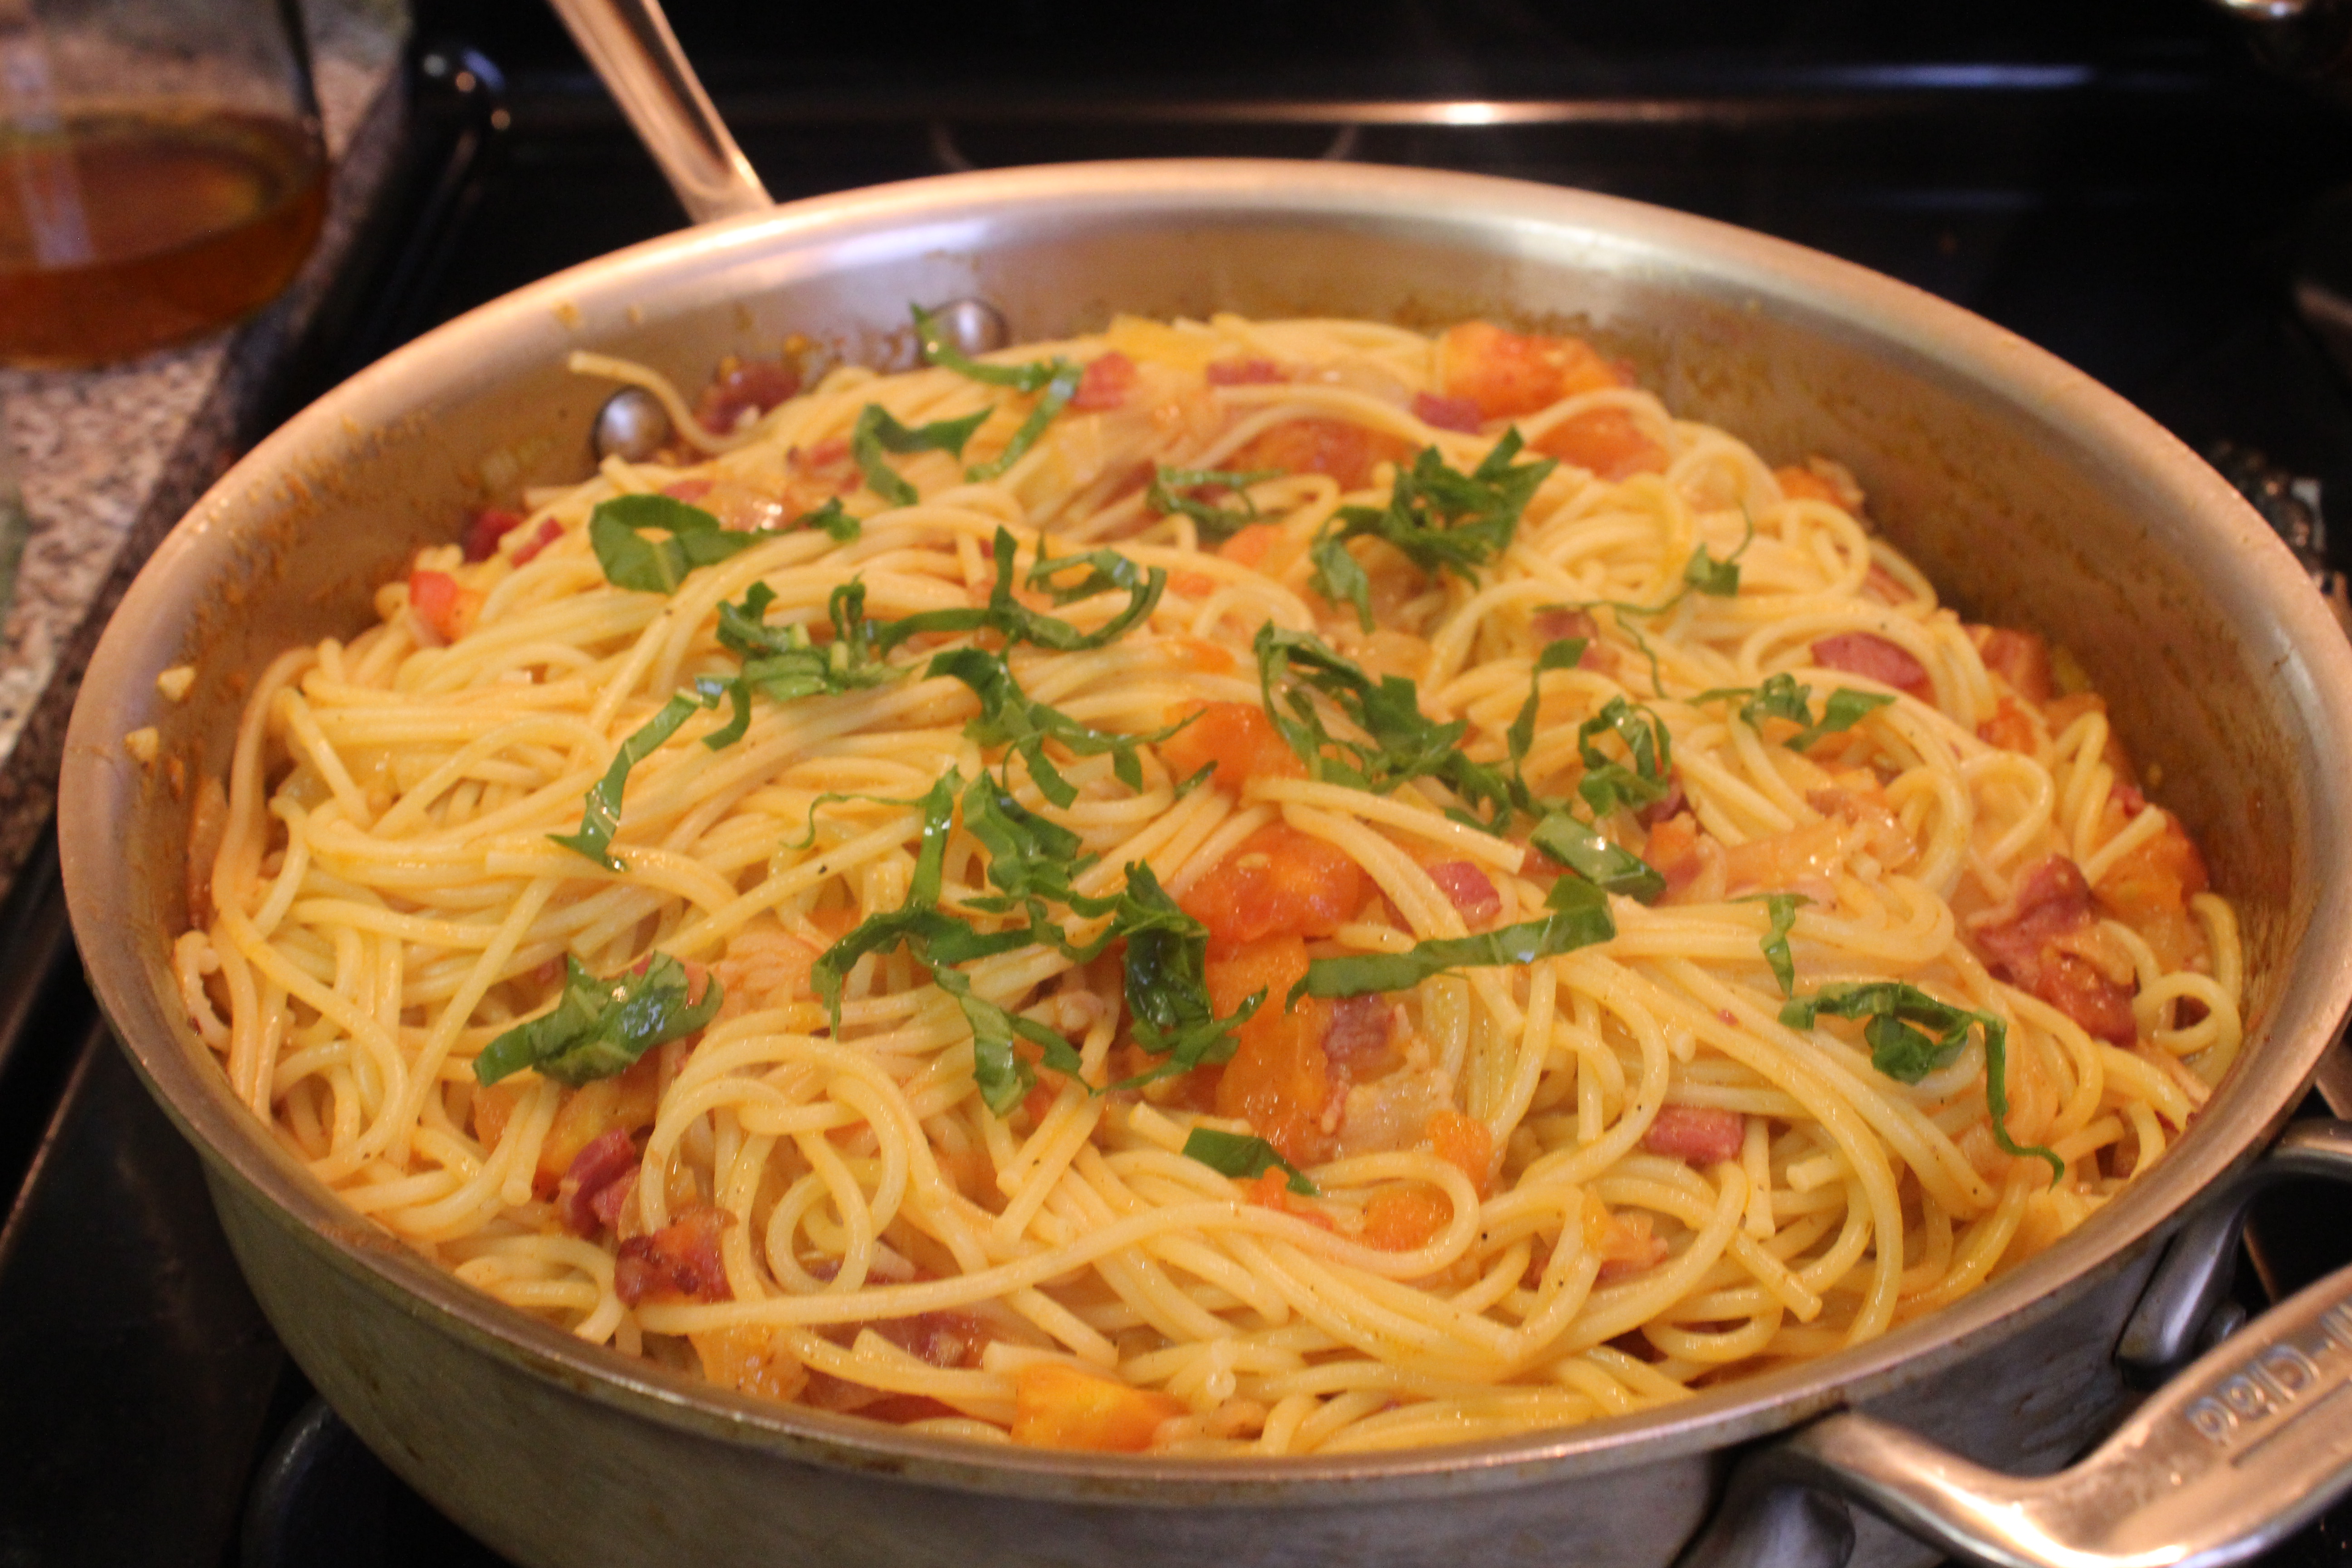
My old, and I mean old (seriously, friends for 13 years now?), friend Moury was with me in the kitchen. And contrary to our last cooking experience, I wasn’t a total tyrant. She took all these photographs for you guys. And since I haven’t been doing any day time eating, these are the only photographs I could manage for this post. IMG_2586So, bacon and pasta lovers rejoice! The perfect marriage of the two is in this dish.

Recipe from Giada De Laurentiis’ Everyday Italian

Ingredients

  • 2 tbsp olive oil
  • 6 ounces pancetta or slab bacon, diced
  • 1 yellow onion, finely chopped
  • 2 garlic cloves (I used 3), minced
  • pinch of dried crushed red pepper flakes (I would go with a generous pinch)
  • 1 (28 oz) can tomato purée (I used just over 1.5 lbs fresh tomatoes, blanched then peeled)
  • 1/2 tsp salt plus more to taste
  • 1/2 tsp black pepper plus more to taste
  • 1/2 cup grated Pecorino (I had none, so I just added some julienned basil)

Directions

  1. In a large, heavy skillet heat the oil over medium high heat. Add the bacon or pancetta and cook until the fat is rendered – about 8 minutes. Add the onion and cook for an additional 5 min. Add garlic and red pepper flakes and cook until fragrant, about 30 seconds.
  2. Add the tomatoes, salt and pepper and reduce the heat to medium-low. Allow the sauce to cook, uncovered for 15 minutes. Stir in the cheese (if you have) and salt and pepper to taste.
  3. Serve with 1 pound of cooked pasta (spaghetti or bucatini).

1 Comment · Labels: American/Mediterranean, Carb, Main, Recipes Tagged: all'amatriciana, bacon, bucatini, carbs, italian, pancetta, pasta, pecorino, pecorino romano, quick and easy, red chili flakes, roman, spaghetti, tomato sauce, tomatoes, weeknight meal

Tandoori Chicken

June 14, 2014

IMG_2526My mother, who is a great cook, simply gets green with envy at my oven utilization. She boasts to her friends how I simply toss a few ingredients together and put them all into the oven and set a timer on. No babysitting, freeing up your hands and mind to take care of the dishes, clean up a wee wee accident (what? that’s not a constant in your day to day?) or whatever else you might need to do. People in Bangladesh just don’t have ovens (or they didn’t at least when she was growing up), so the only method of food prep she’s ever known was stovetop. Luckily, I grew up in new york. I’ve used my oven to satisfy my sweet (and savory) tooth since I was a kid. So, given the craziness of everyday life here, it’s good to have a few of these marinades up your sleeves that you can prepare the morning of or night before, and toss in the oven half an hour before dinner time.  IMG_2506I made these homefries to go along with the chicken. The bag said they’re a good source of potassium. Yay for good carbs! Salt, pepper, paprika, garlic powder and olive oil. 425 for 25 min. Wow!IMG_2518 The spice mix is a little tricky to put together but I highly recommend it! There is a small amount of nutmeg (compared to everything else in it) but the flavor really comes through! The flavor is more vibrant than any Shan mix you may buy (and minus the preservatives). Just spend a little bit of time one afternoon or evening to prepare the mix and you’ll have access to delicious tandoori chicken any time! I’ve actually had it sitting in my cupboard for a while (over a year) because I wasn’t crazy about the recipe that went with the mix, but I tried my hand at creating my own recipe more recently and I was blown away! I integrated a few tricks I picked up from Smitten Kitchen, namely her recipe for Buttermilk Roast Chicken. One: that 1 tbsp of salt in the marinade achieves the same effect of brining your chicken. Two: a little bit of sugar goes a long way when roasting chicken. I never was a fan of sweet/savory flavor combinations, but the amount of sugar in this recipe doesn’t make the chicken sweet, rather helps keep all the flavors balanced.  IMG_2521Another thing that’s helped my cooking recently is raw ginger. I’ve always had an aversion to it. The times I would bite down on a piece while eating haleem. The sharp, unpleasant flavor it adds to drinks. So I kind of carried that into my cooking, only using small pinches of the milder version, ginger powder. But when I started using the real deal, something amazing happened: the foods I cooked reached new heights. Like, can-compete-with-my-mom heights. I used to attribute the difference in our foods to the type of salt we use (she uses table salt, I use kosher or sea salt), thinking perhaps what she uses (or the volume of it) amplifies the flavor in a way that kosher salt doesn’t. But now I really believe ginger to hold the key. It adds a depth, a warmth, that is hard to achieve with black pepper or chili powder. All in all, ginger, nutmeg, tender fall-off-the-bone meat all knocks this recipe out of the park.

I kept the skin on the legs, because I love a good, crispy skin. But this recipe works just as well with skinless.

 Ingredients

  • 6 chicken legs (thigh + drumstick)
  • 1 cup of plain yogurt
  • juice of a 1 lemon
  • 1 tbsp salt
  • 1 tbsp brown sugar
  • 1 tbsp tandoori spice mix
  • 2 cloves garlic, minced or made into a paste
  • 1 inch piece of ginger root, minced or made into a paste
  • a pinch of chili powder (optional)
  • an extra drizzle of olive oil

Directions

  1. Make two cuts into the chicken: one at the thigh, one at the drumstick. Place in a gallon zip lock bag.
  2. Combine yogurt, lemon juice, salt, sugar, spice mix, garlic, and ginger in a bowl or large glass measuring cup. Pour over the chicken in the bag and zip shut. Massage the marinade into the meat. Let sit in the fridge for about 8 hours (I did mine in a hurry, about 4 hours, and although it was delicious, it makes a difference in how deeply the flavor penetrates).
  3. Heat oven to 425 Fahrenheit. Line a baking sheet with parchment or aluminum. Take the chicken out of the marinade, shaking off excess. Spread the chicken out (overcrowding will keep the skin from crisping) and lightly sprinkle some chili powder over the top. Drizzle with olive oil for a nice tan, and bake for 30-35 minutes, depending on the size of the individual legs. The meat should be cooked through, but if your meat isn’t nicely browned, turn the heat up to 450 and bake for an additional 5 minutes. I had some leftover (halal beef) bacon grease from the morning, so I used that instead =)
  4. Serve with naan, home fries, or just a nice salad. Extra points for homemade cilantro yogurt dipping sauce (recipe to come!).


Leave a Comment · Labels: Bengali, Protein, Recipes Tagged: chicken, dinner, gluten free, masala, paleo, roast chicken, spice, spicy roast chicken, tandoori chicken

Chocolate Mousse Cake

May 31, 2014

IMG_2483I have always usually been outnumbered in my family by people who aren’t enamored by chocolate. Same was true when I married my husband. Even more so. But then the kids came, and they loved chocolate, especially  dark chocolate. It was then that I knew they were mine (that was the real testament, not the whole watching them come out of me thing). And so now I have little people to share my chocolate obsession with. Little people to make chocolate cake for on birthdays. Little hands to help stir the chocolate chips into cookie dough. And little fingers to steal chocolate chips from the counter before they even have a shot at meeting pancake batter.

IMG_7226 I’ve been planning on making this cake for months now. In March as I assembled my husband’s strawberry shortcake, I was actually thinking of this one. In January while I frosted my daughter’s rocket cake, I secretly fantasized about the light, airy and intensely chocolatey flavor this mousse would impart on a chocolate layer cake. But now it was my son’s birthday, and it was just the four of us. So I went the whole nine chocolate yards.

There are so many things that make this cake delicious. Chocolate, vanilla, and coffee all flavor the chocolate layers. The original recipe doesn’t call for espresso, but this girl learned from the school of Ina Garten, so there is going to be some coffee in my chocolate cake. The mousse is decadent with 2 cups of heavy cream, 13 oz of bittersweet chocolate, 7 egg whites. This is definitely not an everyday cake, but so worth the effort once you take a bite of the finished product. IMG_7227It’s also not for the novice baker, unfortunately. There is egg white beating, folding, chocolate melting, cooling, uniform cake slicing, etc. So if you’ve done these a few times, then you won’t be daunted by this recipe.

The recipe for the mousse makes 8 cups and the directions imply an even divide of all 8 cups between and atop the 3 layers. I needed much less, even when applying the mousse around the sides like a frosting. I used 6 cups for the layers, 1 cup around the sides, and 1 cup for my midnight craving =)

The only thing to be aware of is if you use it around the sides, this cake will have to be refrigerated. At room temperature, the liquid will start to separate and you’ll have a chocolatey mess for the cake. So, keep it in the fridge until just ready to slice and serve.

IMG_2480At this point I have to make a shout out to my friend Jenn Chowdhury, who gifted me this lovely antique cake stand! You might remember the vanilla cake with chocolate buttercream frosting I made for her birthday a few months back.  I’ve been in the market for a while now, since my previous one broke, and this came in the mail like a gift from above. So, thank  you Jenn!!

Recipe adapted from Fine Cooking.

Ingredients

For the cake

  • Butter or vegetable oil for greasing the pan
  • 1 1/2 cups cake flour
  • 6 tbsps unsweetened natural cocoa powder
  • 2 tsp baking pwder
  • 1/4 tsp baking soda
  • 1/4 tsp kosher salt
  • 1 cup white sugar
  • 1/4 cup vegetable oil
  • 1 large egg
  • 1 tsp vanilla extract
  • 1 cup hottest tap water
  • 1 tsp instant espresso

For the mousse

  • 2 cups heavy cream
  • 1/4 cup unsweetened natural cocoa
  • 4 oz (1/2 cup) unsalted butter at room temp, cut into cubes
  • 13 oz bittersweet chocolate (I used Ghirardelli)
  • 2 tsp vanilla extract
  • 7 large egg whites at room temperature
  • 1/2 cup white sugar

Directions

For the cake

  1. Position a rack in the center of the oven and preheat to 325 degrees Fahrenheit.
  2. Grease a 9×2 circular cake pan. Line the bottom with parchment paper and flour the sides of the pan.
  3. Sift the cake flour, cocoa, baking powder, baking soda, and salt into a large bowl. Add the sugar and whisk until all the ingredients are well blended. Measure the oil into a liquid measuring cup. Add the egg and vanilla and mix with a fork. Add to the dry ingredients.
  4. Fill the liquid measuring cup with 1 cup hottest tap water. Dissolve the espresso in it and add to the dry ingredients. Mix until the dry ingredients  are just moist, scraping down the sides of the bowl. Pour batter into prepared pan and bake for 32 to 34 minutes (I baked for 34 min because we’re not dealing with cupcakes here; I’m not too worried about it drying out.) Test it with a toothpick, ensuring that it comes out clean.
  5. Let it cool in the pan for a bit, until you can handle it with your bare hands. Invert it onto a wire rack to cool completely. I like to loosen the sides with a metal spatula or butterknife. Then I place on hand on top, turn the cake out onto my hand, and delicately place over the wire rack. Remove the parchment paper. Let cool to room temperature. Refrigerate or freeze until ready to apply the mousse.
  6. The original recipe suggests assembling it in a springform pan, but I just did so on the cake stand. Slice the cake into three even layers. I like to cut an inch or two deep going around the circumference, before cutting all the way through (otherwise I usually end up with slanted layers). Set the top two layers aside. Scoop about 2 cups of the mousse onto the layer. Spread delicately with a spatula. Add the second cake layer on top. Scoop an additional 2 cups of mousse and spread evenly. Add the top layer and an additional 2 cups mousse. Before applying to the sides, add strips of parchment paper on the cake stand, tucking into the bottom layer (just to keep the surface clean). Starting from the top, add a dollop of mousse and carefully push down the sides. Rotate the stand and continue until the sides are fully covered.
  7. Garnish with chocolate curls, if desired. Refrigerate until ready to be eaten.

For the mousse

  1. Set up an ice bath in a large bowl. Bring the cream and cocoa to a boil in a large saucepan over medium heat, whisking to incorporate all the cocoa. Remove from heat and add the chopped chocolate and butter. Whisk until well combined. Pour the chocolate mixture into a medium bowl and place over ice bath. Keep stirring while the mixture comes to room temperature. Remove bowl from ice bath.
  2. Beat the egg whites in a large bowl with a hand held electric mixture on low speed until frothy. Increase speed to medium and beat until soft peaks form. Add the sugar gradually and beat until peaks are almost stiff.
  3. Add the beaten egg whites to the chocolate mixture in about four batches. Fold the egg whites into the mixture carefully with each addition. Here is a great video demonstrating folding.
  4. The mousse is ready when all the egg whites are incorporated and there are no lumps.

4 Comments · Labels: American/Mediterranean, Dessert, Recipes Tagged: birthday cake, cake, celebration cake, chocolate, chocolate cake recipe, chocolate mousse recipe, dessert, mousse

Rhubarb Mango Chutney

May 15, 2014

IMG_2464Is rhubarb out of season yet? I am way behind with this post, I know. I have been behind on life, in general, as of late. So even though I made my husband track down rhubarb when the season for it first came around (it is surprisingly difficult to find around these parts) and serendipitously also had some delicious, though overripe, Haitian mangoes on hand to make this weeks ago…I am only now sharing it with you. Sad face.

I know the combination of rhubarb, overripe mangoes, anise seeds and mustard oil aren’t ingredients most people have on hand most of the time. But as we near the end of rhubarb season, I hope you can still attempt to make this chutney. Or at least save it for next year.

I know most people tend to make some sort of rhubarb/strawberry pastry this time of year but something strange has happened to me recently. My sweet tooth has faded. Maybe I’ve made one too many cookies. But for some reason, butter rich, sugar filled treats just don’t give me the same satisfaction it used to. Not to say I’ve shunned them for good. I still taste test what I make and indulge when I go out with my girlfriends. Anyway, I was looking for something a bit more savory, and palatable for the rest of the clan. This was probably one of my most successful experimentations. It was annihilated at my in-laws’. Reduced to half in my own home overnight. It just hit every note. Admittedly, there is a lot of sugar in this, but only because the rhubarb was so darn tart. I don’t regularly have rhubarb, I don’t know if they range in tartness, but the tartness of this batch rivaled any lemon. If yours is less tart, feel free to start out with a smaller amount of sugar, and add more as needed.

Ingredients

  • 1 tbsp mustard oil
  • 1 pinch anise seeds or pach forom
  • 1/2 red onion, diced
  • 3 stalks of rhubarb, leaves and ends trimmed, diced into 1 in pieces
  • 4-5 dried red chilis (less for mild heat)
  • 1/4 cup brown sugar
  • 1 tbsp apple cider vinegar
  • 1 1/2 tsp salt
  • pulp of 2 overripe mangoes, preferably the haitian variety

Directions

  1. Heat oil over medium high heat in a medium saucepan. Add the anise seeds or pach forom and fry until fragrant, about 30 seconds. Add the onions and cook until translucent. Add rhubarb, chilis, sugar, vinegar, salt and mango pulp. Stir and bring to a boil. Reduce heat to a simmer and cover.
  2. Cook for 40 minutes, stirring occasionally, until everything is broken down. Taste for seasoning.

Leave a Comment · Labels: Bengali, Recipes, Side Tagged: achar, anise seeds, bengali, chutney, condiment, gluten free, mango, mustard oil, pickle, rhubarb, rhubarb season, sauce, side, vegan, vegetarian

Spinach Purée with Quinoa (Saag ar Quinoa)

April 25, 2014

IMG_2426I did it! I conquered the quinoa! I thought about ways to desi-fy it since practically anything cooked in a curry sauce in this house gets consumed in minutes. Since I had this bag of frozen spinach in the fridge, I thought about doing a take on the classic palak paneer, replacing the protein in the form of paneer (cheese) with quinoa.

IMG_2421 Before you cringe at the thought of sullying your favorite buttery, cheesy spinach dish with healthy food, keep in mind  – it passed my taste test! In fact as I ate it throughout the week (the hubby helped – though the kids did not), and even went on to make French green lentils with the leftover vegetable stock, I really started acquiring a taste for these plant based proteins. When I had chicken after about two weeks, the poultry smell actually bothered me! Not to say I’m going vegan on you guys. No no no no. IMG_2422As I experiment with South Asian flavors and new ingredients, I’m excited to share some of the things I’ve been whipping up. On a side note: apparently the casual and sometimes excessive usage of the word “excited” or “exciting” is a uniquely American colloquialism. I found this out while reading the supremely entertaining and insightful novel Americanah about two Nigerians, following their lives in their home country and abroad. It reminds me a bit of The Brief and Wondrous Life of Oscar Wao, about a chubby Dominican kid growing up in the states. Both these novels do such a great job of relating the immigrant experience, part universal, part relative to their specific ethnic group. They overshadow most novels in that genre (recall the overly saccharine images of the Mama Ganguli making her holiday cards or the tired “behind the veil” stereotypes offered by Hosseini).IMG_2432 I digress. I used tricolor quinoa for a nice balance of nutty and earthy flavors. The main difference between this preparation and past failed attempts at quinoa was SALT AND PEPPER. After cooking in the low sodium vegetable broth, it was OK. After seasoning to taste, I was like, “I could get used to this.” And the spinach puree, though not plated very well here, was amazing. Pair it with any of your favorite proteins (salmon, grilled chicken breast, etc.). I added a dollop of yogurt to balance the deep seated flavor, but you can add sour cream, creme fraiche or nothing at all!

Ingredients

  • 1 cup quinoa, rinsed
  • 2 cups vegetable broth
  • 2 tbsp light olive or vegetable oil
  • a pinch of cumin seeds
  • a pinch pach forom (optional)
  • 1/2 yellow onion, diced
  • 2 cloves garlic, minced
  • 1 12oz bag frozen spinach
  • 2 green chilis
  • 1/8 tsp ginger powder (or raw ginger, minced)
  • 1 bay leaf
  • 3/4 tsp kosher salt
  • 2 tbsp water

Directions

  1. In a small saucepan, bring the quinoa and vegetable broth (or chicken stock) to a boil. Let simmer for 10 to 15 minutes until the ring pops out of the quinoa. When it’s done, season with kosher salt and pepper (about 3/4 tsp and 1/2 tsp respectively). Set aside
  2. In a large skillet, heat the oil over medium high heat. Add the cumin seeds and pach forom, if using, and let it warm through until fragrant, about 60 seconds. Add onions and saute until translucent (about 4 min). Add garlic and chilis. Stir to combine. Then add the frozen spinach, breaking up clumps with your wooden spoon. When it’s manageable, add the remaining ingredients. Let simmer, covered, for 5-7 min.
  3. Remove one of the green chilis and a bay leaf. You can always add the second chili to the puree if you like it hotter. Carefully add the spinach mixture to a blender and blend, covered, until smooth. Add water as necessary to thin it out. WARNING: (In case you are as inexperienced with the blender as I am)I made mine a bit too thin by attempting to blend it with the “Smoothie” function. “Ice Crush” did a much better job, but it was too late, I added the extra water already.
  4. Serve on top of the quinoa, adding yogurt as desired.


Leave a Comment · Labels: Bengali, Main, Protein, Recipes, Veg Tagged: budget friendly, desi, gluten free, greens, healthy, meat free, palak, quick and easy dinner, quinoa, saag, south asian, spicy, spinach, tj's tricolor quinoa, tricolor quinoa, vegan, vegetables, vegetarian, weeknight meal

Food finds in San Juan, PR

April 10, 2014

IMG_6702
IMG_6717

IMG_6589
IMG_6630

After three and a half years, I made it out of the continental US!! My last trip was our babymoon to Istanbul when I was six months pregnant with my daughter. After having two kids back to back, managing getting them through infancy, we finally made it! Now, Puerto Rico is a commonwealth of the US (and the influence is apparent in any supermarket, shopping mall or any commercial area dotted with American chains). There are a lot of shared services (US Customs, highways, currency) so you can definitely take a breather if you’re traveling with small kids.  One less thing to worry about, you know? But the flip side to that is that everything is imported! When we drove through the rainforest and some of the mountainous regions near the center of the island, there is no denying the lush, fertile environment. Banana, papaya and tomato just growing randomly here and there. The land is just wringing with potential for agriculture. But as a sector, it is practically non existent (apart from some coffee and rum). It is probably due to its function as a trading post for hundreds of years. But far from indulging in some gorgeous tropical fruits like I anticipated, I was greeted with bananas from Ecuador! Driscoll berries! Pineapples from who knows where!

IMG_6732
IMG_6572
IMG_6842

The first picture above shows some fruits I got from a fruit stand off Rt. 149 some 20 miles from San Juan. After some crowdsourcing, I figured out that the green fruit is soursop or guanabana. After allowing it to ripen for two days as the seller suggested, I could not manage a knife sharp enough to deal with this thing! It reminded me of this Portlandia bit when they attempt to open a dorian. A lot of people aren’t crazy about it – but they add it to their drinks. Go fig.

The second picture is a traditional Mofongo (mashed plantain base) with shrimp (in a garlic, tomato sauce) atop. You can top it with any meat or fish (or bacalao – dried salted cod, but I wasn’t a fan).

The third is a picture from the local grocery store (Dorothy, you’re kind of still in Kansas).

IMG_6827
IMG_6794
IMG_6797

IMG_6798
IMG_6832
IMG_6831

One thing that was great about Puerto Rico, is that good coffee is universal. Everyone from hole in the wall diners to this fancy scene out of Williamsburg offers a good cup o’ joe. This place is Caficultura and it’s right in the middle of old San Juan (a few blocks down from where we stayed). And it is every American tourist’s dream. The owners of this place have figured out that while some tourists may venture to try some bacalao and plátanos, most of them would LOVE some traditional American foods, dressed up in “tropical flavors”. See exhibit F, if you will. The french toast with pineapple marmalade and coconut. Exhibit C, though, is more along the lines of traditional puerto rican food. The mallorca bread with tangy/sweet guava jam. Definitely worth trying but not nearly as good as a quesito (puff pastry with sweetened cream cheese filling).

IMG_6817
IMG_6819

IMG_6814
IMG_6820

Finally, we have Jose Enrique. A bit more upscale, without being stuffy. A little bit further out from the more touristy parts of town like Old San Juan and Condado. Our appetizers of crab ceviche on plantains, cheese fritters and fried fish (I forgot what kind of fish!) were amazing. The fritters came with this sweet and spicy sauce that I will have to try to recreate (definitely had honey, orange juice, hot peppers and cilantro). We ordered Caribbean cherry and the house juice (a blend of pineapple and other juices). For the main course, my husband got the whole fried fish (I believe it was yellowtail) and I got the pan seared sea bass in a romesco ragout with artichokes. The creaminess of the vegetables perfectly complimented the texture of the fish. His yellowtail came with some sweet potatoes and papaya that I wasn’t crazy about.

If we had more time (and a sitter for the kids) we would definitely check out the

  • white bean soup at  Marmalade
  • the fish tacos at Punto De Vista
  • El Jibarito and
  • St Germain

Leave a Comment · Labels: Food Fun Tagged: cafe, caficultura, carribean cherry, coffee, creole sauce, guanabana, guava, jose enrique, mallorca, mofongo, old san juan, pineapple, PR, puerto rico, quesitos, san juan, soursop

Banana Date Nut Bread

March 25, 2014

IMG_2408I bought quinoa a week ago. I still don’t have the guts to prepare it, out of fear of what happens to unfortunately too many of my experiments in healthy-food-ness. Make it. Eat some the first day. Then a day goes by: everyone opts for the other options in the fridge. Another day goes by: my mom brings over a vat of chicken curry. Another day goes by: take out time! By day 4, no one will be eating what they hadn’t eaten the past 4 days (my chia seed pudding is currently suffering that fate)! So while I procrastinate on the quinoa, I tried to make some healthier substitutions in my usual banana bread. After going through Mastering the Art of French Cooking, I was all like “yeah! butter! if french people can douse their food in it, why can’t we?”. Then I read an article that scared the pants off of me about saturated fats. So what to do?! There’s got to be a balance between the Paula Deen fried mac’n’cheese-wrapped-in-bacon death on a plate and quinoa/kale/green smoothie diet.IMG_2403So, here is my answer. Banana bread. I know bananas have a bad rap for the amount of sugar in them, but hey, they have potassium. That’s important, right? Personally, I’d rather eat natural foods with natural sugars (like coconut water) and vitamins/minerals than an artificially flavored protein shake to curb my appetite! So, on to this bread. Does it have sugar? Yes. But there’s fiber from the date and whole wheat flour. Does it have fat? Yes. But it’s coconut oil and supposedly the saturated fat in that is better for you. And nuts! Good fats that keep you full longer! I cut the amount of sugar from the original recipe by a 1/2 cup. If you’re rolling your eyes at me at this point, I’m ok with that. This isn’t a cake baked in a loaf pan that you can call a breakfast. It’s hearty. It tastes good. And you don’t have to feel guilty for having a slice. Have it with a glass of milk for a snack, or with coffee for breakfast.

Ingredients

  • 1/2 cup coconut oil
  • 3/4 cup sugar
  • 5 medium bananas, smashed
  • 2 eggs
  • 1/2 cup buttermilk
  • 1 cup whole wheat flour
  • 1 1/2 cups all purpose flour
  • 1 tsp salt
  • 1 tsp baking soda
  • 1/2 cup chopped, pitted dates
  • 1/2 cup chopped pecans

Directions

  1. Bring the buttermilk and eggs to room temperature: set the half cup of buttermilk out and let it come to room temperature while assembling the rest of the ingredients. Place the eggs in a bowl with lukewarm water (cold ingredients will cause the coconut oil to congeal).
  2. Preheat oven to 350 degrees Fahrenheit. Spray a 9x5in loaf pan with non-stick spray (or grease with butter).
  3. Combine coconut oil and sugar in a stand mixer and beat on medium speed until combined (or use any electric mixer) for about 2 minutes. Add the bananas, eggs, and buttermilk, one at a time until combined.
  4. In a separate bowl, whisk together the flours, salt, and baking soda. Slowly add to the wet ingredients with the mixer running, until combined.
  5. Turn off the mixer. Add the dates and pecans. Stir with a spatula or wooden spoon to combine (scraping off the sides and bottom).
  6. Bake in preheated oven for 1 hour 15 minutes (start checking with a toothpick at 1 hour 5 minutes. It should come out dry).

4 Comments · Labels: American/Mediterranean, Breakfast, Carb, Recipes Tagged: banana bread, bananas, bread, breakfast, buttermilk, coconut oil, dates, quick bread, snack, vegetarian, whole wheat flour

Caramel Cupcakes

March 17, 2014

IMG_2372 My sweet friend Rabia is expecting her second baby and one of the organizers of her baby shower, another long time friend, Nargis, tapped me to supply the cookies and cupcakes for the event! It was such a treat to experiment with new cupcake recipes, challenge myself with making sugar cookies shaped like books (theme was bring a book for baby), and contribute to such a lovely tablescape (made by Nargis!).IMG_2370Instead of doing the usual chocolate/vanilla selection, I decided to try a caramel cupcake recipe that’s been sitting on my shelf for years. It’s from a magazine from Fine Cooking entitled “Celebration Cakes” (that I think I got from a Lowe’s or Home Depot). If you’ve never worked with caramel, it might be a little tricky to get it right. But a little practice with caramel is so worth it for the world of concoctions you can make. The burnt sugar added some wonderful deep notes to the cupcake. And it came out moist and perfectly tender.IMG_2380 Along with the cupcakes, I made sugar cookies in the shape of books by slightly bending my square cookie cutter to a rhombus shape. And, because everything tastes better with chocolate, I applied a chocolate glaze made out of 10 tbsp butter and 10 oz of semi sweet chocolate chips (melted). I did the outline of the book with a ziploc bag with the tip cut. I filled in the “cover” by applying a dollop of the glaze and smoothing it out with the back of a spoon. I applied the “pages” with a simple powdered sugar/milk concoction. And the lettering – traditional buttercream. IMG_2375For the frosting, I used Ina Garten’s cream cheese frosting from her Flower Cupcakes, tinted in blue and pink. Recipe for the caramel cupcakes from Fine Cooking below. Their suggested pairing is a butterscotch frosting. If you’d like for me to share that recipe, just let me know. Enjoy!

Ingredients

  • 1/3 cup plus 3/4 cup granulated sugar
  • 1 1/3 cups unbleached all-purpose flour
  • 1/2 tsp baking powder
  • 1/4 tsp salt
  • 1/2 cup (1 stick) unsalted butter at room temperature
  • 2 large eggs at room temperature
  • 1 tsp vanilla extract

Directions

  1. Preheat oven to 350 degree F and line a standard muffin pan with liners.
  2. Put 1/3 cup sugar in a shallow skillet and heat over medium high heat. This takes several minutes so while that goes, bring 1/3 cup of water to boil in a small saucepan. Keep warm. Once the sugar starts to melt, swirl it around every once in a while to help it along. Once it becomes a deep amber color, turn off the heat and carefully pour the water into it. It will sizzle so stand back. The caramel will harden so return to a medium high heat and stir with a wooden spoon to dissolve the caramel.
  3. Spray a glass measuring cup with non stick spray (I don’t know if this step is necessary, but I did so for good measure). Pour enough of the liquid caramel to a 1/2 cup measure. Let cool until warm.
  4. Sift the flour, baking powder, and salt into a small bowl. In your stand mixer, or in a large bowl, beat the butter on medium speed for 30 to 60 seconds. With the mixer running, slowly add the 3/4 cup sugar. Beat for about 1 minutes, scraping down the bowl as necessary. Add eggs, one at a time, beating for 60 seconds after each addition. Scrape down the bowl, add vanilla and continue beating. Switch to low speed and add 1/3 of the dry ingredients. Follow up with 1/2 of the liquid caramel. Add another third of the dry ingredients, second half of the caramel, and finally the last third of the dry ingredients.
  5. Divide the batter evenly. I like to use an ice cream scoop for this. Bake for 18 to 20 minutes, until a toothpick comes out clean.
  6. Wait to completely cool before frosting.

4 Comments · Labels: American/Mediterranean, Dessert, Recipes Tagged: baby shower, buttercream, caramel, caramel cupcakes, cream cheese frosting, cupcakes, dessert, icing, party, party favors, party ideas, sugar cookies, tablescape

Easy Fried Rice

March 10, 2014

IMG_6406 Ever since I started cooking for myself, my taste for takeout has rapidly declined (pizza and sushi exempt). Take chinese takeout for example: when I was a kid, it was the ultimate treat. My Friday lunch if I used my allowance wisely. I’m not sure what you know about Bengali moms, but they are pretty militant in their meal regiment. Rice, vegetable saute/bhorta, some kind of protein curried, and daal. That is what you have for dinner, every night. Without fail. Every bengali kid who grew up here knows the struggle to have something different on the table (first world problems, I know). And the retorts that follow: “Eh? Pizza? How is that any kind of food? What with all that cheese…and they wonder why American kids are so fat!”. This is usually said as one or more uncles are stuffing their faces with beef or goat curry and are working away at a Mt Everest sized mound of rice on their plate.

Anywho, takeout became less of a treat as I started making things like fried rice, fried chicken or tacos at home. The takeout versions just seemed laden with MSG, salt and grease. I used to be a little incredulous of Rachel Ray always insisting that the food you cook at home is so much better than takeout because you control what goes in there. But once you wean your taste buds of those noxiously high amounts of salt and fat, you can appreciate well made food. Food that someone didn’t just throw salt and fat at to make taste good. Rather, food that took time and thought to cook. Tasting along the way to make sure everything came together at the end.

IMG_6411Not to say that this recipe doesn’t include oil or sodium. I make mine with light olive oil (as opposed to extra virgin) and soy sauce, along with fresh garlic, ginger powder, and a generous serving of sriracha afterwards. It’s very versatile though: use any leftover meat you may have. And it’s quick and easy enough for a weeknight meal. You can use any combination of vegetables you like, as long as there are some root vegetables (onions, carrot, celery, etc.) along with corn, peas or even zucchini. For the protein, you can substitute eggs, small cubes of beef, shrimp or even tofu. And the cilantro is optional (I would put cilantro on everything if I could).

Ingredients

  • 1 cup short grain rice
  • 3 tbsp olive oil or vegetable oil
  • 1 1/2 cups mixed root vegetables, chopped small, comparable to the size of peas (I used onions, carrots and green peppers)
  • 2 cloves garlic, minced
  • 1/4 tsp ginger powder
  • 2 tbsps soy sauce
  • a pinch of red pepper flakes (optional)
  • 1 cup cooked chicken, cubed (if using left over curried chicken, rinse under water to get rid of the spices)
  • 1/4 cup frozen peas
  • 1/4 cup frozen corn
  • a handful of cilantro, chopped

Directions

  1. In a small saucepan or pot, rinse the rice with cold water. Then add water to cover (the water should cover the rice by at least an inch). Bring to a boil over high heat. Reduce heat to medium while preparing the vegetables.
  2. In a wok or large skillet, heat the oil over medium high heat. Add the vegetables and let them soften (about 5 minutes depending on how big you cut them). Add garlic, ginger, soy sauce and red pepper flakes. Reduce heat to medium.
  3. Working quickly, and keeping an eye on your vegetables so they don’t burn, drain the rice in a colander. Add to vegetables. Add chicken and frozen vegetables. Combine over medium heat. Be sure to break up any big chunks of rice (short grain rice is very starchy). Cook until frozen vegetables are heated through. Top with cilantro and taste for seasoning.
  4. Serve with Sriracha or any hot sauce of your liking.

Leave a Comment · Labels: Carb, Dinner, Main, Recipes Tagged: asian, budget friendly, chinese, easy meal, fried rice, frozen vegetables, meat, quick and easy dinner, quick meal, rice, sriracha, vegetables, weeknight meal

Coconut Egg Curry (Deem Bhuna)

February 26, 2014

IMG_2326This weekend was a welcome respite from the bitter cold of the past few months. Temperatures soared to the 50s (watch out LA, we’re catching up). I refused to wear socks…despite that fact that all the snow hadn’t fully melted. We took it all in. Enjoyed our walks instead of rushing from building to car to store then back.

But now the week has begun and and with it, freezing temps. So you can imagine my efforts to avoid multiple trips to the store. I’m pulling out all the stops to use up pantry ingredients. And I know how my readers love a CHEAP, QUICK and DELICIOUS weeknight meal.IMG_2322This doesn’t look like your usual curry (for lack of liquid). This type of dish is called a bhuna: where the liquids are allowed to evaporate for the most part, leaving a concentrated flavor enhanced usually by a large amount of caramelized onions. Most Bengalis would leave a dish like this for special occasions, typically shunning the high amount of cholesterol by the egg and coconut milk combination. Except now, according to recent studies, the cholesterol/fat found in both is good for you (but perhaps not for South Asian populations??). Who knows what to believe anymore with studies constantly disproving what we thought to be true for so long. I’m going to go with my usual wisdom: enjoy in moderation!

Ingredients

  • 6 eggs
  • 1/4 cup olive oil or vegetable oil
  • 1 medium onion, thinly sliced
  • 1 12 oz can coconut milk
  • 3 cloves garlic, minced
  • 1/4 tsp ground ginger
  • 3/4 tsp cumin
  • 3/4 tsp coriander
  • a pinch of turmeric (optional)
  • 1 bay leaf
  • 2 green chilis (or more if you like)
  • 1 tsp salt (or to taste
  • 1/2 tsp black pepper (or white pepper for a more mild heat)

Directions

  1. Place the eggs gently into a small saucepan and add enough water to cover the eggs. Bring to a boil over hight heat, then put the lid on and turn off the heat. Let sit for 6 minutes. Then run under cold water to help cool down enough to peel. PEELING TIP: crack on the counter and roll around. That helps loosen the shell.
  2. In a small nonstick saute pan, heat a tablespoon of oil over high heat. While it heats, toss the eggs with a pinch of turmeric and salt. Once hot, add the peeled eggs and let it sear on one side, after 30 seconds or so, stir to brown the flip side (do the best you can with this). Remove from heat.
  3. In a large saute pan, heat the remaining oil over medium high heat. Add the onions and saute until they are brown around the edges (8 to 10 minutes). Add the coconut milk, garlic, ginger, cumin, coriander, turmeric (if using), bay leaf, chilis, salt and pepper.  Let it simmer over a medium heat for about 5 minutes. Add the eggs, toss to combine, and check for seasoning.

VARIATIONS

Simple bhuna: ditch the coconut milk for water. Increase turmeric to 1/2 tsp.

Tomato and cilantro: use 1 cup water instead of coconut milk and add 1 tomato, diced. Garnish with 1/4 cup chopped cilantro.

Korma: Ditch the turmeric. Use milk or half and half in lieu of coconut milk. Garnish with raisins and slivered almonds.


1 Comment · Labels: Bengali, Main, Protein, Recipes Tagged: bengali, cheap, coconut curry sauce, coconut milk, curry, deem bhuna, egg, egg curry, eggs, gluten free, low budget, vegan, vegetarian, weeknight meal

  • Newer Entries
  • 1
  • …
  • 9
  • 10
  • 11
  • 12
  • 13
  • …
  • 17
  • Previous Entries
American, Bangladeshi. Savory, sweet. I don't discriminate and neither should you.

Most recently…

Load More...
Follow on Instagram

Social

Subscribe to Blog via Email

Enter your email address to subscribe to this blog and receive notifications of new posts by email.

Tags

appetizer beef bengali breakfast butter cake caramel chicken chocolate chocolate chips cilantro clean eating coconut comfort food cookies dessert dinner entertaining fall fruit ganache gluten free halal healthy homemade honest chops honest creations iftar italian pasta pastry pistachio quick and easy dinner ramadan recipe side side dish south asian spinach vegan vegetables vegetarian weeknight dinner weeknight meal whipped cream

Theme by 17th Avenue · Powered by WordPress & Genesis