Kitchen3N

Recipes and food fun from Apt 3N

  • About
  • Gallery
  • Recipes

Raspberry Swiss Meringue Buttercream

November 30, 2017

img_0488 
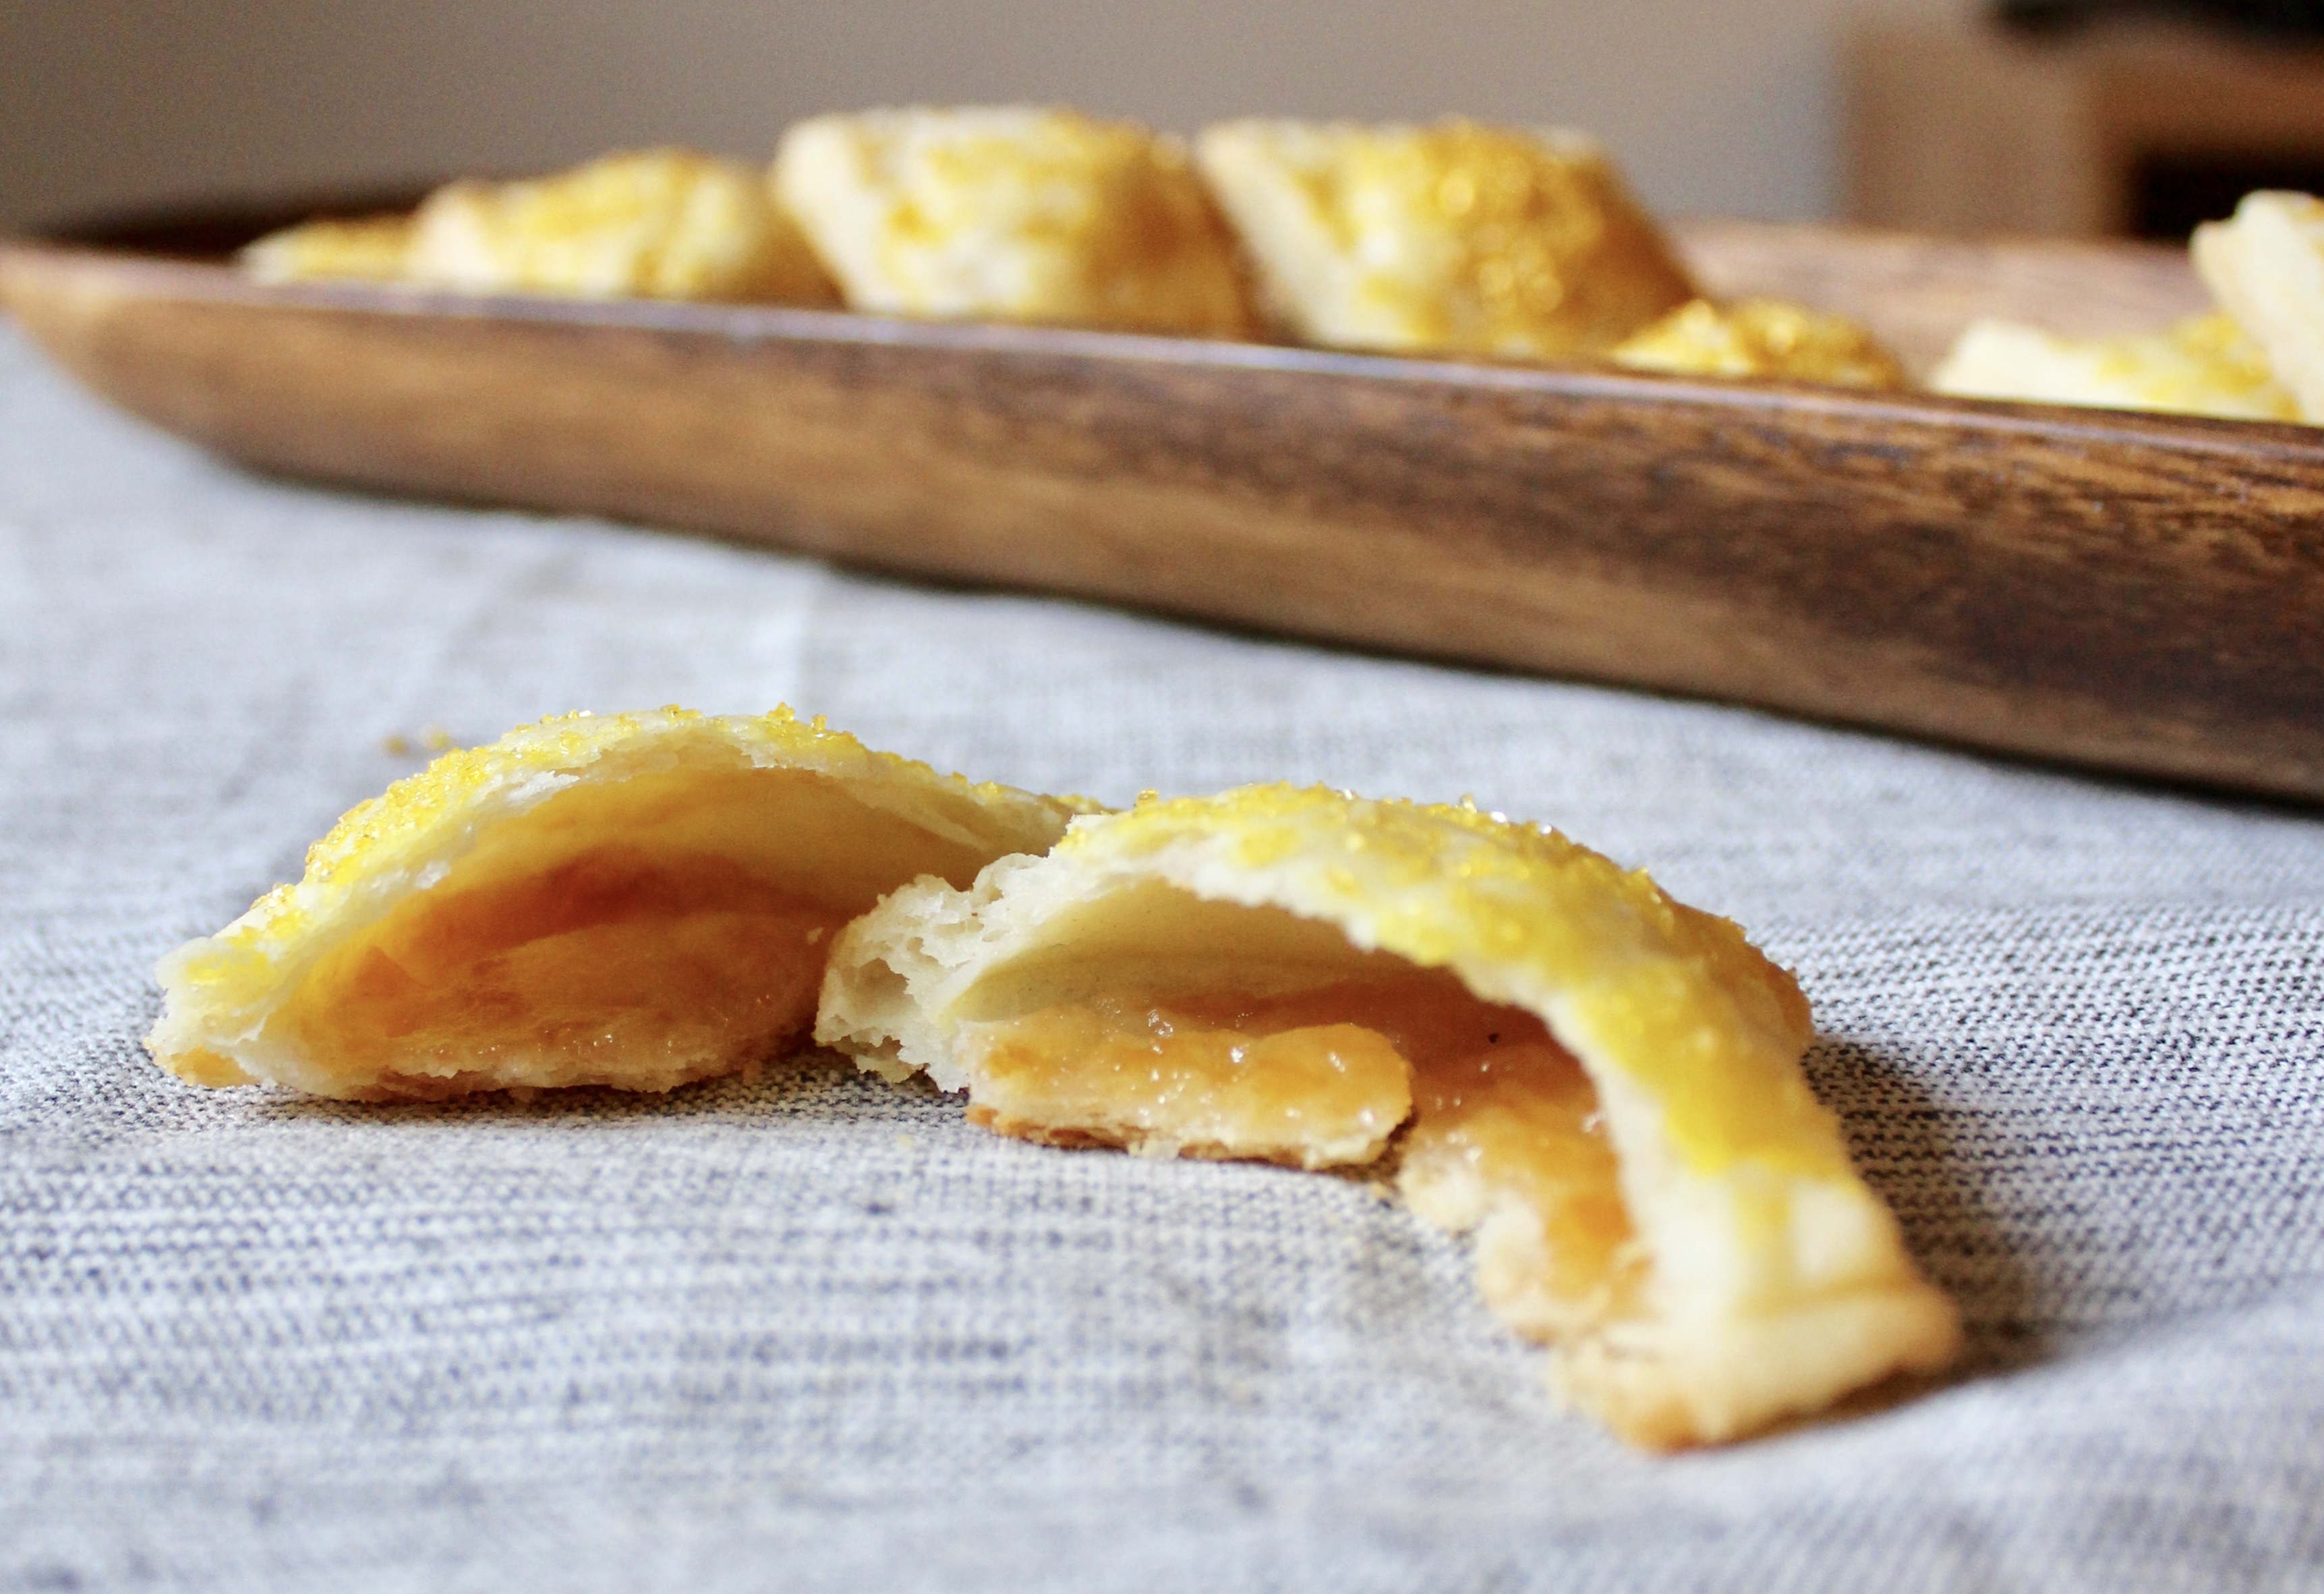
I recall as a kid, I would get visibly angry if upon cutting into a cake at someone’s birthday party, the interior revealed a pale cake with fruit wedged between the layers. I mean c’mon! Save the fruits for the healthy afterschool snack. If I’m dressing up and buying you a present, the least you can do is serve up some decadent chocolately goodness. I mean as I kid I wasn’t on the hunt for swiss chocolate or anything, heck I’d be happy if they served the Entenmann’s double chocolate cake over any of those cakes from my childhood. The one exception I make: raspberries. But only when smothered in chocolate, no less. Chocolate and raspberry will forever be one of my favorite flavor combinations. fullsizeoutput_6a2a
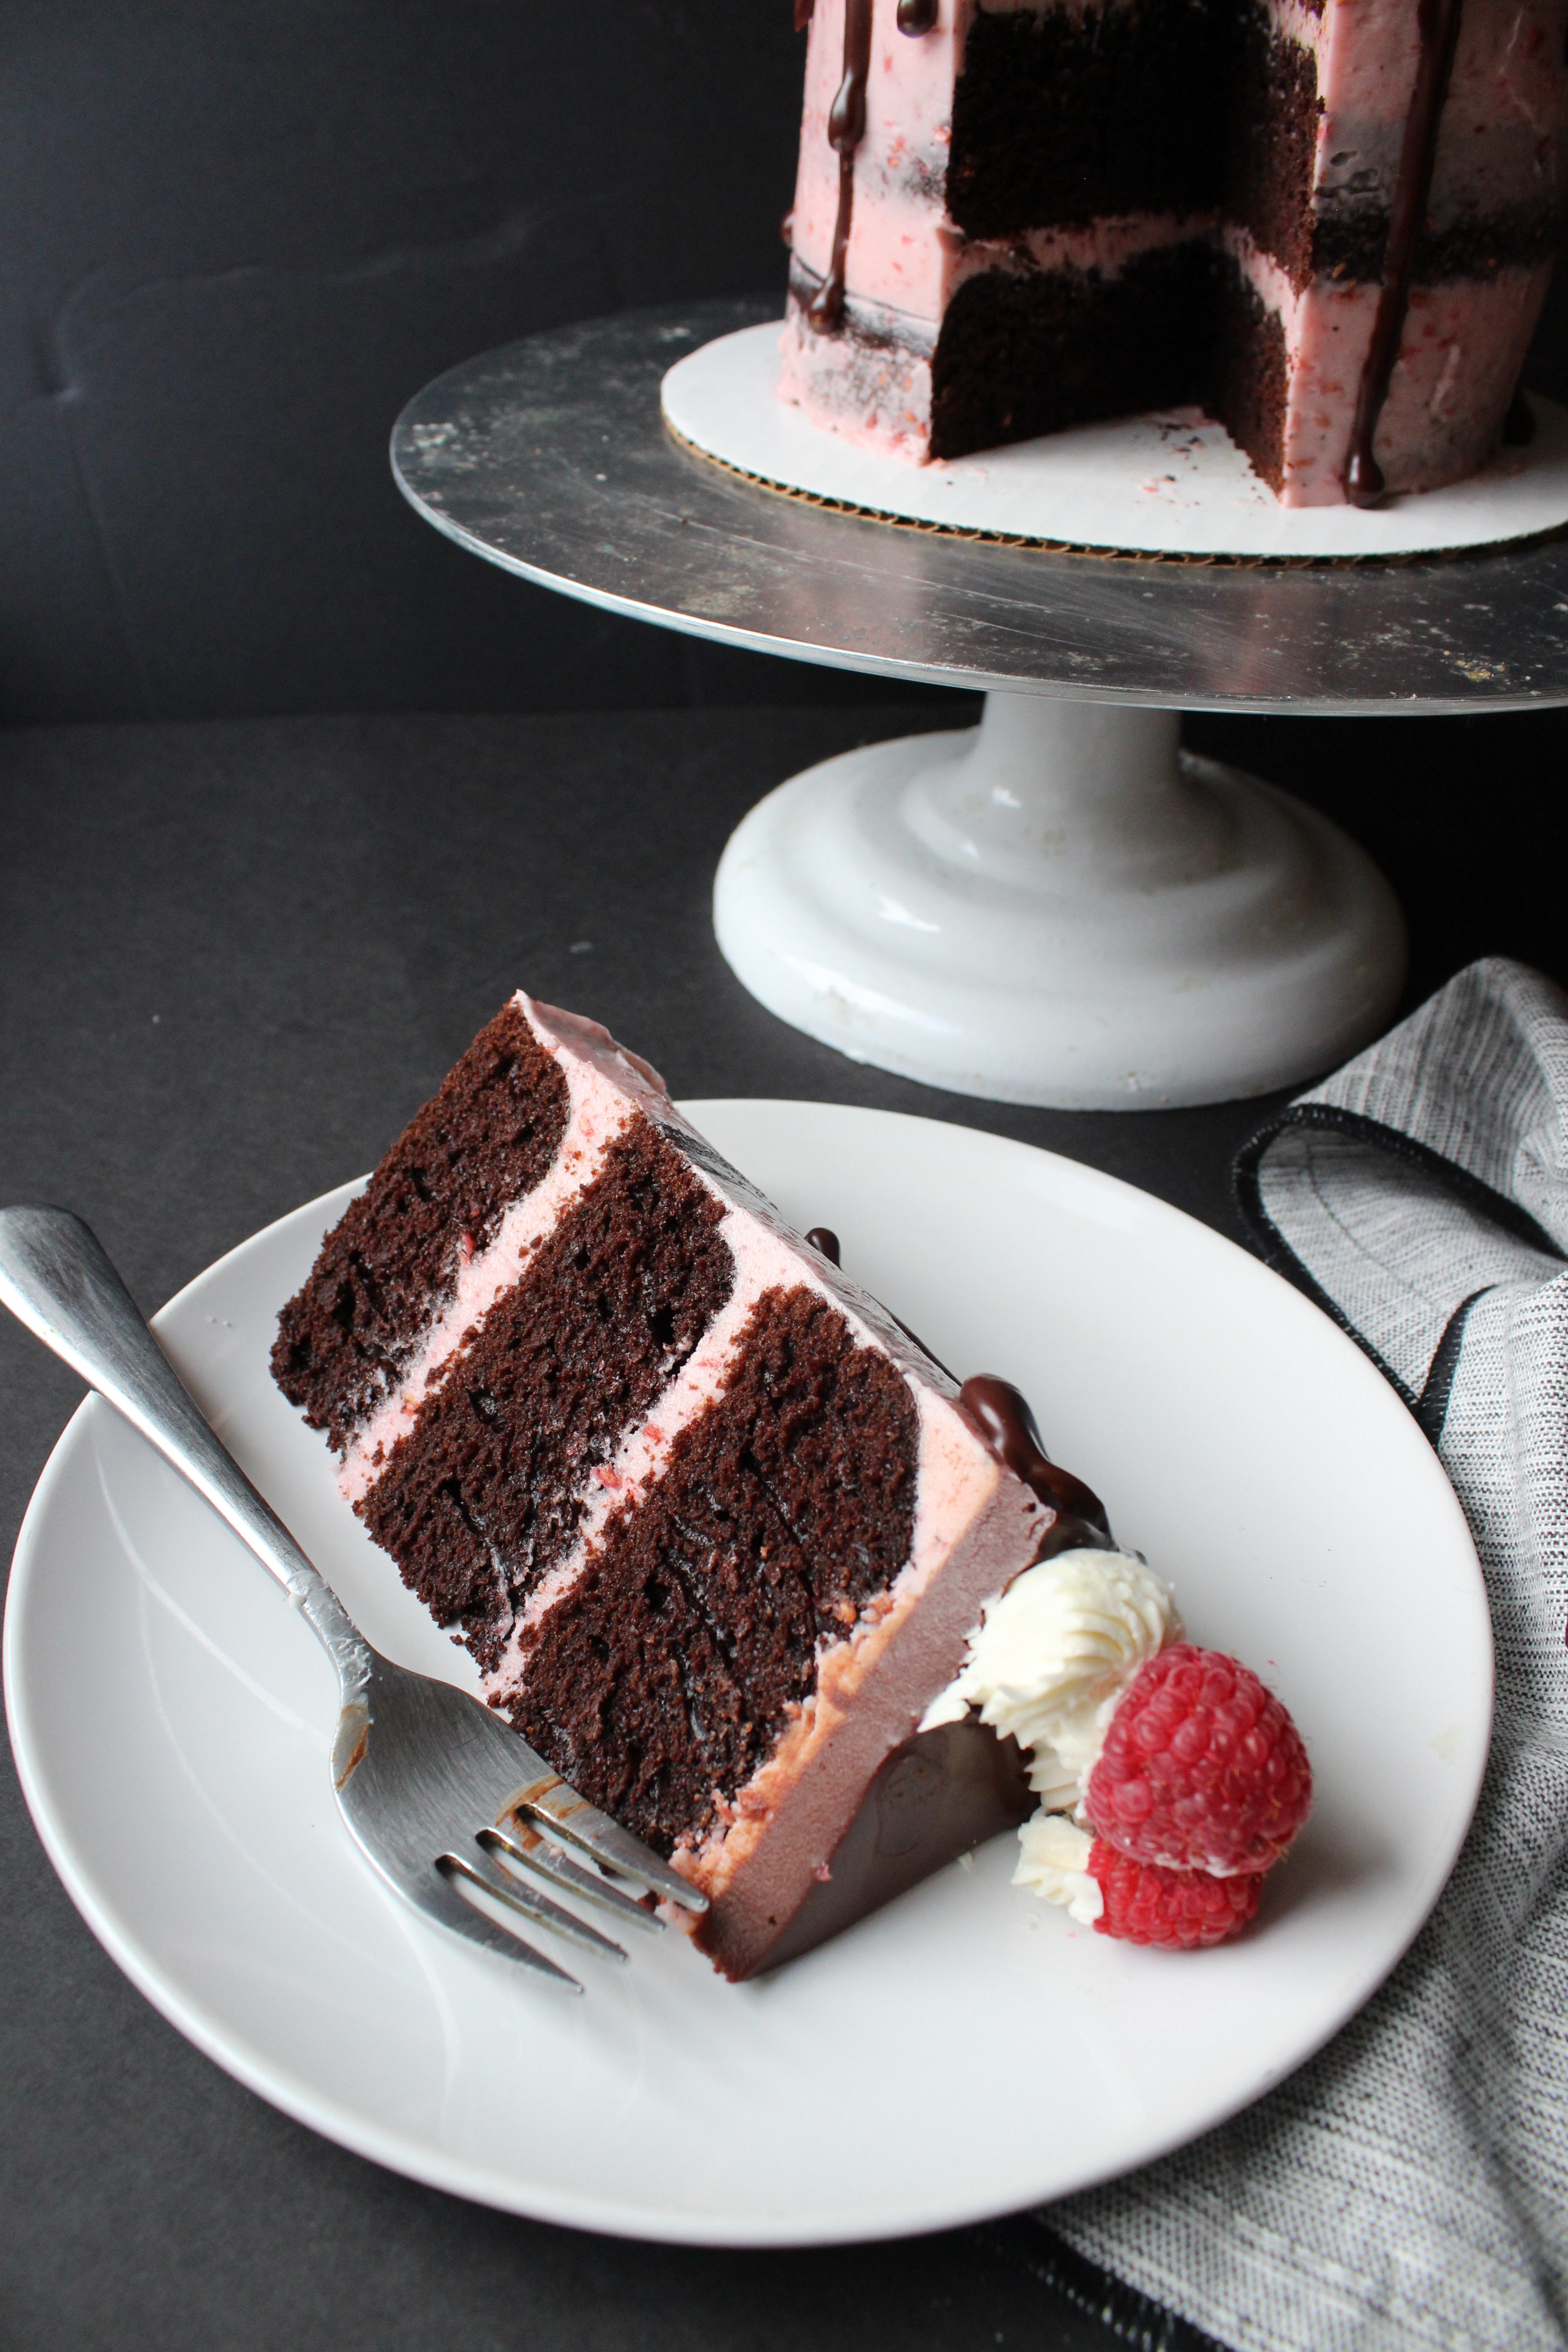
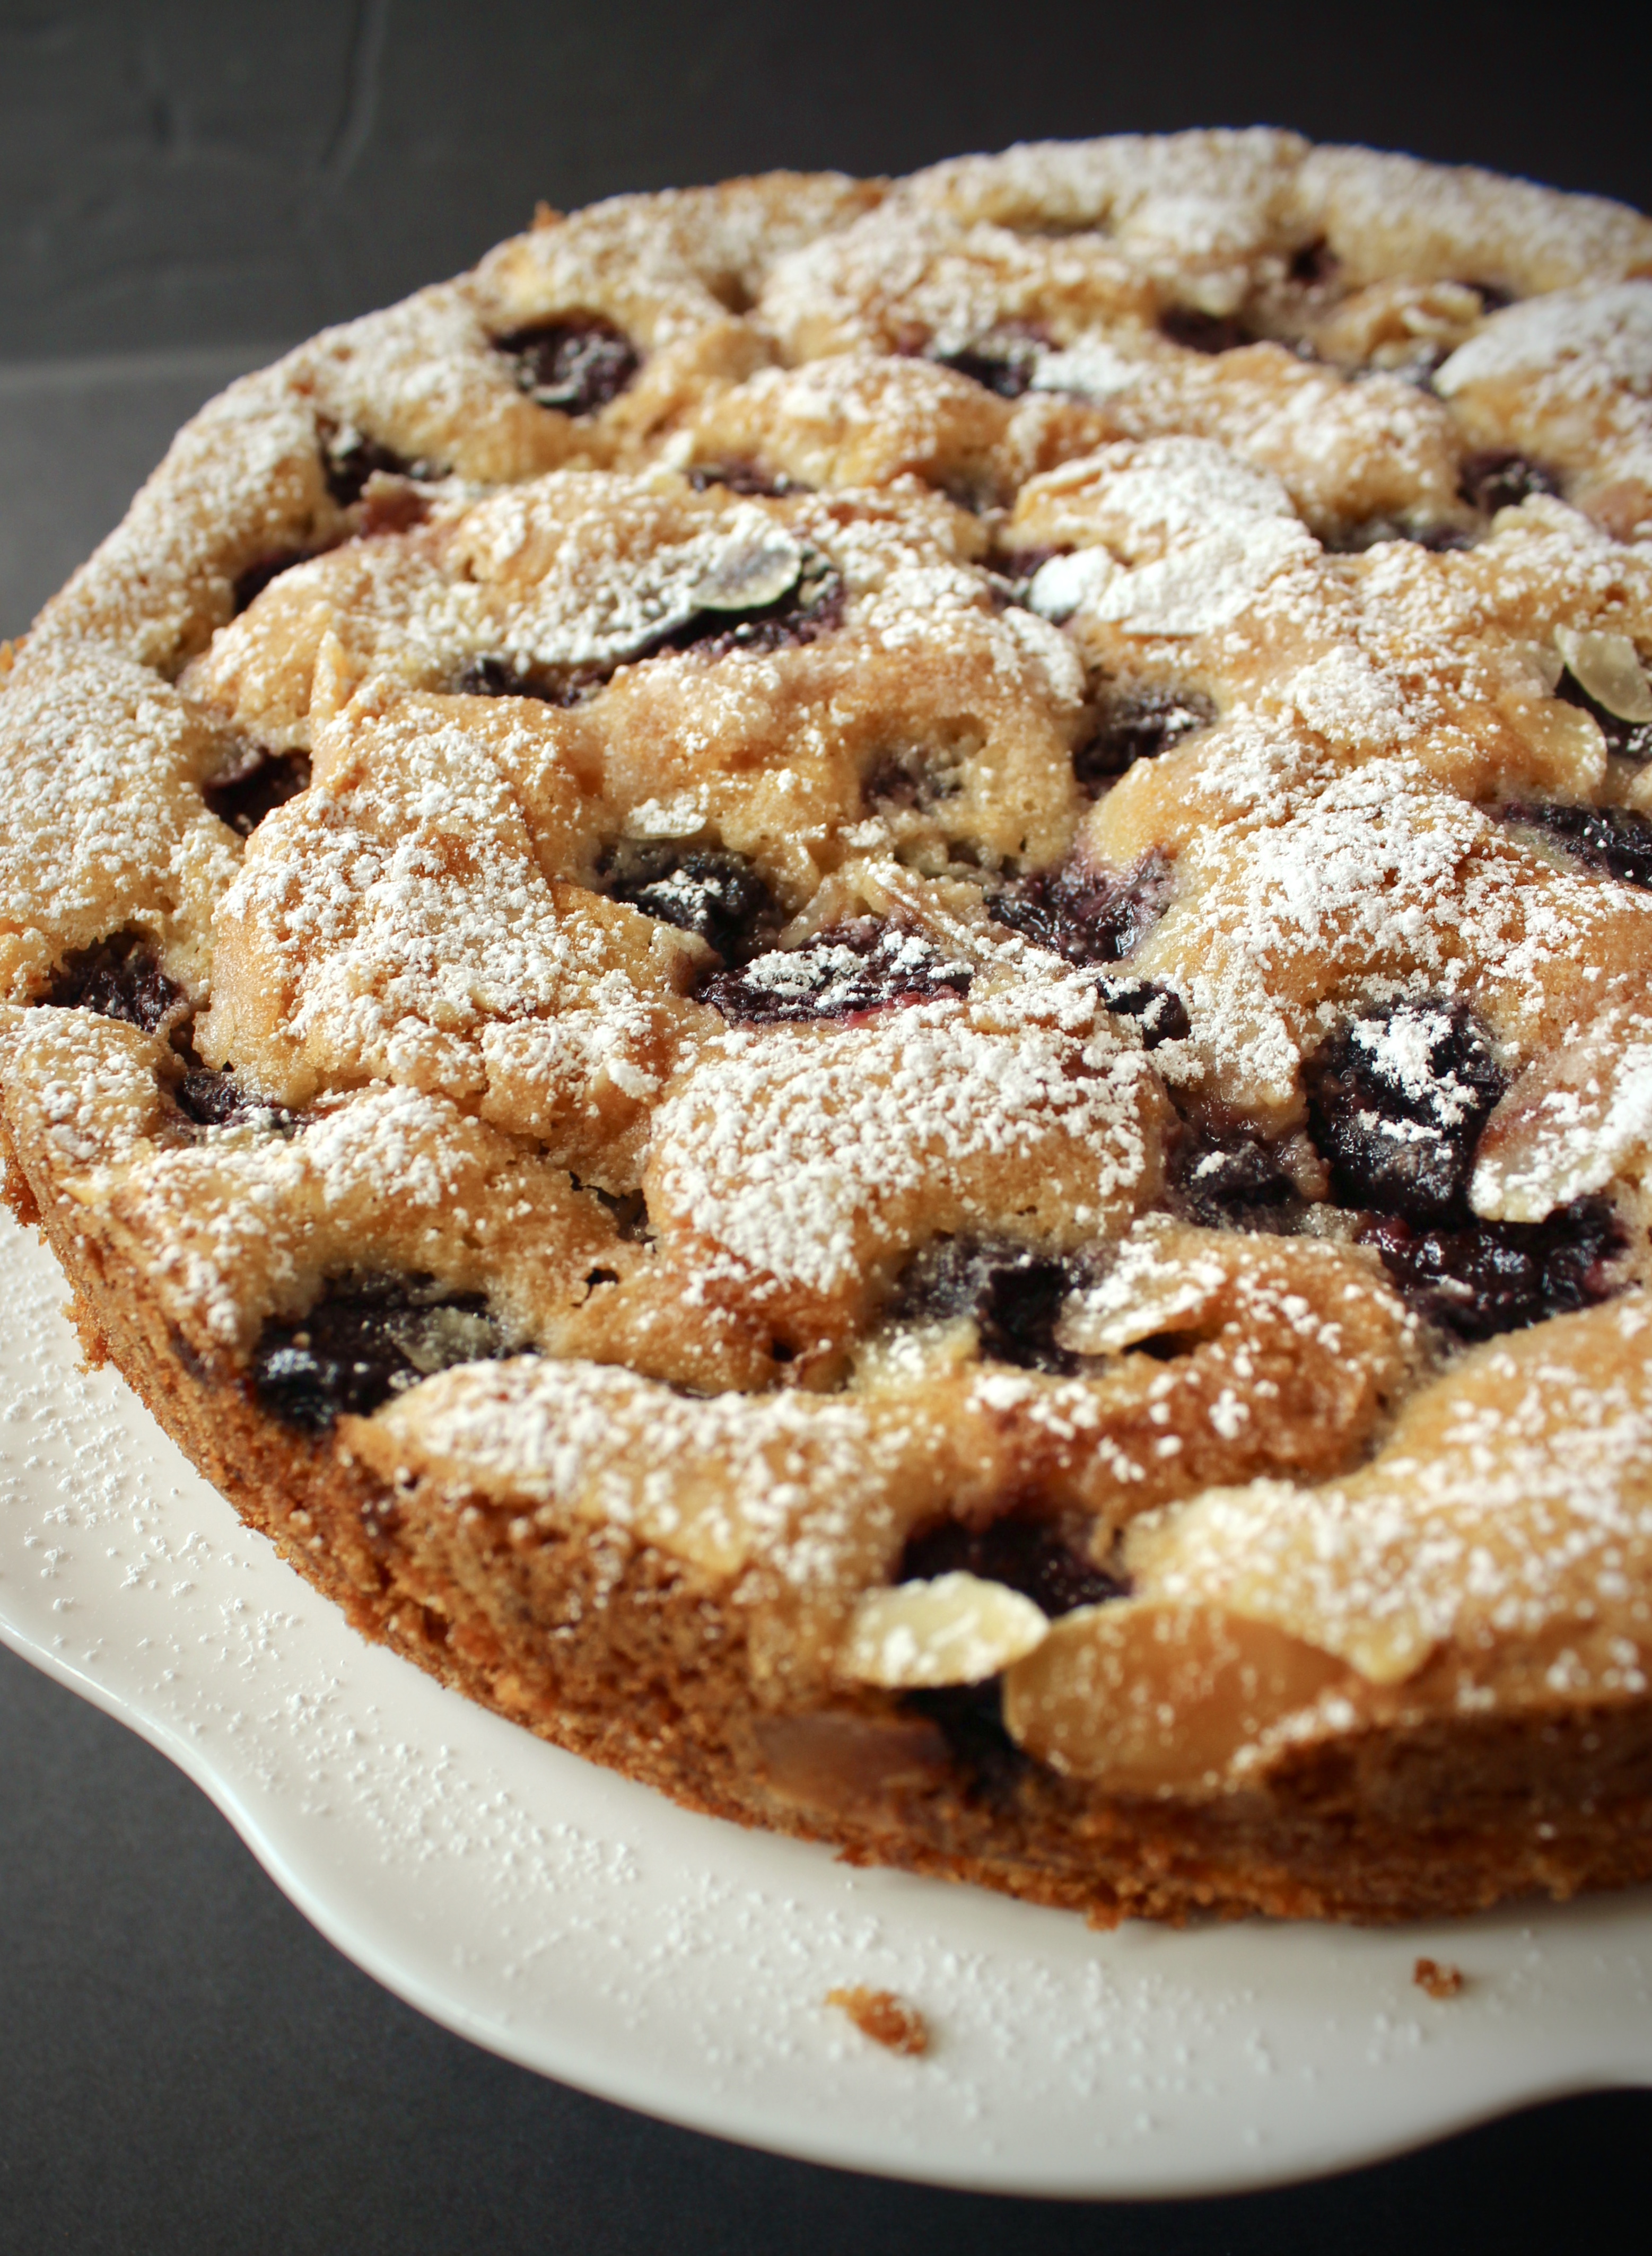
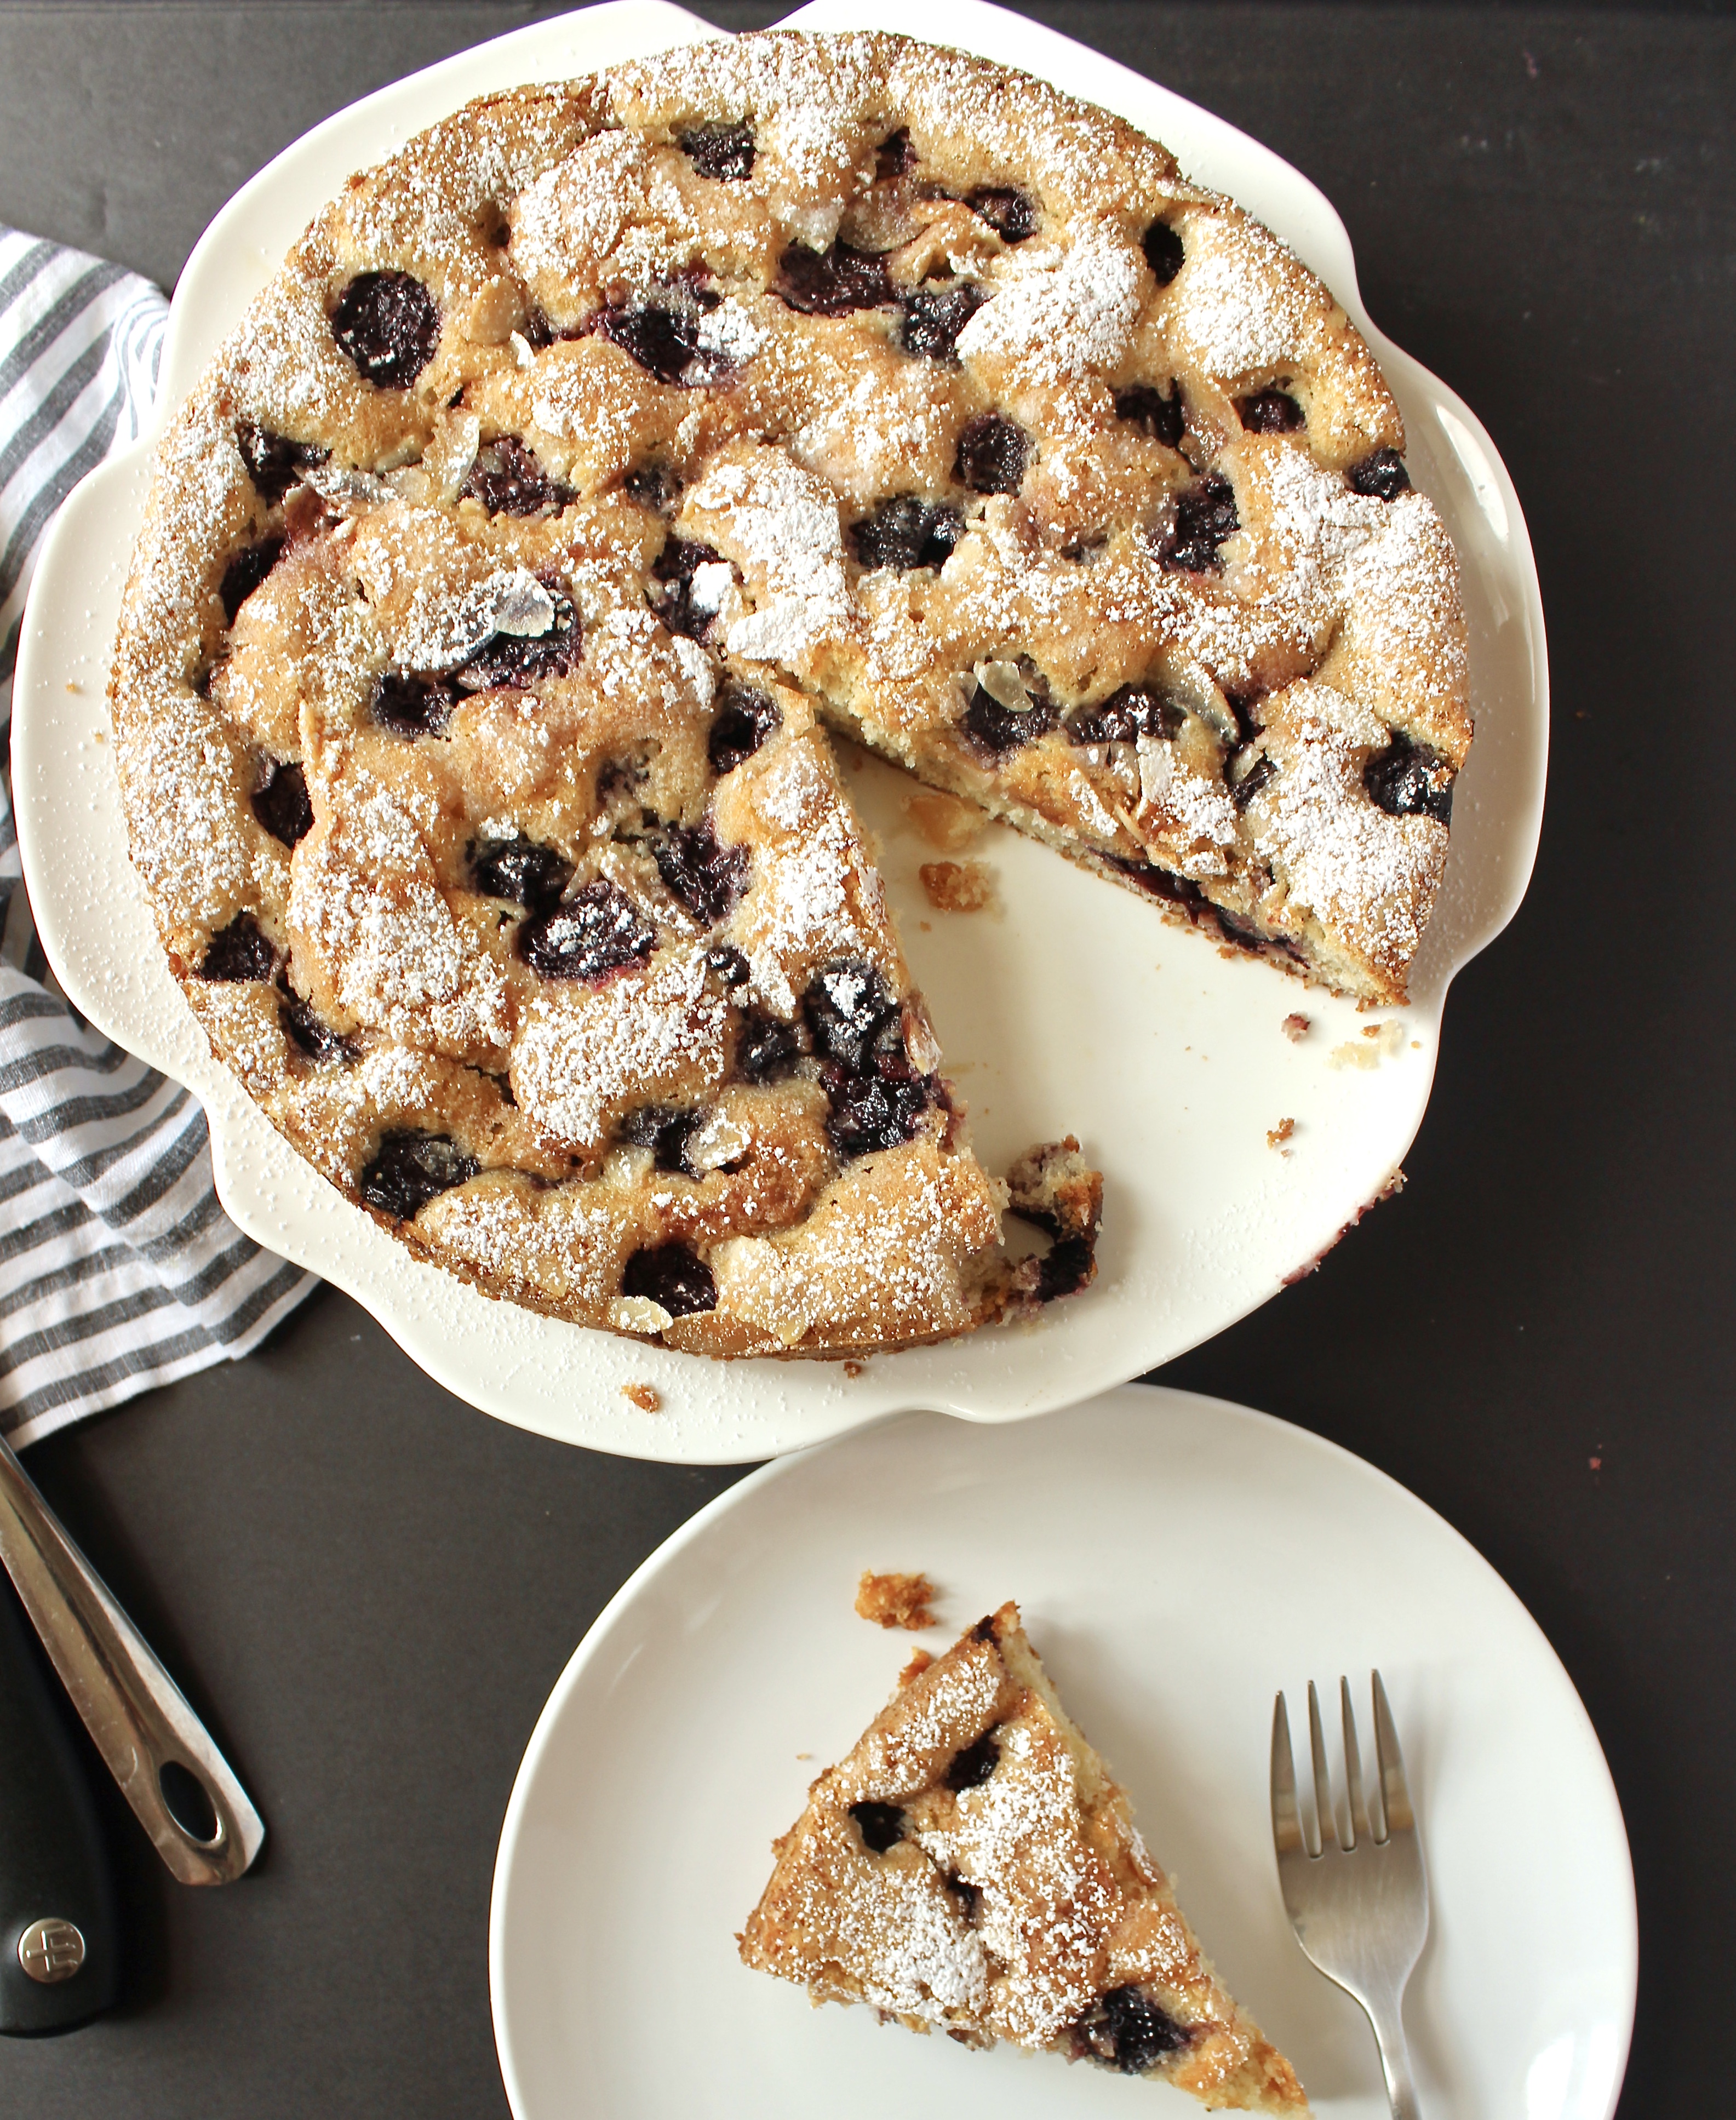
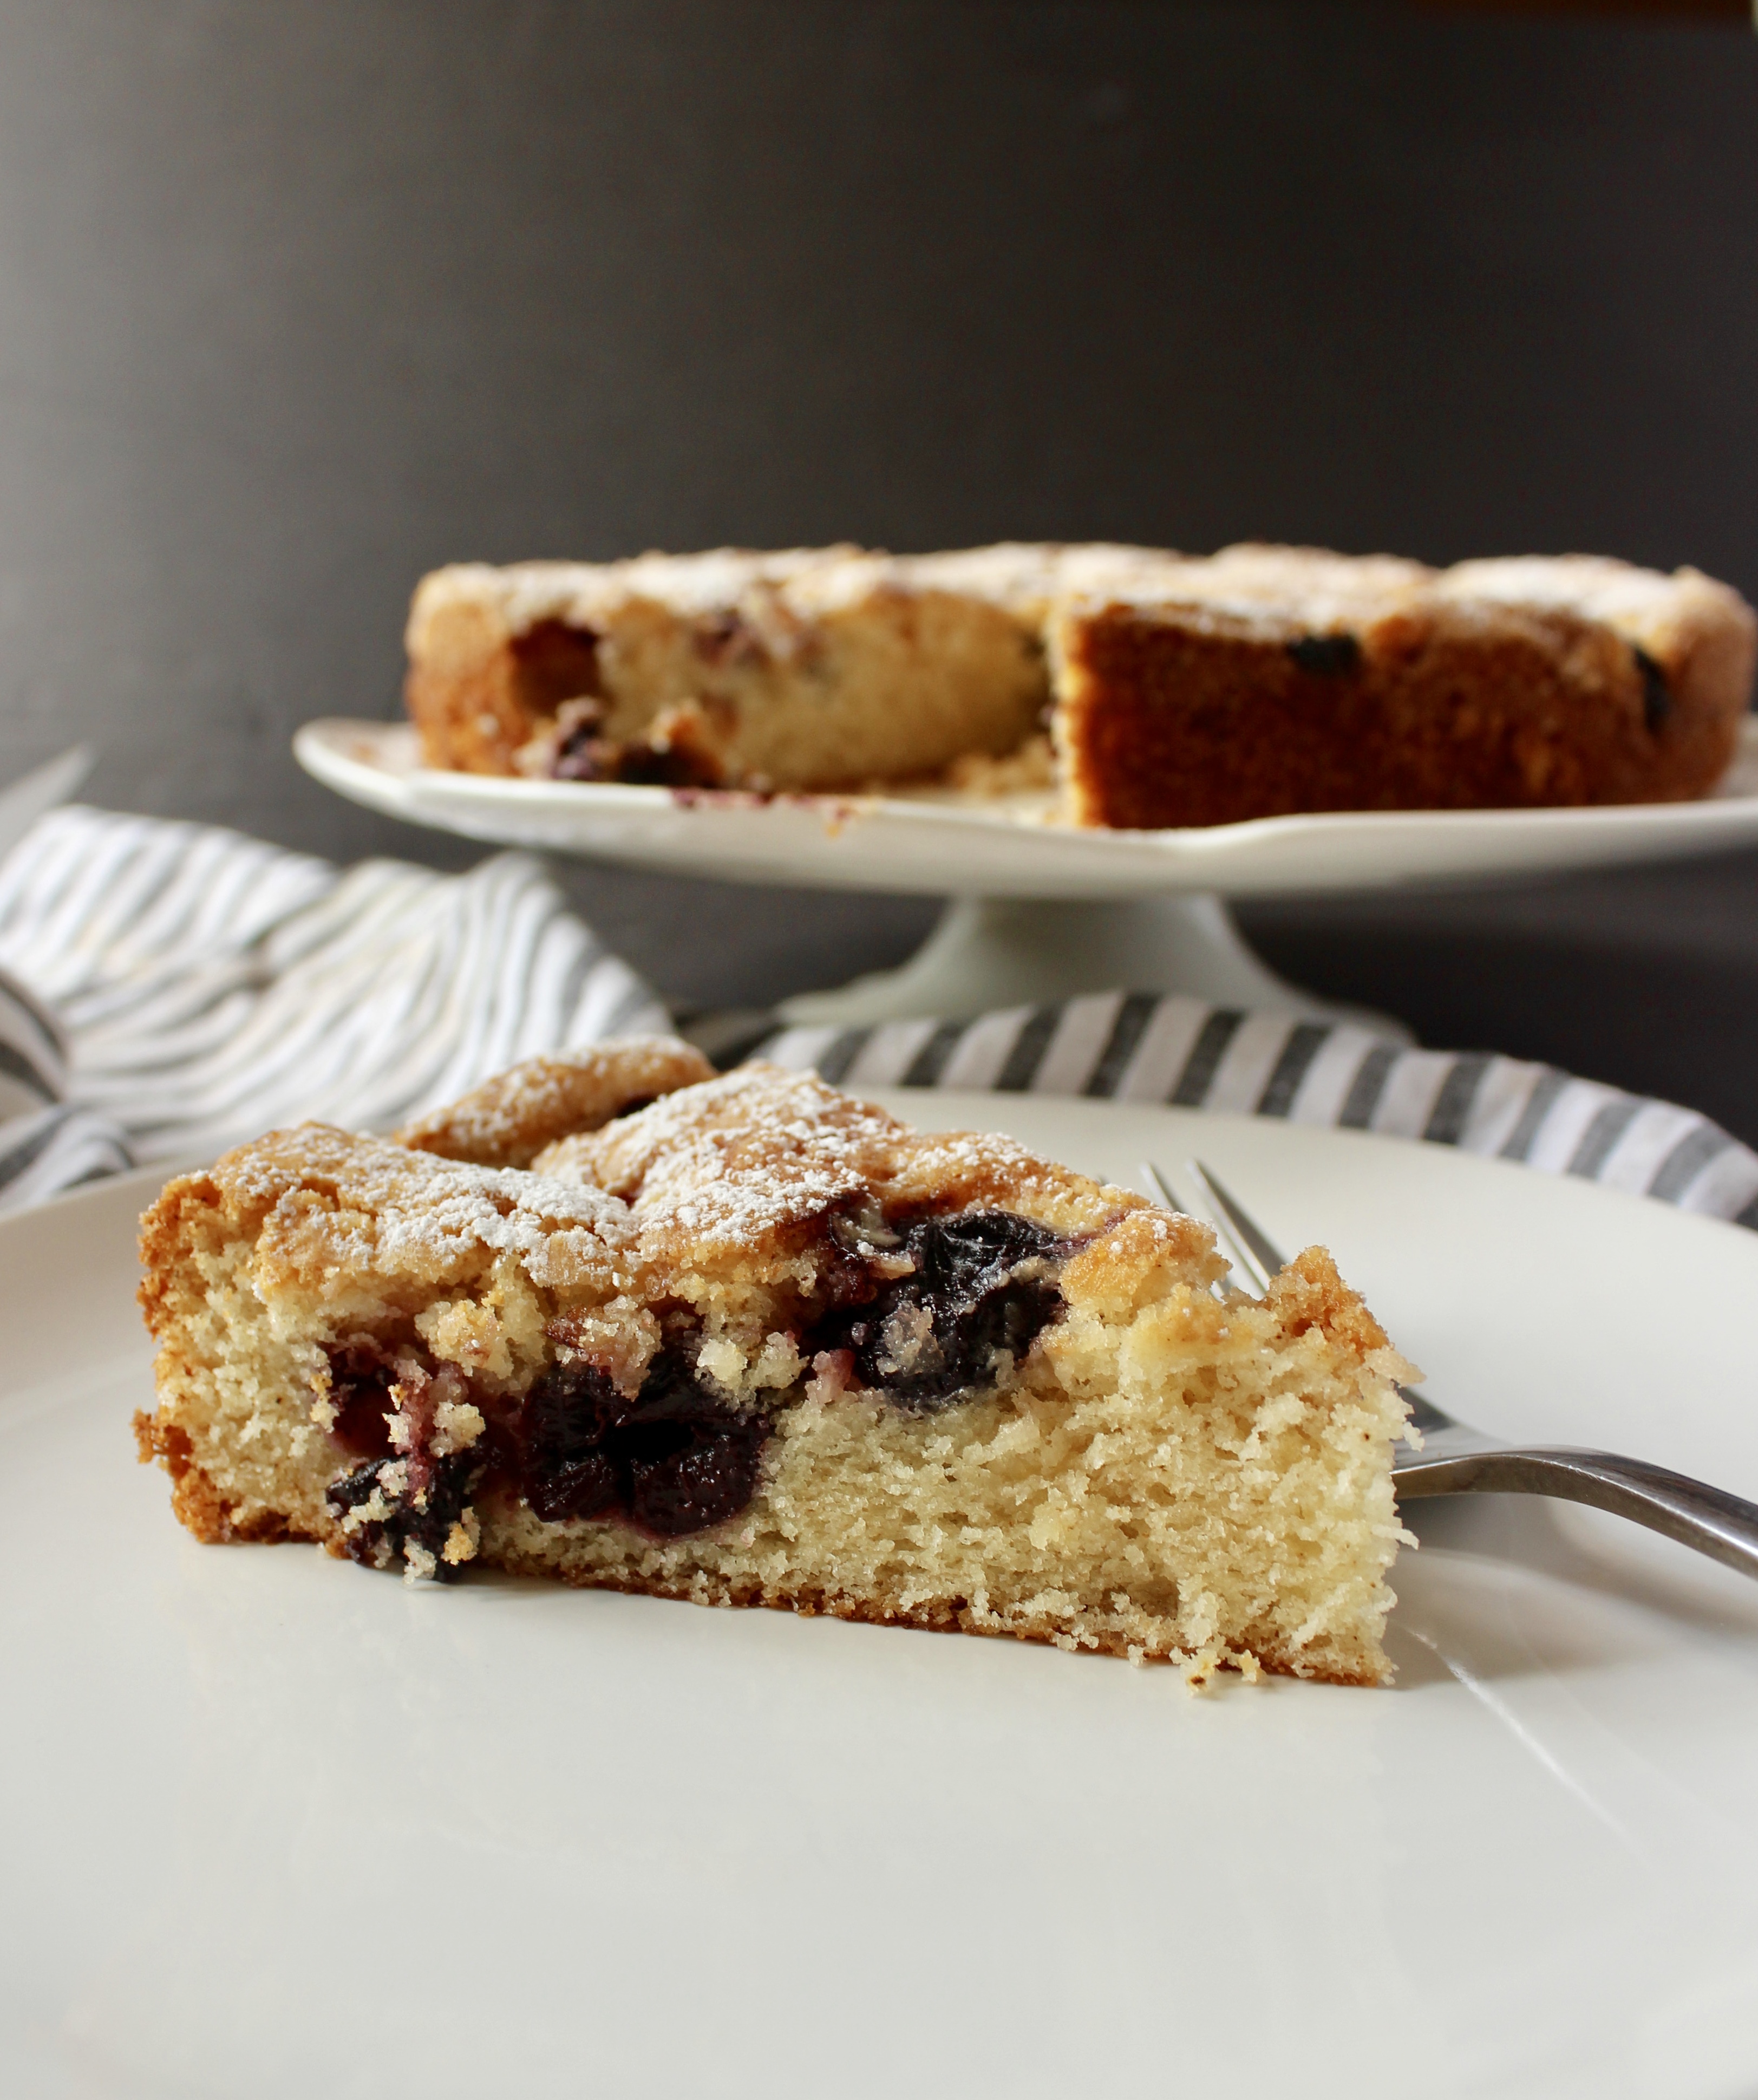
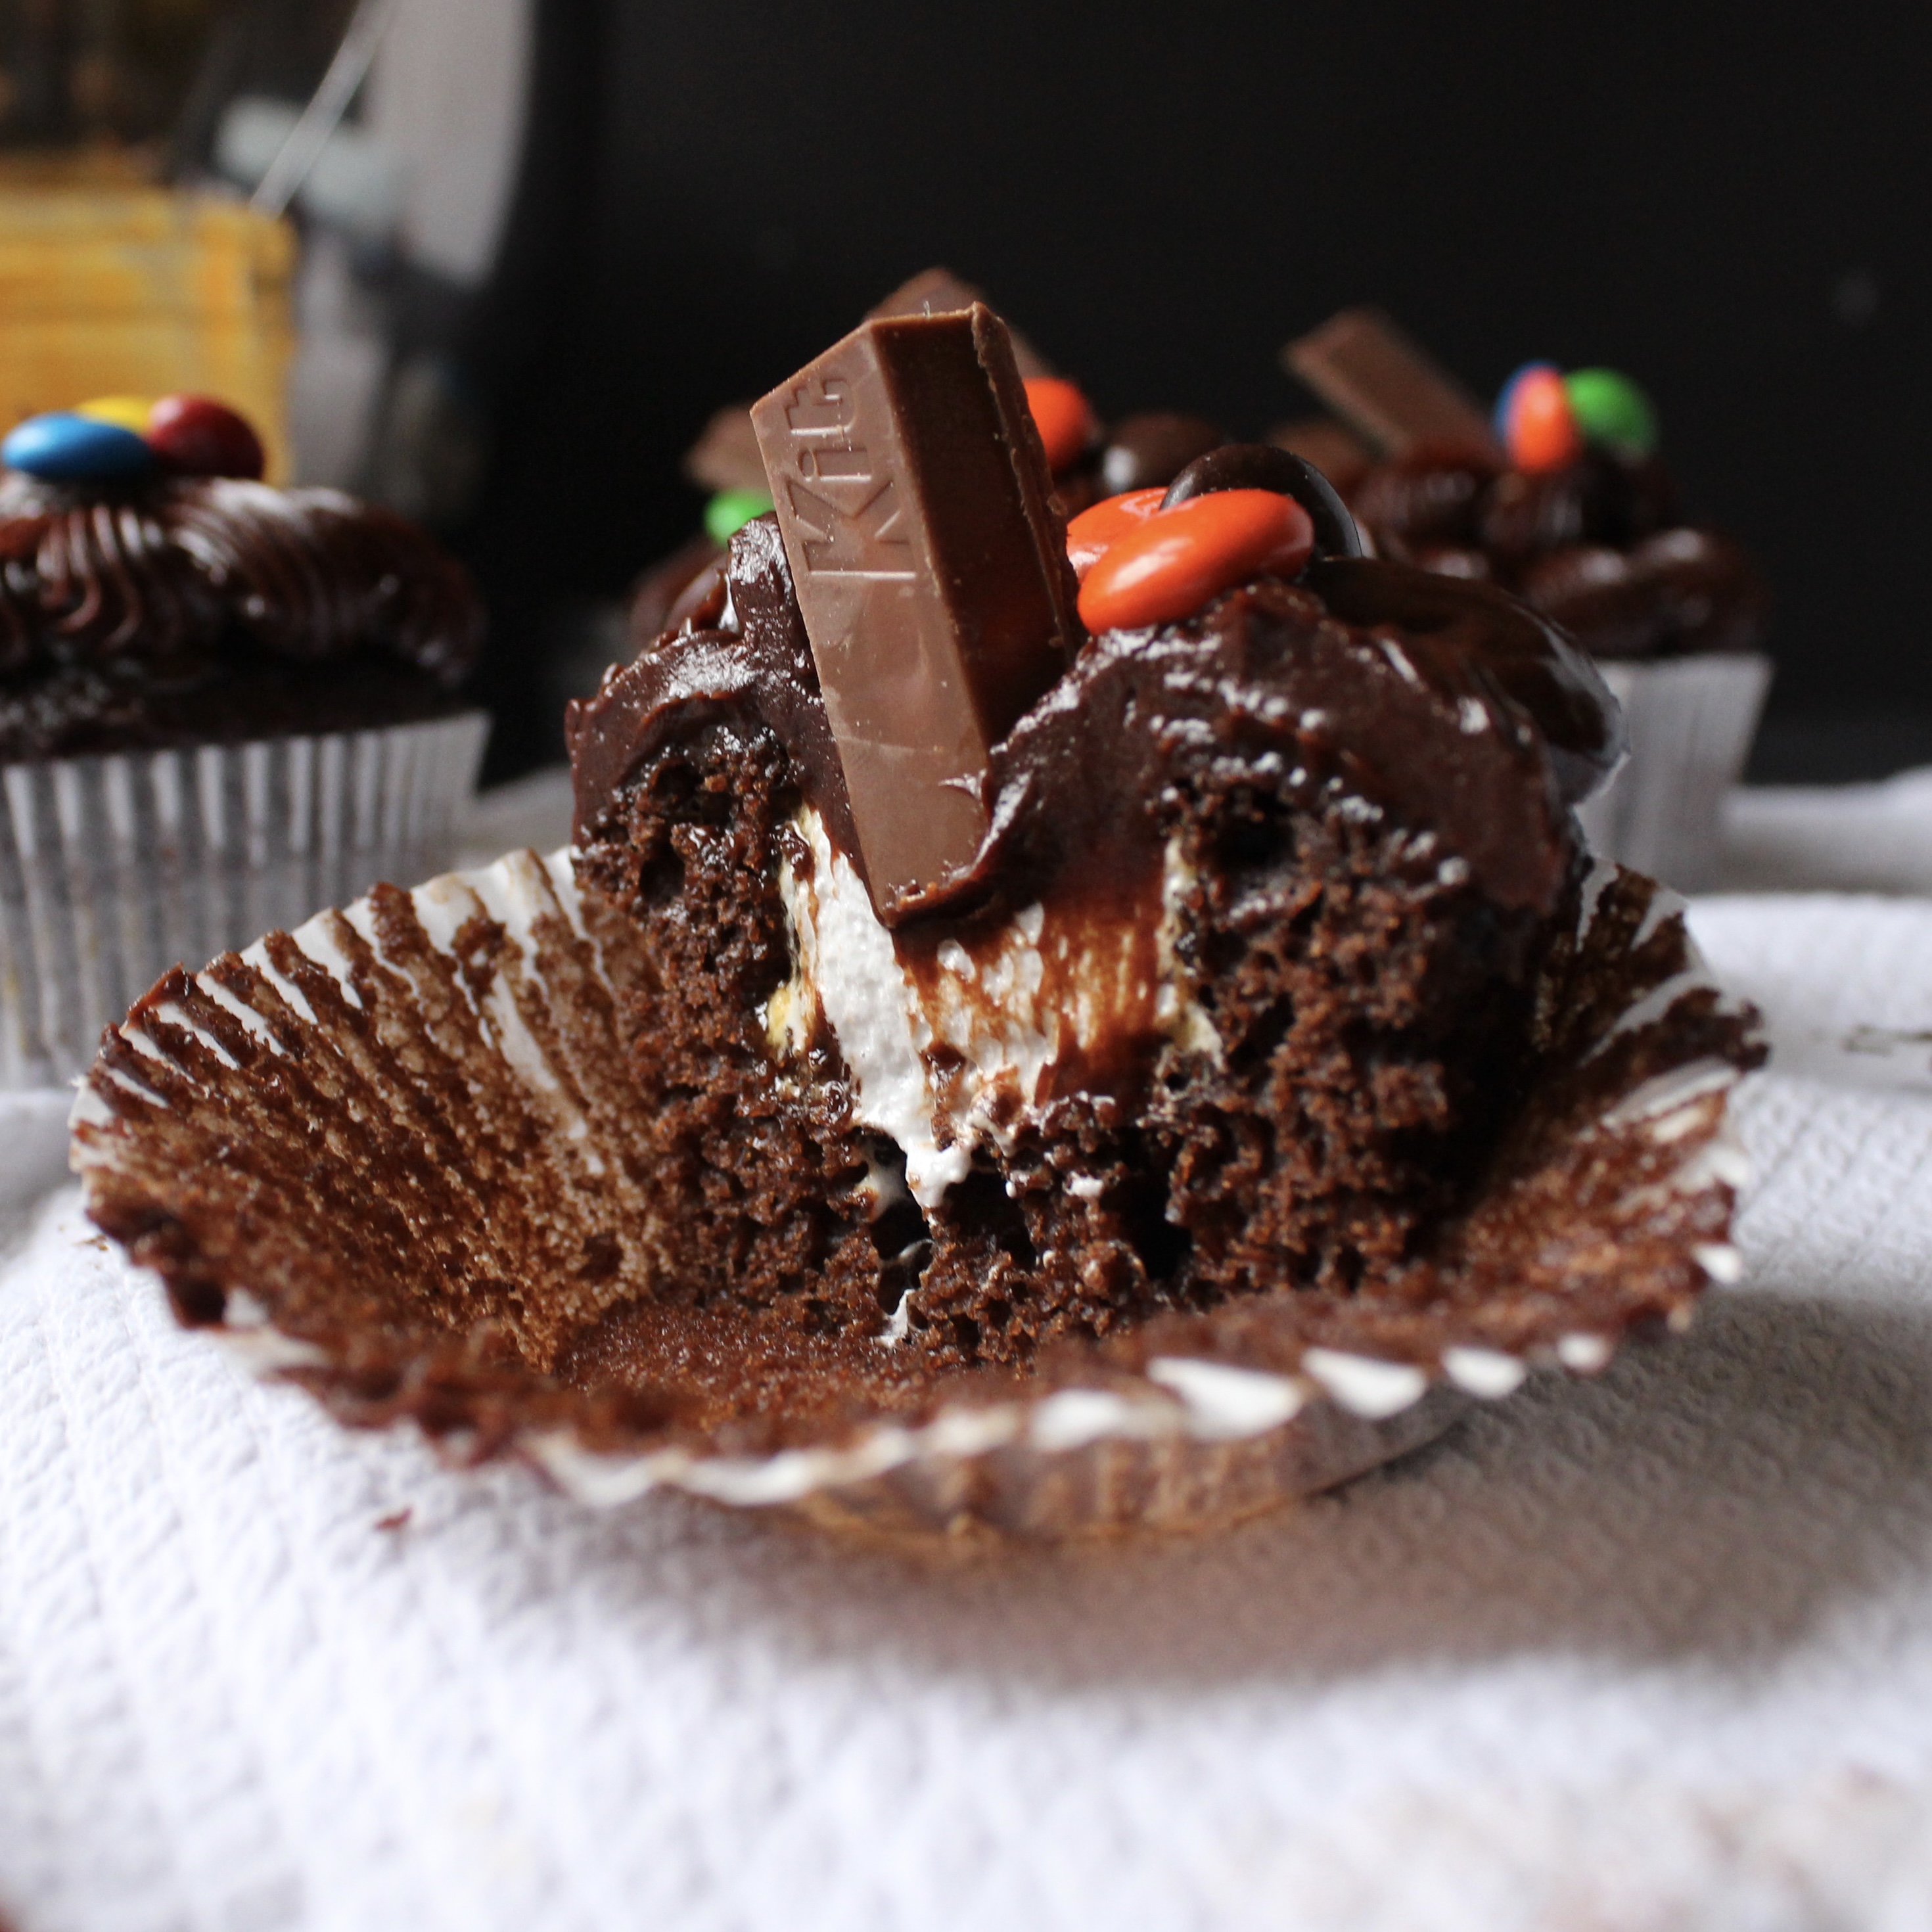
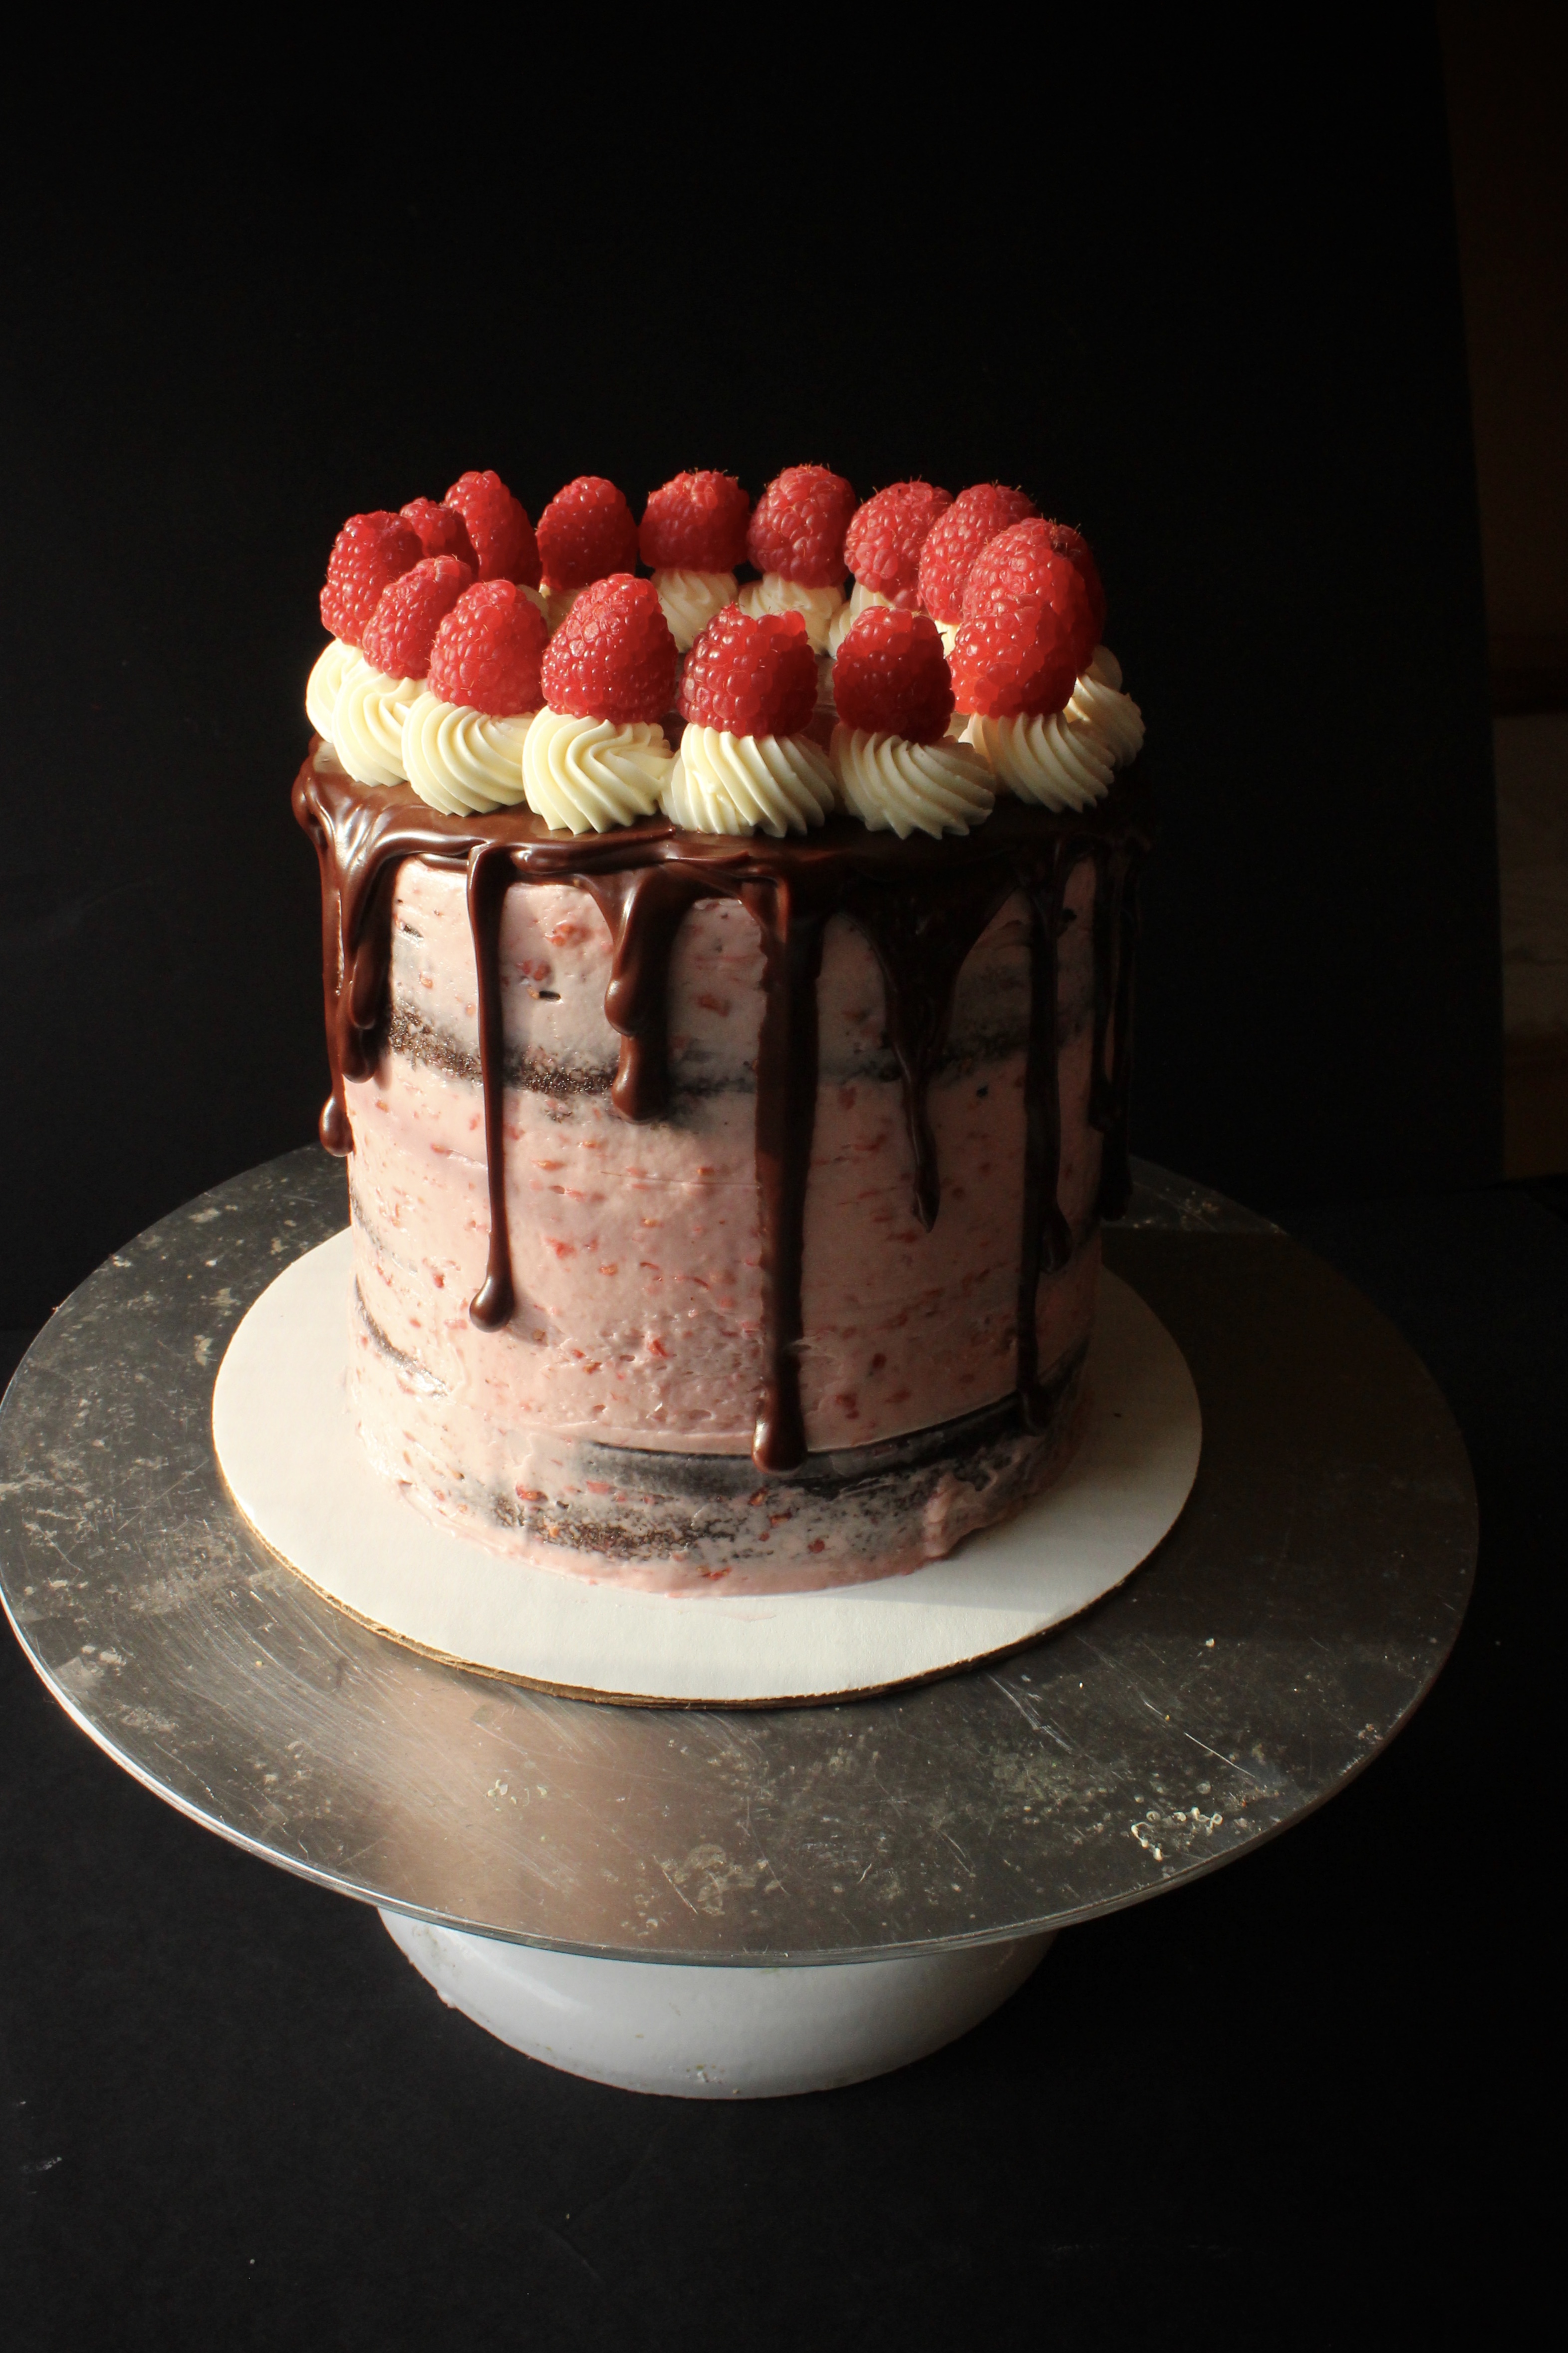
The chocolate/raspberry mousse cake from my local bakery was a long time favorite of mine, until my palette changed and only my homemade chocolate cake will do. So I created this homemade version, using swiss meringue buttercream instead of mousse as they are similar in texture and sweetness. In traditional Naureen style this is chocolate ganache dripping all over the cake, the perfect accent to the raspberry and chocolate layers underneath.

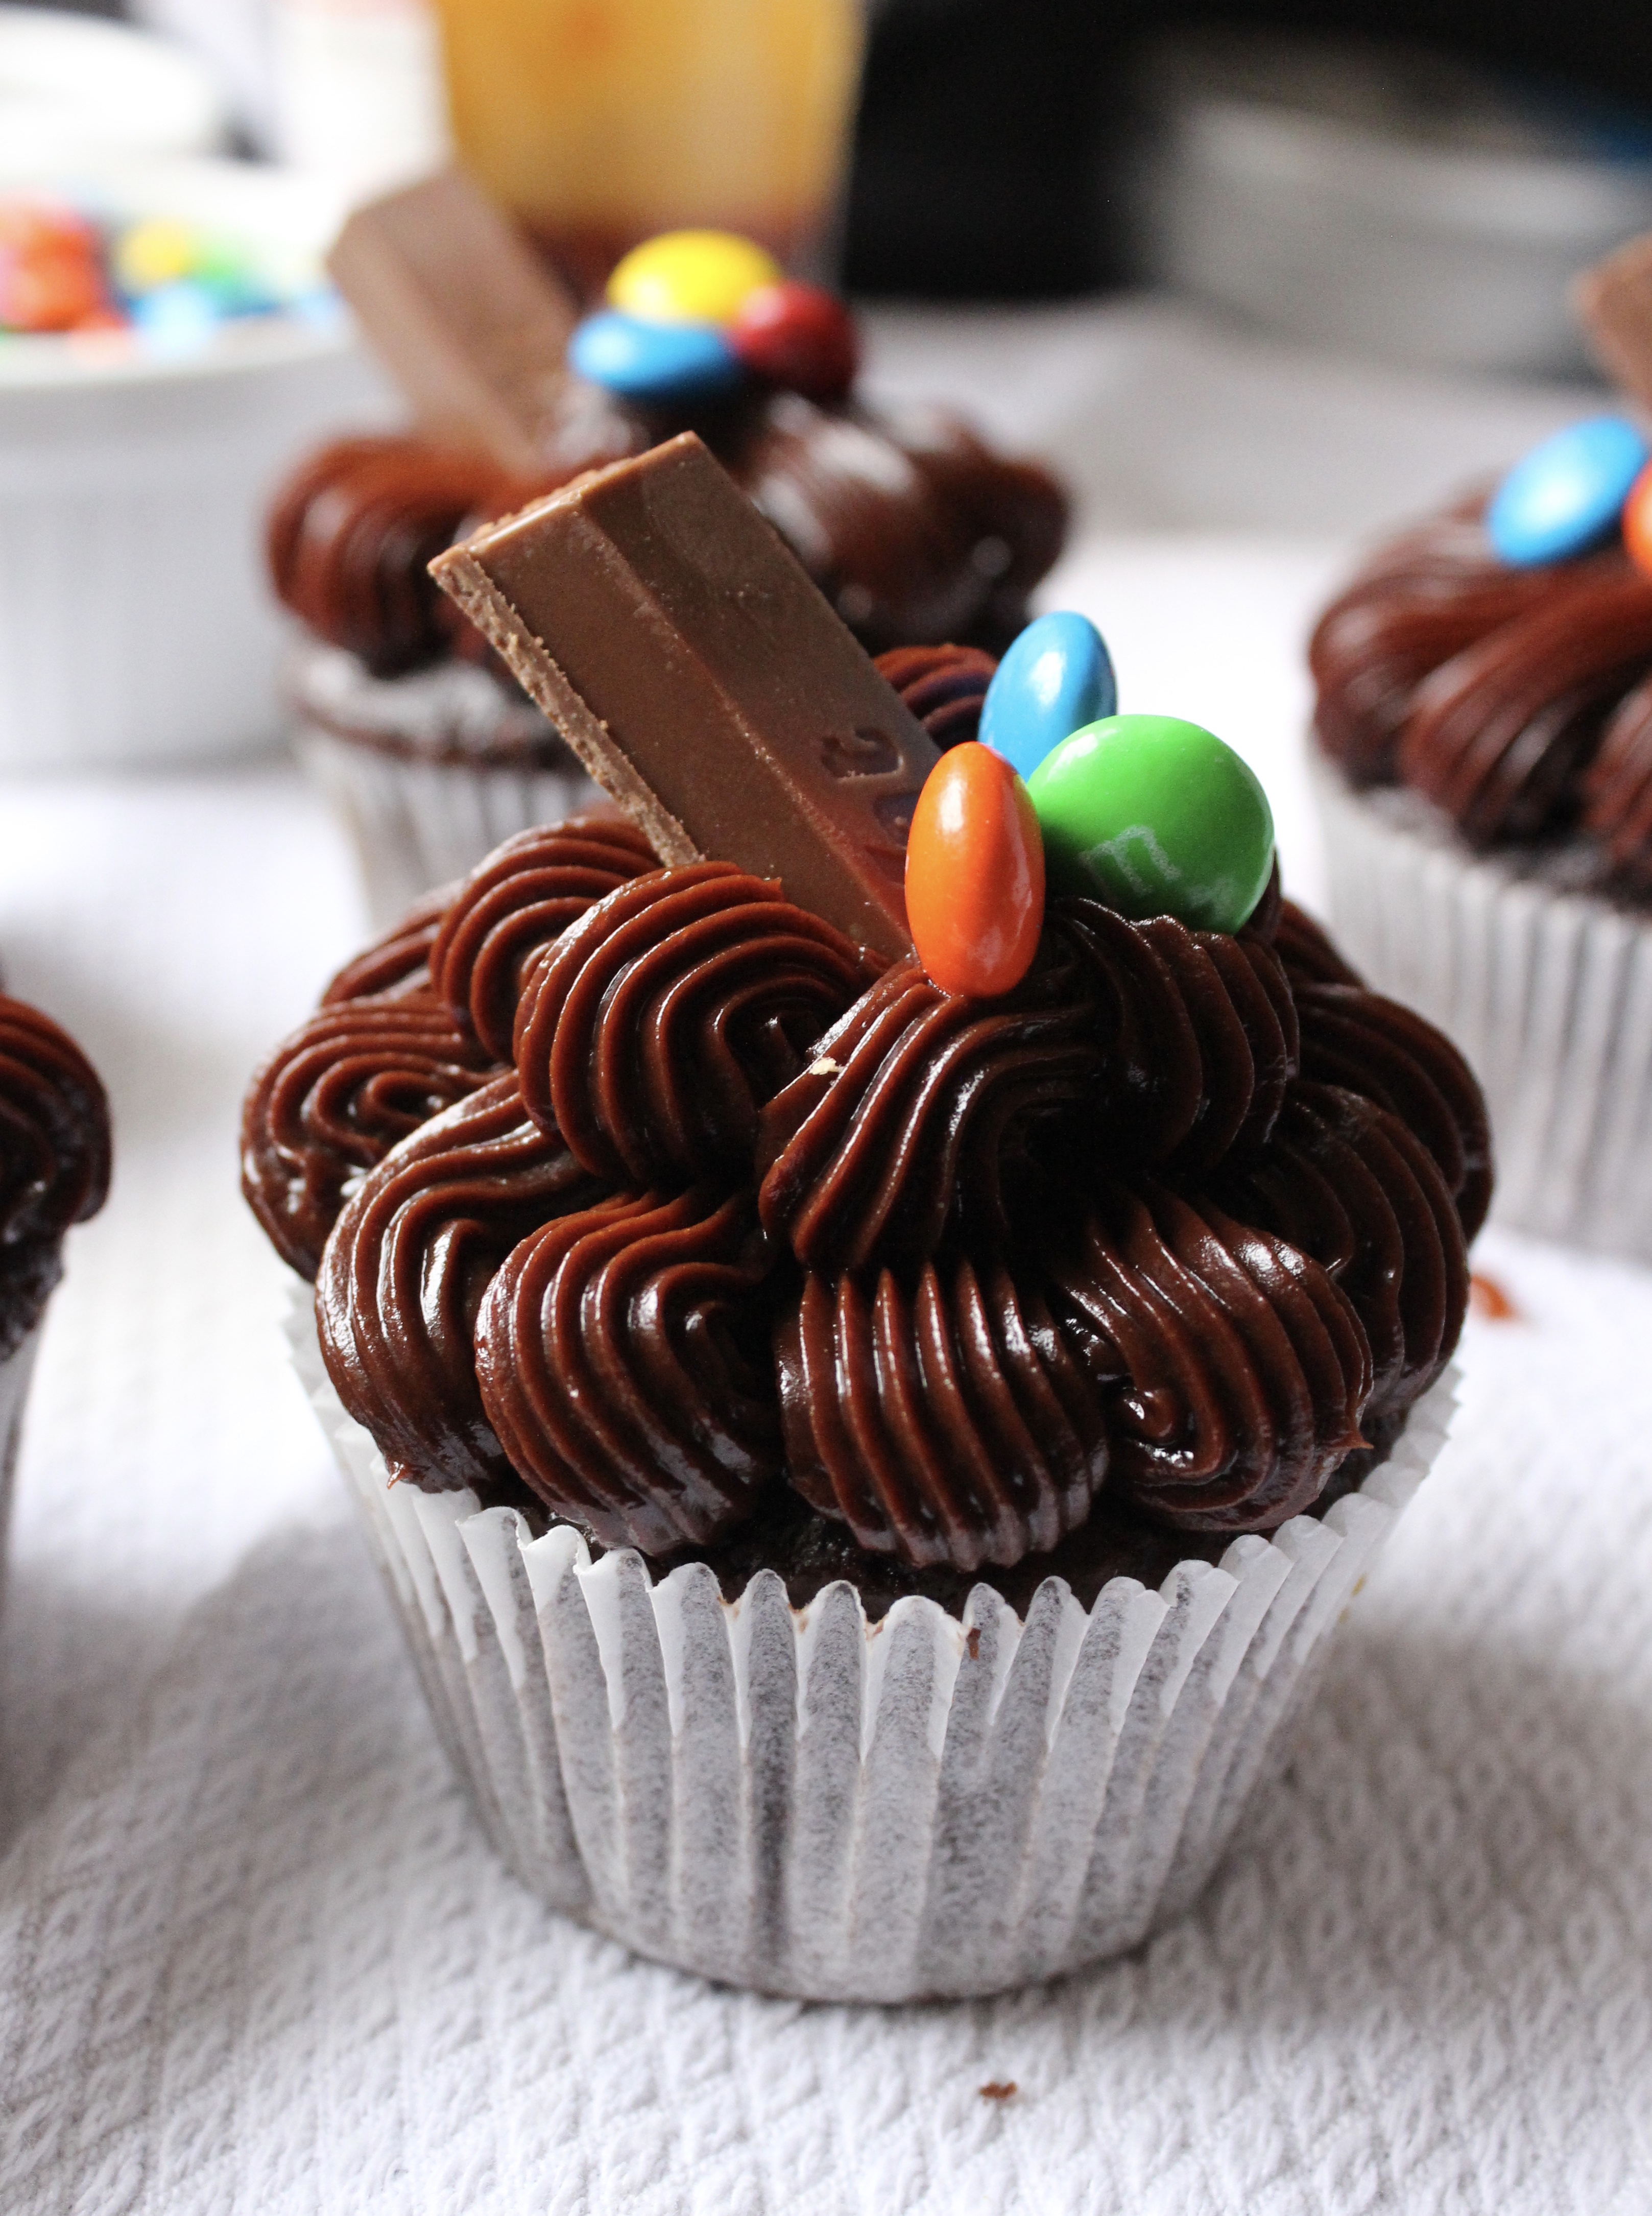
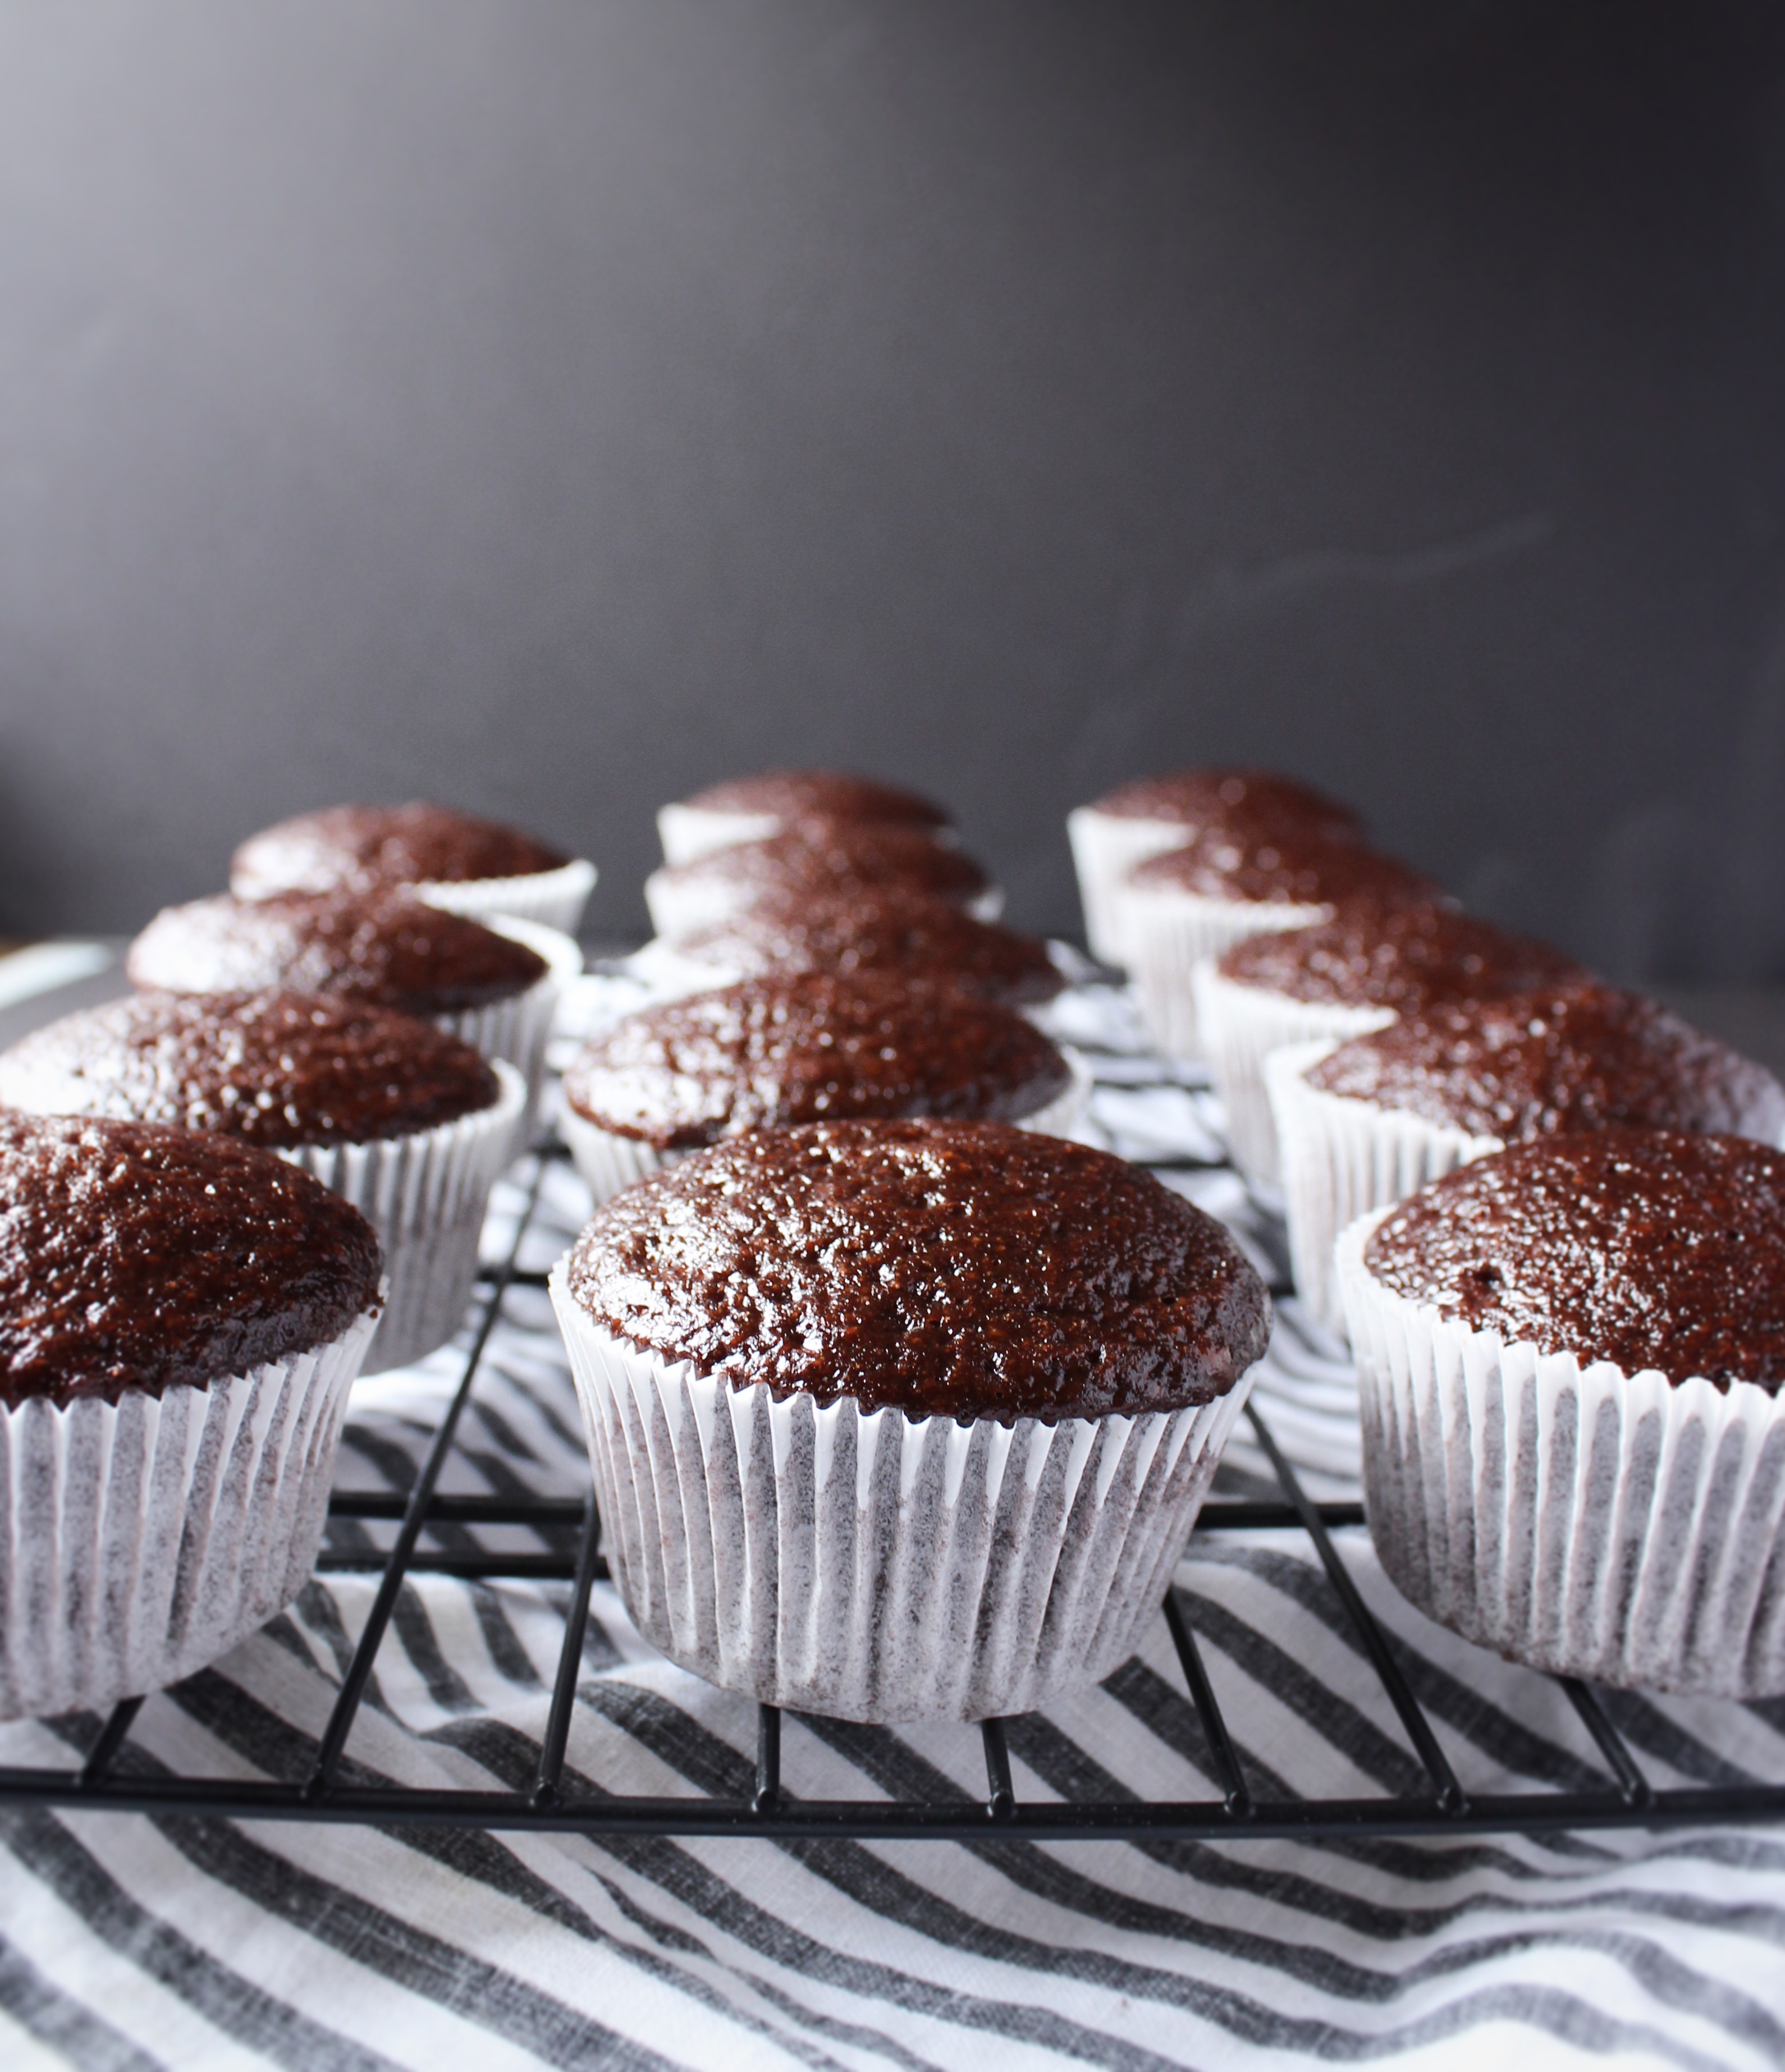
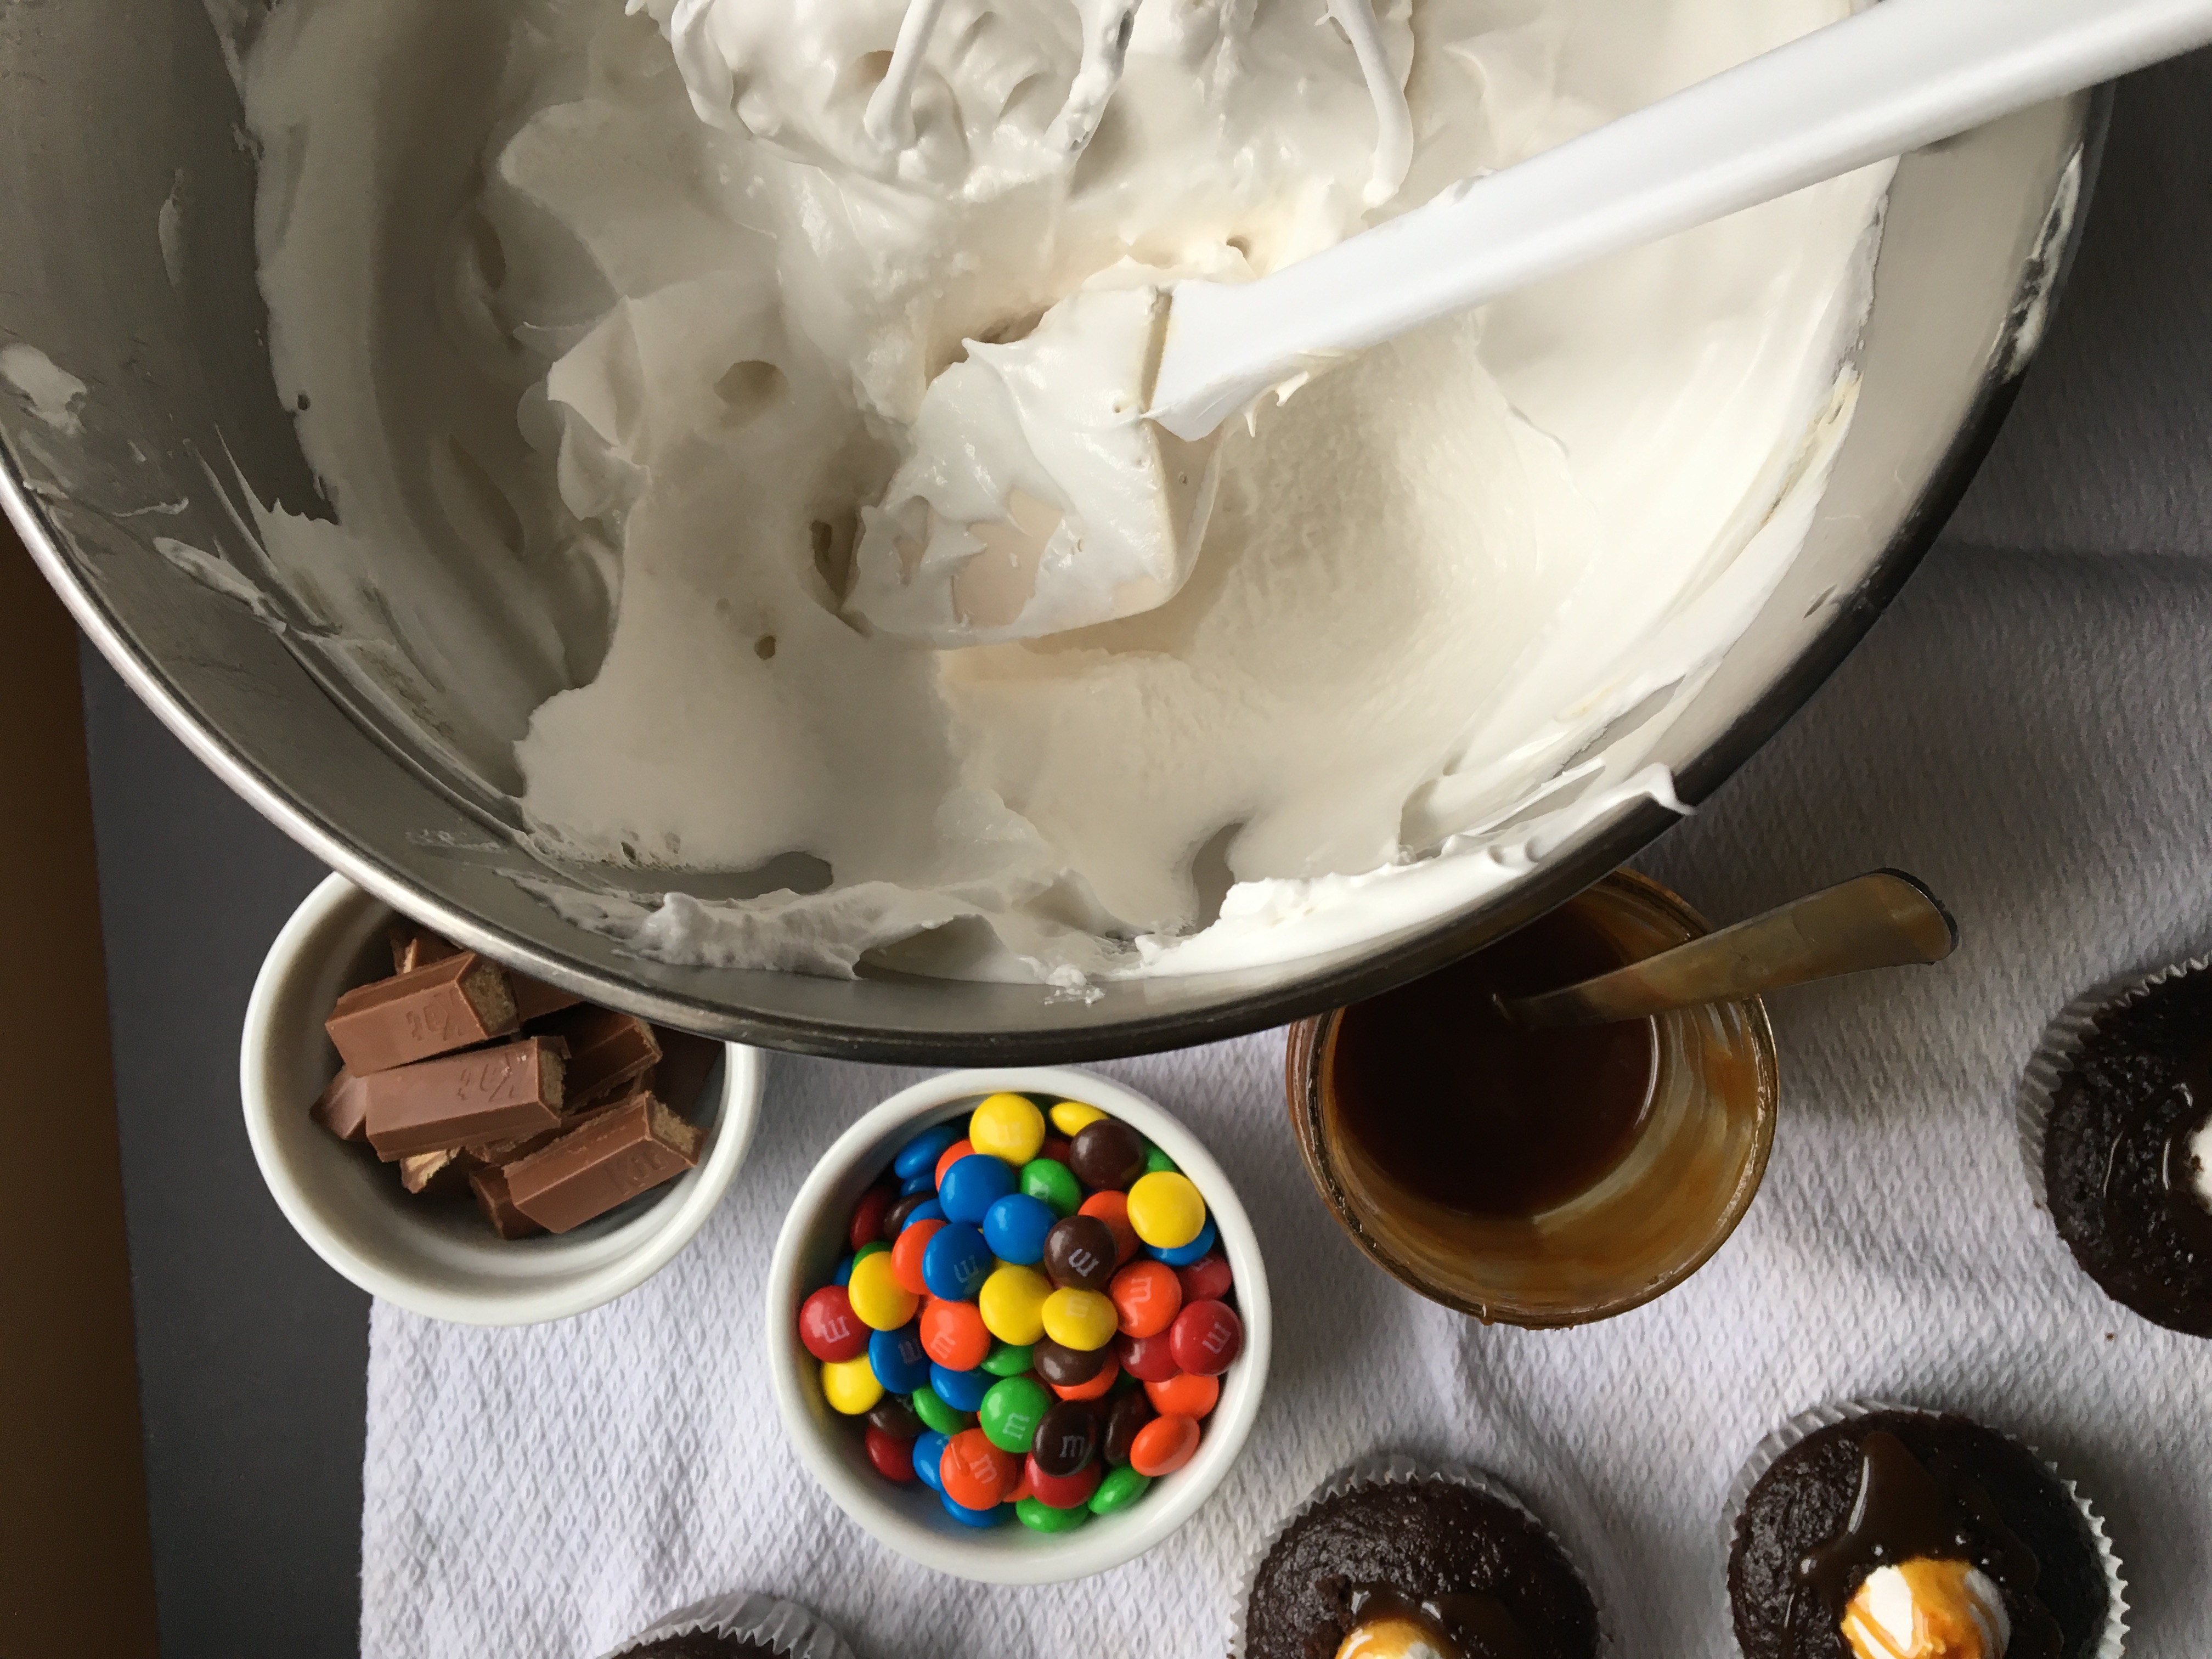
This recipe makes enough to frost a three layer 6 in round cake in the semi naked style.

Ingredients

  • 6oz. fresh raspberries
  • 1 1/4 cups granulated sugar, divided
  • 1 tsp lemon juice
  • 3 egg whites
  • 18 tbsp room temperature unsalted butter, cut into tbsps
  • 1 tsp vanilla extract

Directions

  1. In a small saucepan over medium heat combine raspberries, 1/2 cup sugar and lemon juice. Stir and allow to come to a boil. Once it comes to a boil, lower the heat to low and allow to reduce and thicken, about 10 minutes. Remove from heat and mash with fork. Allow to cool.
  2. In another small saucepan bring a small (about 1in thick) amount of water to simmer. In the bowl of your stand mixer or in a large heat proof mixing bowl, whisk together egg whites with 3/4 cup sugar.
  3. Place over the simmering water and whisk occasionally until the sugar has dissolved and mixture is quite warm to the touch (you shouldn’t feel any granules when you stick your finger in). Remove from heat and start beating with the whisk attachment at medium speed. Beat for a few minutes, until the mixture cools down to room temperature and the mixture is thick and glossy. When the bowl no longer feels warm (test the temperature by placing the back of your hand on the side of the bowl), start adding the butter, 1 tbsp at a time. It will look weird. Feel free to stop and scrape down the bowl.
  4. Continue beating at medium to high speed until the mixture looks curdled. Keep beating until it comes together into a homogenous, smooth buttercream. Lower the mixing speed and add vanilla and cooled raspberry compote. Use immediately, or store in the refrigerator, covered for 2 weeks. To use after thawing, re-beat with a whisk attachment until smooth.

Leave a Comment · Labels: American/Mediterranean, Dessert Tagged: buttercream, chocolate, dessert, fruit, ganache, homemade, raspberry

Pastry Pillows

November 27, 2017

fullsizeoutput_69aa
I’m baaaaaaaack! After recovering from hosting Thanksgiving dinner, I’m back in the kitchen making some of my favorite things: small bites, filled with butter, sugar, then topped with more fat and more sugar. Yeah! Just in time for the holiday season, I’m whippin’ out my trusty old “100 Best Cookies” catalogue from Better Homes and Gardens that I got way back when I used to live Poughkeepsie (2010). I don’t celebrate Christmas, but I love all the holiday baking that comes along with the season.
img_9337
I’ve also been watching a whole lot of The Great British Baking Show so I’m super inspired by all the different creations I see on the screen. What shall I bake next? A Stollen (a German holiday bread studded with dried fruit with a marzipan center)? A chocolate twist bread? Chocolate revel bars? I’m enjoying the down time to explore cakes’ buttery brethren – though I’ll be back in the kitchen baking cakes as of tomorrow =).
fullsizeoutput_69a8

I was fascinated by this recipe. Most pastry dough requires skillful combining of cold butter and flour in order to achieve flaky texture, but this fool proof dough creams together butter and cream cheese and mixes in flour. Somehow they puff up in the oven and look like glorious buttery pillows. The best kind of bedding I’d say! I did something sneaky and subbed mini chocolate chips for the jam in some of my later pillows. Hope you enjoy these as much as my friends and family have!

Recipe adapted from Better Homes and Gardens “100 Best Cookies” 2010.

Ingredients

  • 1 cup butter, at room temp
  • 8oz cream cheese, at room temp
  • 2 cups all purpose flour
  • 1/4 tsp salt
  • 1/4 cup apricot preserves (or any other fruit preserve you like)
  • 1/4 cup almond paste (I used marzipan)
  • 1 egg, lightly beaten
  • 1 tablespoon water
  • Pearlized, coarse or granulated sugar for sprinkling

Directions

  1. In the bowl of your stand mixer, or in a medium bowl using an electric hand mixer, beat the butter and cream cheese on medium speed for 30 seconds. While that mixes, whisk together flour and salt in a small bowl. Reduce speed to low and add flour mixture to the butter/cream cheese mixture. Mix until just combined, scraping the sides of the bowl occasionally. Divide the dough in half, place each half onto plastic wrap and flatten into disks. Refrigerate for 1 hour or until firm enough to handle.
  2. Preheat oven to 375 degrees F. In a small bowl beat egg with water. Set aside.
  3. Lightly flour your work surface and roll out your dough to 1/8in thick. I like to transfer my dough to a parchment paper lined baking sheet at this point so I can cut out and remove scraps without messing up the shapes. Use a 2in square cookie cutter to cut out an even number of squares. Removed scraps, roll up and wrap in plastic. Refrigerate. Place a scant 1/4tsp preserves and a scant 1/4tsp almond paste on each square. Use a pastry brush to apply a small amount of egg wash around the borders. Set aside.
  4. On a separate work surface, roll out the second dough to 1/8in thickness. Cut out the same number of squares as the first dough. Carefully lift each square (I use a small offset spatula to help with this) and place on top of a square containing apricot/almond. Smooth out the tops so the edges line up with the bottom squares. Crimp the edges closed with a fork. Brush with egg wash (lightly) and dust the tops with pearlized or granulated sugar. Bake in preheated oven for 10-12 minutes. Repeat with scraps.

Leave a Comment · Labels: American/Mediterranean, Dessert Tagged: apricot, dessert, fruit, hand pies, homemade, jam, pastries, pastry pillows, pies, snack

Hajj – Spiritual Journey to Mecca & Medina

October 3, 2017

img_7755

Umbrella lining the courtyard of Masjid Nabawi in Medina

I apologize in advance for the less than quality pictures included in this post. Since this was a spiritual journey, photography was not high on my priority list. I actually took very few photos considering I am a blogger on a trip, but the few I did take I thought I’d round up in a post since I’ve been wanting to collect and share my thoughts on the whole experience.

img_7873

There are fans + misters blowing cool mist onto pilgrims in the courtyard

Hajj is a pilgrimage that all Muslims must make once they are financially and physically able to. It is the final of the five pillars of Islam. It is performed between the 7th and 13th of the Islamic month of Dhul Hijjah. Though the actual Hajj rituals last only 5-6 days, the typical itinerary lasts between 2 weeks and 40 days. Mainly because it is customary to visit Medina (the Prophet’s city, where he found a safe haven during persecution) and spend some time in Mecca before the actual days of hajj.

img_7891

One of the minarets of Masjid Nabawi

img_7765

Grainy but OK! Make up free for 3 weeks and it felt amazing!

img_7769

On the way to Mount Uhud where the historic battle was fought and early Muslims had lost, teaching the Prophet and his companions many lessons, one of which: patience.

img_7886

I can’t describe to you the feeling of seeing the Kaaba for the first time. Perhaps it is most similar to seeing your first born child for the first time. You hear stories about it, you imagine for the longest time what it will be like, but when you see it you’re utterly unprepared by the awe you feel. Your breath is taken away. You fall to your knees and cry. You imagine the angels circumambulating the same exact way, perpendicular to this location in the heavens. You imagine all the times you’ve faced this structure. All the times you’ve faced it from afar with fear, with hope, with joy, with pain and it all bundles up and comes pouring out in your tears and your prayers.

img_7863

After our first Tawaf or circumambulation of the Kaaba (7 times)

I won’t go into the semantics of hajj, because there are quite a few steps and it can be overwhelming, but I will include the following:
you have to complete a few tawafs (circling the kaaba)
running between the hills of Safa and Marwa (aka sayee)
staying in a tent at Mena for a few nights (a 10sq mile camp site housing 2 million pilgrims)
making supplication in Arafat (the site of the Prophet’s last sermon, and Abraham’s historic sacrifice)
overnight stay under the night sky (no tent, no nothin) in Muzdalifa
stoning the jameraat (the site where Ibrahim threw stones at Shaytaan for trying to deter him from his mission)

img_7937

High up on this mountain is the cave of Thawr where the Prophet (peace be upon him) hid from his enemies who were deterred by the sight of cobwebs and a nesting bird who appeared miraculously.

The first thing they tell you to prepare you for Hajj is Sabr or patience. You strive to stay calm and collected through the heat, the crowds, the long waits, the discomfort, the homesickness and the ailments. Honestly, none of those things tested me too much. The group I traveled with, Dar Es Salaam, kept us very comfortable (with a few exceptions).

img_7943

Mount Hira, where the Prophet Muhammad would go up to meditate. His wife at the time, Khadjiah (RA) would meet him halfway to bring him food and water. This was where the Angel Gabriel revealed the first verse of the Qur’an. “Read” or “Iqra” in Arabic, he said. Muhammad (SAW) replied, “I cannot read” for he was illiterate. Gabriel repeated, “Read” and he once again replied “I cannot read”. This exchange happened 3 times until Gabriel started reciting Surah Al’Alaq, “Read in the name of your Lord who has created man from a single clot [of blood]…”


Most of us did our own thing throughout the journey. Once we arrived in Mena though, that changed. We were in huge tents lined with pull out one seaters placed one after another. Personal space was limited to a 2x6ft area. I never felt such a strong bond of sisterhood. Many of us younger women left behind similar aged children at home. We were dealing with missing them, dealing with the fatigue of our journey, the overarching questions of how to maintain our good deeds once back home and instilling good values in our children. The older aunties reminded me of my mother. There were so many opportunities to help them – getting them water or tea, mixing up electrolytes when they got sick (many people got dehydrated), etc.

img_7892

Inside one of the extensions of Masjid Haram (the masjid housing the Kaaba)

The focus on increasing your good deeds was such a transformational point for me. Every time I helped someone out, I saw someone else that was doing it on a monumental scale. There were the sisters who brought their elderly moms, pushing them around in wheelchairs, getting them food, taking them to the bathroom. Husbands caring for ailing wives. Parents tending to their adult disabled children. It was a humbling experience. To see others committed to such service. It demonstrated to me the importance and the nobility of serving others. Whether it is a parent taking care of a child, a doctor taking care of a patient, or a worker handing out a water bottle to a thirsty pilgrim – you realize that these are the deeds that will be carried on long after you are gone.

img_7899

With my baldy. It is customary for men to shave their heads after umrah. And a face mask because when you’re in the midst of so many people, there’s bound to be something contagious in the air!

img_7896

Watching the flow of people circling the kaaba is truly mesmerizing: like celestial bodies orbiting a central mass.

Prior to hajj I was constantly plagued by feelings of inadequacy. Being a stay at home mother while my former classmates were becoming VPs and MDs, I always questioned my path. Whatever path you choose, or is chosen for you, the sooner you make your peace with it, the sooner you can give it your all.

img_7919

Swissotel really spoiled us. I did not lose any weight during this trip.

img_7923

Mounds of baklava and other regional sweets.

Since I’ve gained this clarity of purpose, my cake designs have improved. Now that I view my children as my first priority, and not just getting in the way when I have a deliverable, my focus has improved. I have the energy to stay up late, working on a cake, and tend to a sick child either intermittently or in a few short hours. I am so grateful for this perspective, for this experience, for the lessons I learned. I hope to carry it with me as long as possible.

img_8073

We stayed at Swissotel for a few days to take advantage of the vicinity to the Kaaba, then we were transported to a Meccan suburb for the days leading up hajj, preparing physically and spiritually for the journey. It struck me how mountainous, dry and barren the landscape was. How people lived here for thousands of years, how tough they must have been, puzzles me. We were coddled, air conditioned from point A to point B, fed and hydrated round the clock. How they traversed and inhabited these lands in the intense heat and minimal provisions is beyond me. Pictured here are clothes hung to dry as we took advantage of the washers on the rooftop of our travel group’s building.

Source: https://alsajdah.wordpress.com/2015/09/30/the-hajj-graphic-step-by-step/

Source: https://alsajdah.wordpress.com/2015/09/30/the-hajj-graphic-step-by-step/

I hope to return to this sacred place with my children. Nothing cements faith like seeing the historic sites that one has learned about since childhood. The convening of so many from around the world engaging in the singular activity of worship is otherworldy. The barren landscapes, the unimaginable hardships our ancestors endured, is inspiring and humbling.

img_7961

The first Jameraat, or stone wall symbolizing where the Prophet Ibrahim threw stones at the devil for attempting to sway him from his mission.

img_7966

Al Mashaer train. Really improved transport for Hajjis.

That is all for now. I’ve had this saved as a draft for well over a week. Peep through the rest of the pictures and come back soon!

img_7939

Mt Arafat, where the Prophet Muhammad, peace be upon him, gave his final sermon. Also the place where Ibrahim alaihi wa salaam performed his historic sacrifice.

img_7982

Sunrise as we leave Muzdalifa. You make every attempt to leave at dawn, before the scorching sun gets to you.

img_7993

For the morning of Eid, I indulged in some sweets (left). On the right was this delicious Indian breakfast: savory semolina cooked with mustard seeds and bay leaves with a spicy coconut chutney. Yum!!

img_8017

We indulged in some halal McDonald’s once.

img_8072

Everyone was up every morning at dawn for prayers.

img_8080

After our last tawaf on the rooftop, I sat down and snapped this picture of the royal clock tower and surrounding hotels that dwarf everything in its vicinity.


4 Comments · Labels: Uncategorized Tagged: hajj, hajj 2017, hajj mabrur, holy, islam, mecca, medina, muslim, pilgrimage, saudi arabia

Cherry Almond Cake

August 2, 2017

fullsizeoutput_6170
I know, I know. I’m actually posting a non-chocolate recipe. There are few things that I enjoy as much as I enjoy chocolate. Vacations. Lobster truffle mac and cheese (just discovered at cute Sunnyside spot Côté Soleil while out to dinner with the talented and endearing Moni Begum of Moni’s Kitchen). Moroccan almond cookies made by La Rose Kitchen. Actually, any almond dessert is fabulous. Rainbow cookies. Marzipan (yup, straight up). Stollen (German holiday sweet bread with marzipan filling).

So cherry almond cake was a no-brainer. Last week I had made a cherry frangipane (fancy word for almond filling) tart. Recipe from NYTimes. It was SO good, but since there’s already a perfectly good recipe out there, I wanted to share a less-fussy version of the dessert for those who may not have the time or desire to make pâte sucrée, chill it, roll it out, fit it, trim it, blind bake it, then fill and bake once more.

fullsizeoutput_6171
The answer is this single layer cherry almond cake. A standard beginning of creamed butter and sugar with the addition of 2 tbsp of almond paste that has been sitting in my cupboard FOREVER. Thickened with an egg, flavored with almond extract. Finally beefed up with a cup of flour, leavener and salt. I greased and lined a 9 in cake pan with parchment. Then I poured in the batter, smoothed out to the edges, dotted the cherries throughout for an even distribution, topped with slivered almonds and sugar, then baked for about 45 minutes.
fullsizeoutput_616f
I used defrosted, drained frozen pitted cherries for this. Fresh cherries would have been out of this world, but I wasn’t about to try to pit 14oz of cherries! Fresh or frozen, it’s a delicious cake, but I would decrease the sweetness next time around. I adapted it from a Cooking Light recipe (I increased the fat content so could use a lower sugar content). Feel free to try it either way!

Ingredients

  • 6 tbsp unsalted butter
  • 2 tbsp almond paste
  • 2/3 cup granulated sugar (would decrease to 1/2 cup next time)
  • 1/4 tsp almond extract (might increase this to 1/2 tsp next time)
  • 1 egg
  • 1 cup flour
  • 1 tsp baking powder
  • 1/8 tsp salt
  • 1/8 tsp cloves
  • 1/3 cup milk
  • 2 tbsp slivered almonds
  • 2 tbsp granulated sugar
  • 14 oz pitted cherries
  • powdered sugar for sprinkling

Directions

  1. Preheat oven to 350 degrees F. Spray the bottom and sides of a 9in cake pan with cooking spray, Cut out a 9in round piece of parchment and line the bottom of the pan with it. Spray with more cooking spray.
  2. In a medium bowl, sift together the flour, baking powder and clove. Add salt and stir to combine.
  3. In the bowl of a stand mixer or in a medium bowl using an electric hand mixer, cream butter, sugar and almond paste until light and fluffy, about 2 minutes at medium low speed. Stop to scrape down the sides of the bowl. Add egg and almond extract, continue beating until the egg is incorporated, then scraped down the sides of the bowl again. Add half o the flour mixture, then the milk, then the remaining flour. Mix until incorporated, then pour into the prepared cake pan. Dot the top with cherries, almonds and an even sprinkling of the remaining granulated sugar.
  4. Bake in preheated oven for 45-50 minutes until top is golden brown.
  5. After cooling, sprinkle with powdered sugar to serve.

2 Comments · Labels: American/Mediterranean, Dessert Tagged: almond, cake, cherry, dessert, easy dessert, easy recipe, entertaining, home baking, home cooking, seasonal, summer, sweets

Chocolate Zucchini Bread

July 18, 2017

fullsizeoutput_6048

There is no rhyme or reason to this cake. It is neither healthy, nor a proper dessert. It is simply for chocolate lovers. It is a glorious use of a bland, high water content vegetable that lends it’s moisture to the crumb of this perfect snack cake. It’s blandness acts as a perfect palette for all the wonderful cocoa and brown sugar flavor to absorb.
img_9542
I’ve posted about chocolate zucchini cake before. This bread version is a bit heartier with whole wheat flour and almond flour – a little more substance to justify my classification of it as a snacking cake! I wasn’t happy with any of the recipes I found online for chocolate zucchini loaf, so I made my tweaks, including adding chocolate chips, and voila! Perfection.

Ingredients

  • 2 1/2 cups all purpose flour (or 1 cup AP flour/1 cup whole wheat flour, 1/2 cup almond flour)
  • 1/2 cup dutch processed cocoa plus extra for coating chocolate chips(if using natural cocoa, swap the amounts of baking soda and baking powder)
  • 1 tsp baking soda
  • 1 1/2 tsp baking powder
  • 1/2 tsp salt
  • 1/2 cup sugar
  • 1 cup brown sugar
  • 2 eggs
  • 12 tbsp melted butter
  • 1 lb zucchini, grated
  • 1/2 cup semisweet chocolate chips

Directions

  1. Preheat oven to 350 degrees F. Butter and lightly dust a 9inx5in loaf pan with cocoa powder. Stick in the freezer while preparing your ingredients.
  2. Melt butter in a saucepan over medium heat. Turn off heat and allow to cool down.
  3. Wash and cut off one end of zucchini. Grate, not completely finely, but not in huge slivers either. Place a large sieve over a bowl and place grated zucchini there to drain while you prepare the rest of the ingredients.
  4. Combine all the dry ingredients in a large bowl (everything except the eggs, butter and chocolate chips). Whisk to combine, breaking up any large clumps. Make a well in the center and add eggs and butter. Mix with a wooden spoon (Bengali alert: I used my hands to mix this batter!). Add all of the zucchini and stir until combined. In a small bowl combine the chocolate chips with sprinkling of cocoa (maybe 1/4tsp).  Toss to coat the chocolate chips with the cocoa. Add to the batter, gently folding in. Take the loaf pan out of the freezer and add the batter, spreading evenly across the loaf pan. Bake in preheated oven for 1 hour 10 minutes or until a toothpick comes out relatively clean.*
  5. Allow to cool completely before attempting to remove it from the pan.

*It won’t come out completely clean due to the moisture of this loaf. A few crumbs are ok. You just don’t want it to come out with wet batter.

Leave a Comment · Labels: American/Mediterranean, Carb, Dessert, Snacks Tagged: bread, chocolate, loaf, snack cake, zucchini

Banana Almond Muffins

February 24, 2017

fullsizeoutput_4b82
For all the carbs one consumes when having a muffin, I expect it to have hold me over for some time! I’m getting old! My metabolism is slowing down! I can’t afford to just “eat tasty things” when I’m “hungry”. I have to snack on things like nuts, eat quinoa for breakfast, and add kale as a permanent fixture to my weekly grocery list.

I always tweak breakfast cake recipes to include some heavier elements, like nuts, whole wheat flour, chia seeds (haven’t ventured much with qunioa flour or flax seed but I’ll get there). Hence banana almond muffins. Chocolate chips because everything tastes better with chocolate chips (and because my kids won’t consume them with the same voracity without them). fullsizeoutput_4b83
These freeze well – I made a batch and froze them for our first family trip of the year to Vermont. It’s pretty warm for this time of year but we will try to introduce the kids to skiing! And these muffins definitely helped get us through the car ride up here.

Original, almond free recipe available on Food Network by Tyler Florence.

Ingredients

  • 1 1/2 cups all purpose flour (can substitute 1/2 cup whole wheat flour)
  • 1/2 cup almond flour
  • 1 1/2 tsp baking soda
  • 1/2 tsp salt
  • 4 overripe bananas
  • 1 cup brown sugar
  • 3/4 cup (or 1 1/2 sticks) unsalted butter, melted, cooled
  • 2 eggs
  • 1/2 tsp vanilla extract
  • 1/2 tsp almond extract
  • 1/2 cup chopped pecans
  • 1/2 cup chocolate chips

Directions

  1. Preheat oven to 375 degrees F. Line muffin pans with paper liners.
  2. Combine the flours, baking soda and salt in a large bowl.
  3. In a small bowl, mash 2 bananas with a fork until it forms a chunky mush.
  4. In the bowl of your electric mixer, or in a bowl using a handheld mixer, beat remaining two bananas with brown sugar at medium speed for 3 minutes. Add eggs, melted butter, extracts and mix until combined. Add the dry ingredients (flours, soda, salt) and mix until just combined. Add pecans, chocolate chips and mashed banana, then stir by hand.
  5. Use an ice cream scoop to measure batter into each muffin liner to about 2/3 full. Bake in preheated oven for 18 to 20 minutes. I only have one muffin pan so I do 1 batch at a time.

Leave a Comment · Labels: Uncategorized

Lion King Cake

February 10, 2017

fullsizeoutput_4ac4

Hi Guys,
I haven’t been creating or sharing recipes with you guys recently. So I thought I would check in with some cake decorating how to’s. I’ve been learning a lot as I’ve been creating more and more custom cakes for folks. So I’ll share some of my insights in case it’s helpful for someone out there who may be tasked with a similar project.

My task was to create a Lion King themed cake, using buttercream. Most of the Lion King themed cake Pins and Google search results display fondant cakes with hand molded Lion King figurines. So I had to be creative. The sunset part, easy. Orange, yellow buttercreams, mix them together a little bit for a transition between colors. Smooth finish, done. The only trick I’d suggest is this: when you’re running your straight edge around the cake for the smooth finish, gradually pull the straight edge up a little bit. Otherwise you end up with strict bands of color, as opposed to nice gradation that you would see in a sunset.

But what about the tree silhoutte? And the remaining figures? Should I use a crusting buttercream and paint it on using food color? Should I tint some buttercream black and pipe it on? I went with the latter since I opted for a swiss meringue buttercream, which doesn’t develop a crust like an American buttercream would. I pulled up a picture on my phone and tried to imitate the image as best as I could. It wasn’t too bad – apparently trees are quite forgiving.

Hope you enjoy the video below. Please feel free to leave any questions in the comments below.

Leave a Comment · Labels: Food Fun Tagged: buttercream, cake, cake decorating, how to, lion king, piping, tips and tricks, tutorial

Chocolate Candy Cupcakes

January 16, 2017

fullsizeoutput_48ea

After a startling reading on the weight scale towards the end of December, I swore off sugar. Just two years prior I worked so hard to lose my baby weight. Inspired by beach body coaches in my network, I vastly cut down sweets, decreased portion sizes, drank tons more water, swapped quinoa for rice in many of my meals, and began to regularly exercise using Fitnessblender, the only exercise I’ve been able to stick to thanks to the fact that I can choose from workouts of different durations and can do it from the convenience of my home. So I lost the 9 pounds of lingering weight, and 8 pounds on top of that.

img_4672

And then I fell off the wagon. Slowly but surely I downward spiraled, picking back up my sweets habits and eating rice and curry without restraint. I kept up with the exercise more or less but it wasn’t enough with my slowing metabolism.

So I decided to stop eating foods with added sugar. It’s just one step, but surely it should help. But of course the universe has to align to make this impossible for me. Shortly after making my resolution, I attended a gingerbread house making playdate where I was SURROUNDED by candy and cake and all kinds of good stuff. Soon after that my daughter’s birthday rolled around and somebody’s gotta do QC and make sure things taste right. Amiright?

img_4685

I did a good job holding off on tasting these, but then I needed a cross section for the blog, so guess where the other half went.

Yup.

fullsizeoutput_48e9

This is a really magical combination for the chocolate lover in your life. It’s reminiscent of the creme filled hostess cupcakes, but made even better with quality cocoa in the cupcake and chocolate in the ganache, homemade salted caramel sauce and delicious candy toppings. Remember we eat with our eyes first, and kids moreso than us. So if they see m&ms, they automatically think it’s a superb cupcake.

Enjoy the quick video tutorial below!

This is an adaptation of Hershey’s Perfectly Chocolate Chocolate cake. Because I used Dutch-process cocoa (which is alkalized, or less acidic than natural cocoa), I upped the amount of baking powder and decreased the amount of baking soda from the original recipe. I also used boiling water instead of hot coffee as many chocolate cake recipes call for, as it made for a way too tender a crumb. Perfect in layer cakes, but for cupcakes, you need something with structure.

Ingredients

  • 2 cups sugar
  • 1 3/4 cups all purpose flour
  • 3/4 cup dutch process cocoa (I use Rodelle)
  • 2 1/2 tsp baking powder
  • 1/2 tsp baking soda
  • 1 tsp salt
  • 2 eggs
  • 1 cup whole milk
  • 1/2 cup vegetable oil
  • 2 tsp vanilla extract
  • 1 cup boiling water

Directions

  1. Preheat oven to 350 degrees F. Line a muffin/cupcake pan with paper liners. You will need 15 in total. My cupcake pan only has room for 12, so I need to make these in 2 batches.
  2. In a large bowl or in the bowl of your stand mixer add the sugar. Place a sifter over the top of the bowl and add flour, cocoa, baking powder and soda. Sift the ingredients into the sugar. Add salt. Stir to combine using the paddle attachment.
  3. In a 4 cup measuring cup or in a medium bowl, measure out the milk and vegetable oil. Add eggs and vanilla and mix well using a fork. With the mixer running on low, slowly drizzle in the wet ingredients into the dry. Stop occasionally to scrape down the sides and bottom of the bowl. Turn the mixer back onto low and slowly drizzle in boiling water. Stop the mixer and scrape down with a spatula to ensure the batter is homogenous.
  4. Using an ice scream scoop, scoop batter into the cupcake liners 2/3 of the way to the top. Bake for 15 to 18 minutes or until a toothpick inserted in the middle comes out clean.
  5. After they cool, hollow out the middle using a small circular cookie cutter. I used the smallest one from this set. I filled it with marshmallow creme using a piping bag and wide tip. I drizzled some salted caramel sauce over them. Then frosted them with chocolate ganache and garnished with chocolate candies.

Leave a Comment · Labels: American/Mediterranean, Carb, Dessert, Food Fun, Recipes Tagged: candy, caramel, chocolate, cupcakes, ganache, marshamallow creme, marshmallow fluff

Cauliflower Stir Fry

January 10, 2017

fullsizeoutput_4831

I had to make something vegetarian after my husband made me watch HBO’s Vice the other day. This particular episode was on the industrialization of the meat industry and man was it terrifying. The ghastly amounts of meat we eat day in day out. How the farm-to-table movement is essentially our savior if we want to reap the rewards of our earth in any sort of sustainable fashion. Scary stuff! But we can do our part by 1) supporting businesses like Honest Chops and local farmers market vendors that only source from sustainable farms and 2) eating less meat. There’s a world of protein out there (eggs! chickpeas! tofu!) explore!
fullsizeoutput_4834

If you’ve been trying to to eat less meat, or just eat/cook more vegetables at home, I’ve summarized some pointers for cooking veggies below. Luckily for you I’ve made so many mistakes when cooking veggies throughout the years I have some words of wisdom to impart, especially when dealing with cauliflower:

  • Don’t waste. I use the outer leaves as well as the florets. It’s often discarded in American cooking shows, but why the heck wouldn’t you eat it?I just toss the tough inner core, and finely chop the rest. Time consuming, but a worthwhile endeavor.
  • Dicing it into tiny tiny pieces is major key. Cauliflower can be bland, so the best way to ensure it absorbs as much flavor as possible, is by dicing it super small, increasing its surface area.
  • Sequence is also key. Once you start cooking vegetables regularly, you get a sense for which ones take longer to cook than others. Root vegetables like carrots, potatoes and turnips always take longest. Then onions, peppers and cruciferous veggies (broccoli, cabbage, cauliflower, collard greens, kale, etc.). Finally, your tender greens (zucchini, spinach, peas).
  • Garlic is your best friend. With some veggie dishes like spinach or broccoli/mushroom stir fry, I’ll fry the garlic in the oil so it the flavor of the garlic diffuses through the dish. I only do this for quick cooking vegetables. If you try to do this in a dish like this, or potato hash, the garlic will simply burn. Thus I add it after the vegetables have had an initial cooking period.
  • anchovy paste is also a fun way to flavor your vegetables. It’s salty and nutty when dissolved in oil. A fun trick I learned in Italy.

img_8551

The same guidance I gave for the garlic goes for the mustard seeds. Many recipes will say to first heat mustard seeds or pach phoron (Bengali 5 spice) in oil until they start to pop. Once again, because the total cook time for a stir fry with veggies in this quantity can go over 20 minutes, I wanted to avoid burning any of the elements.
img_8555
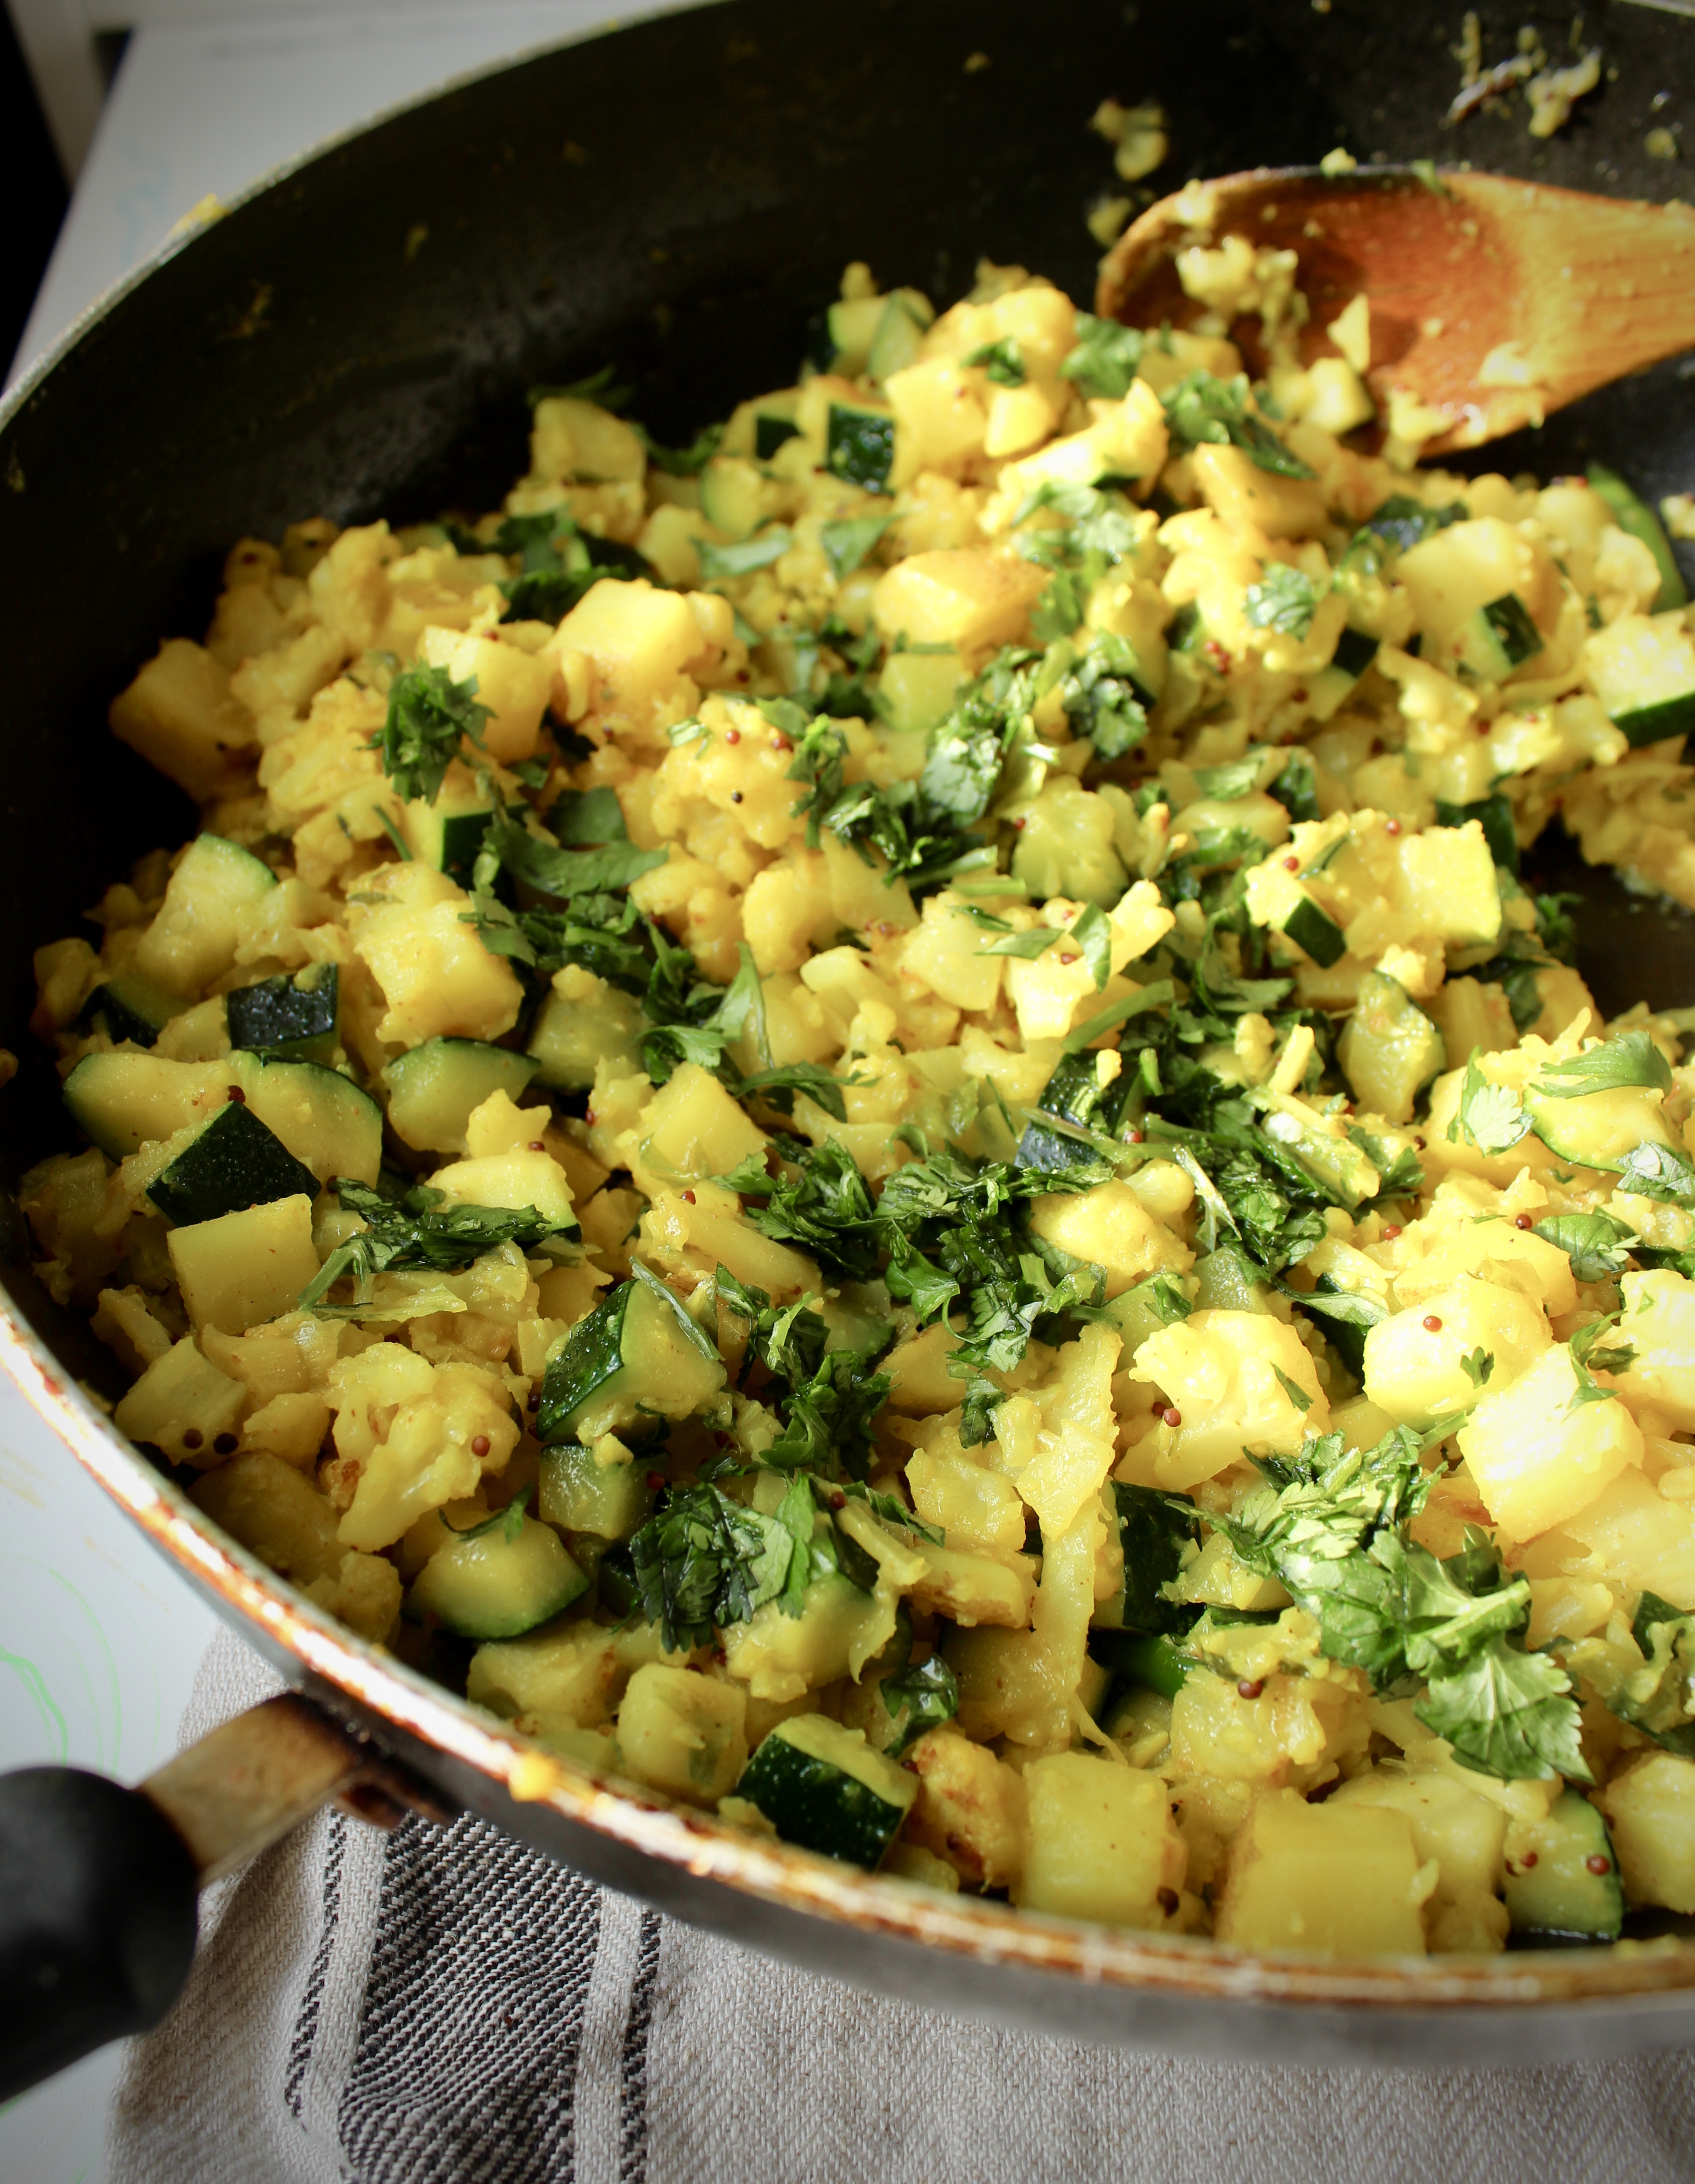
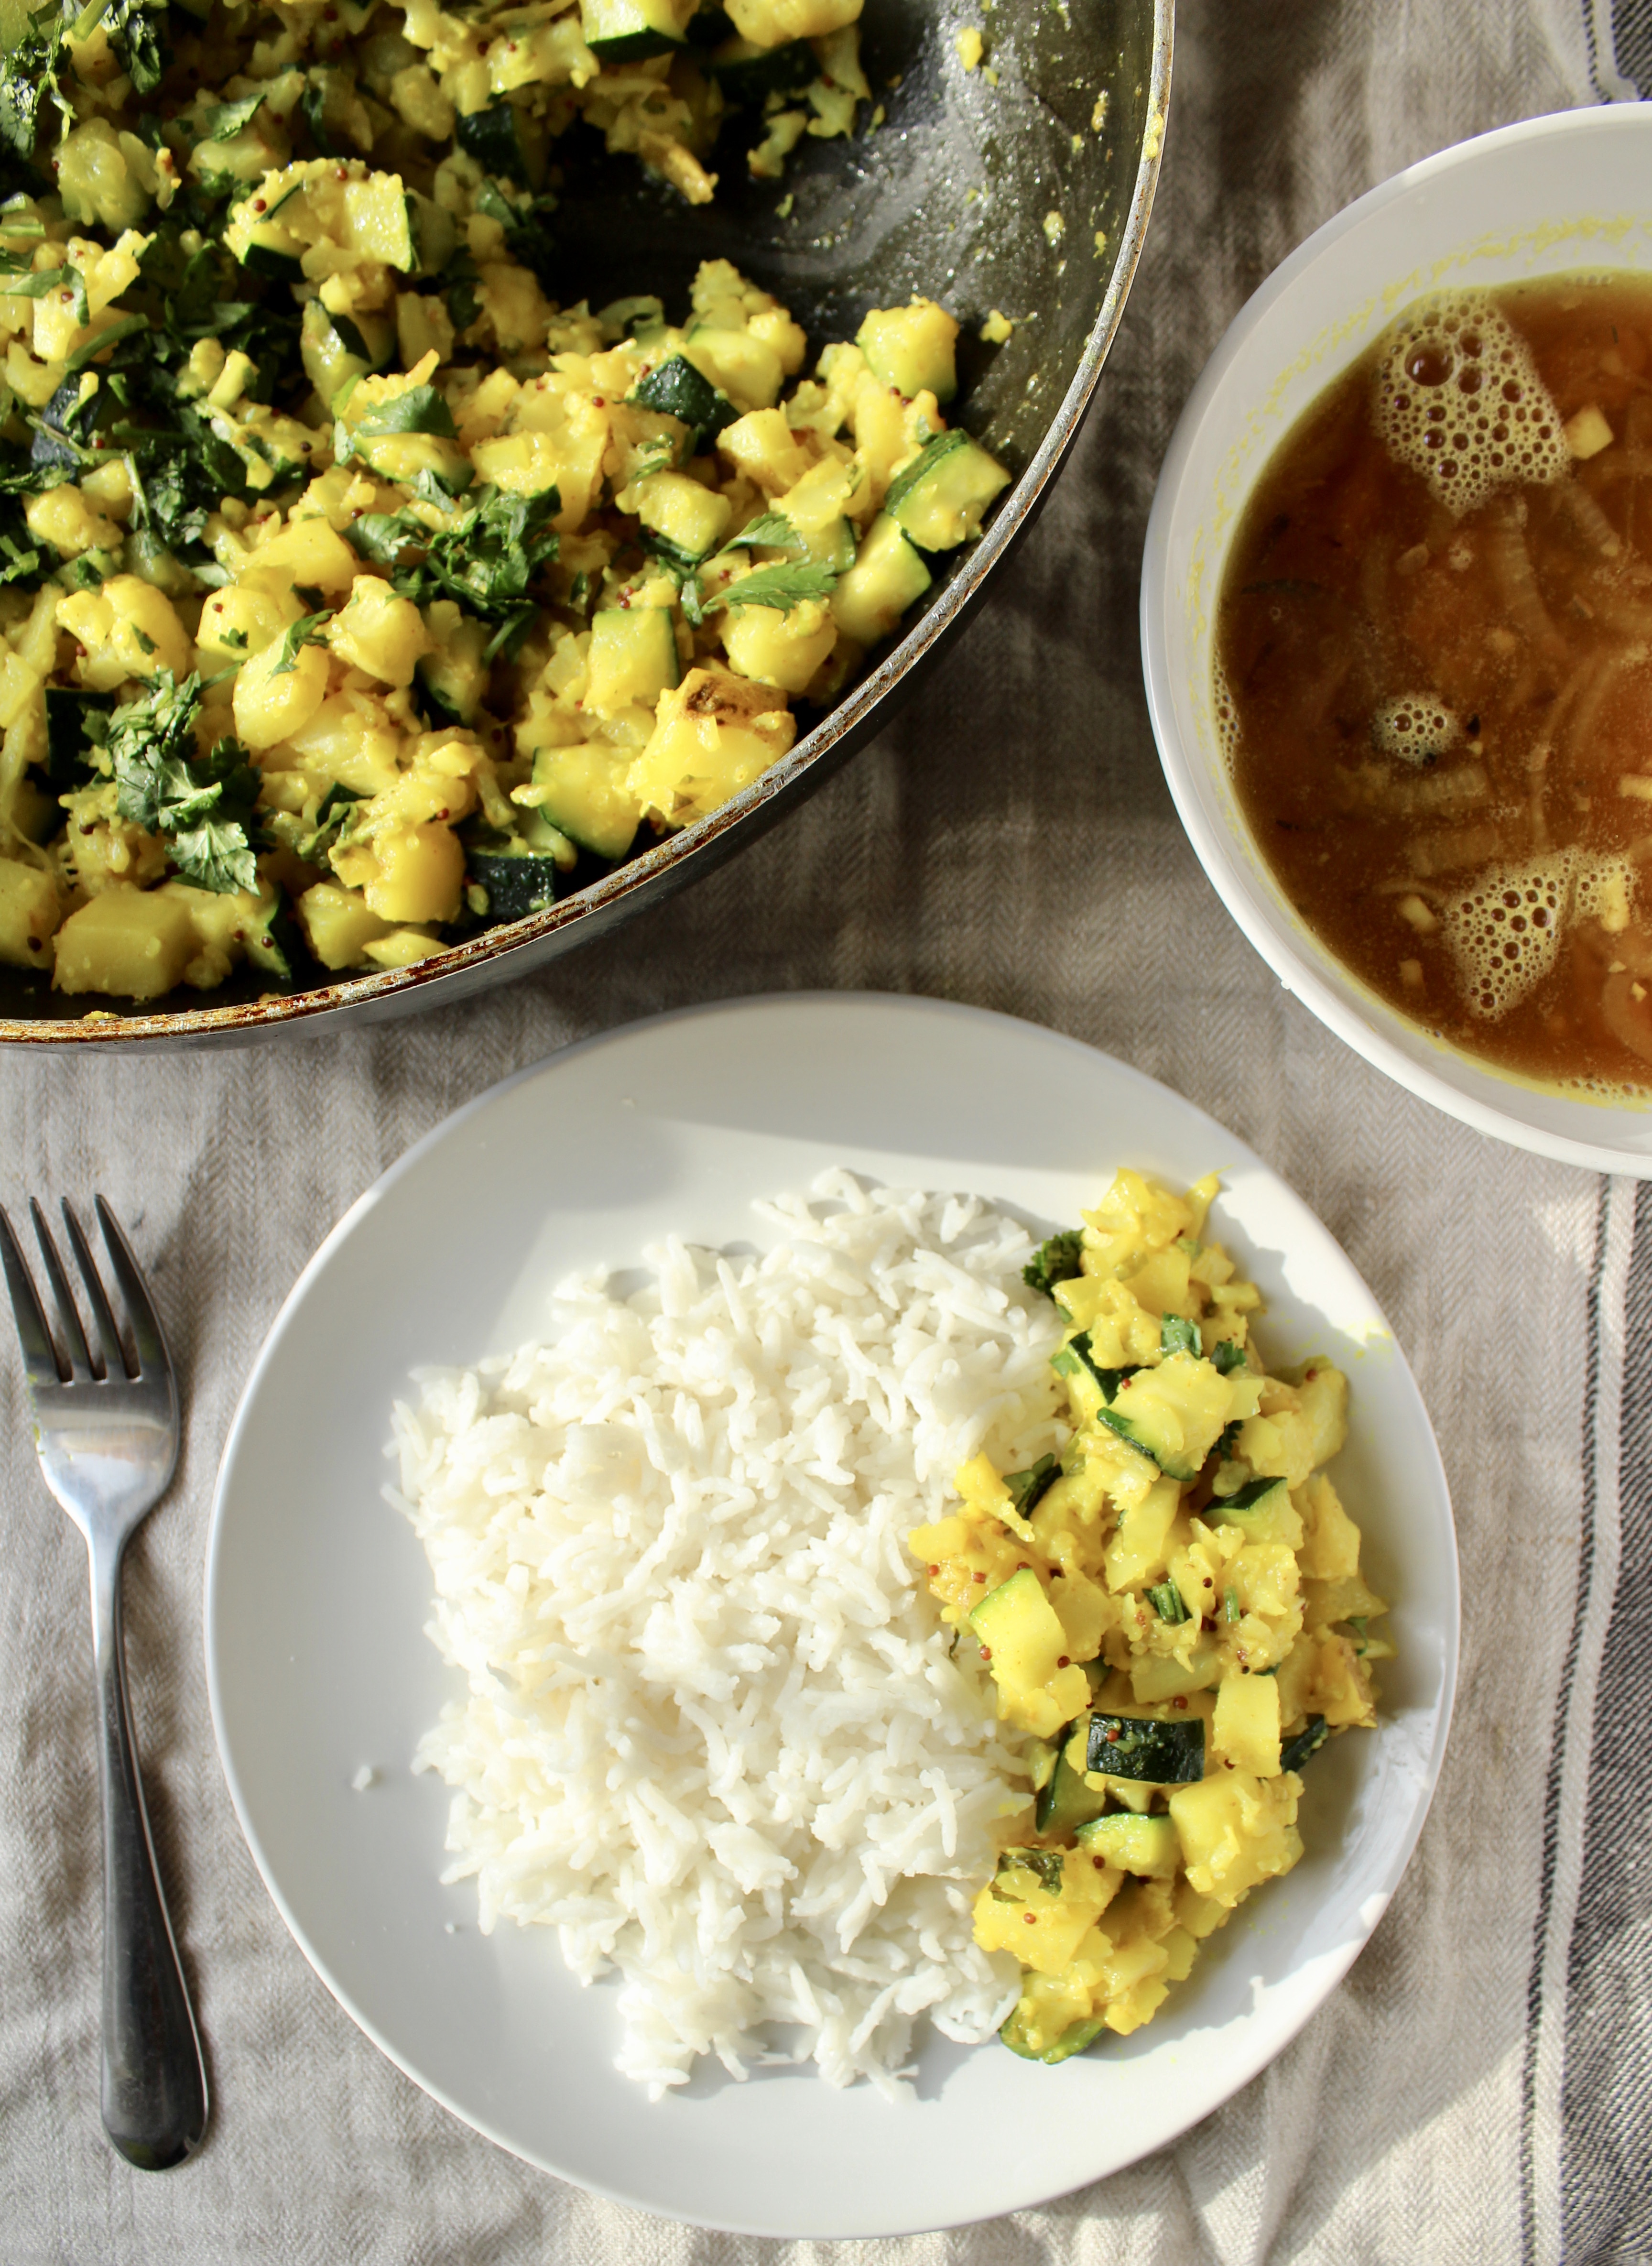
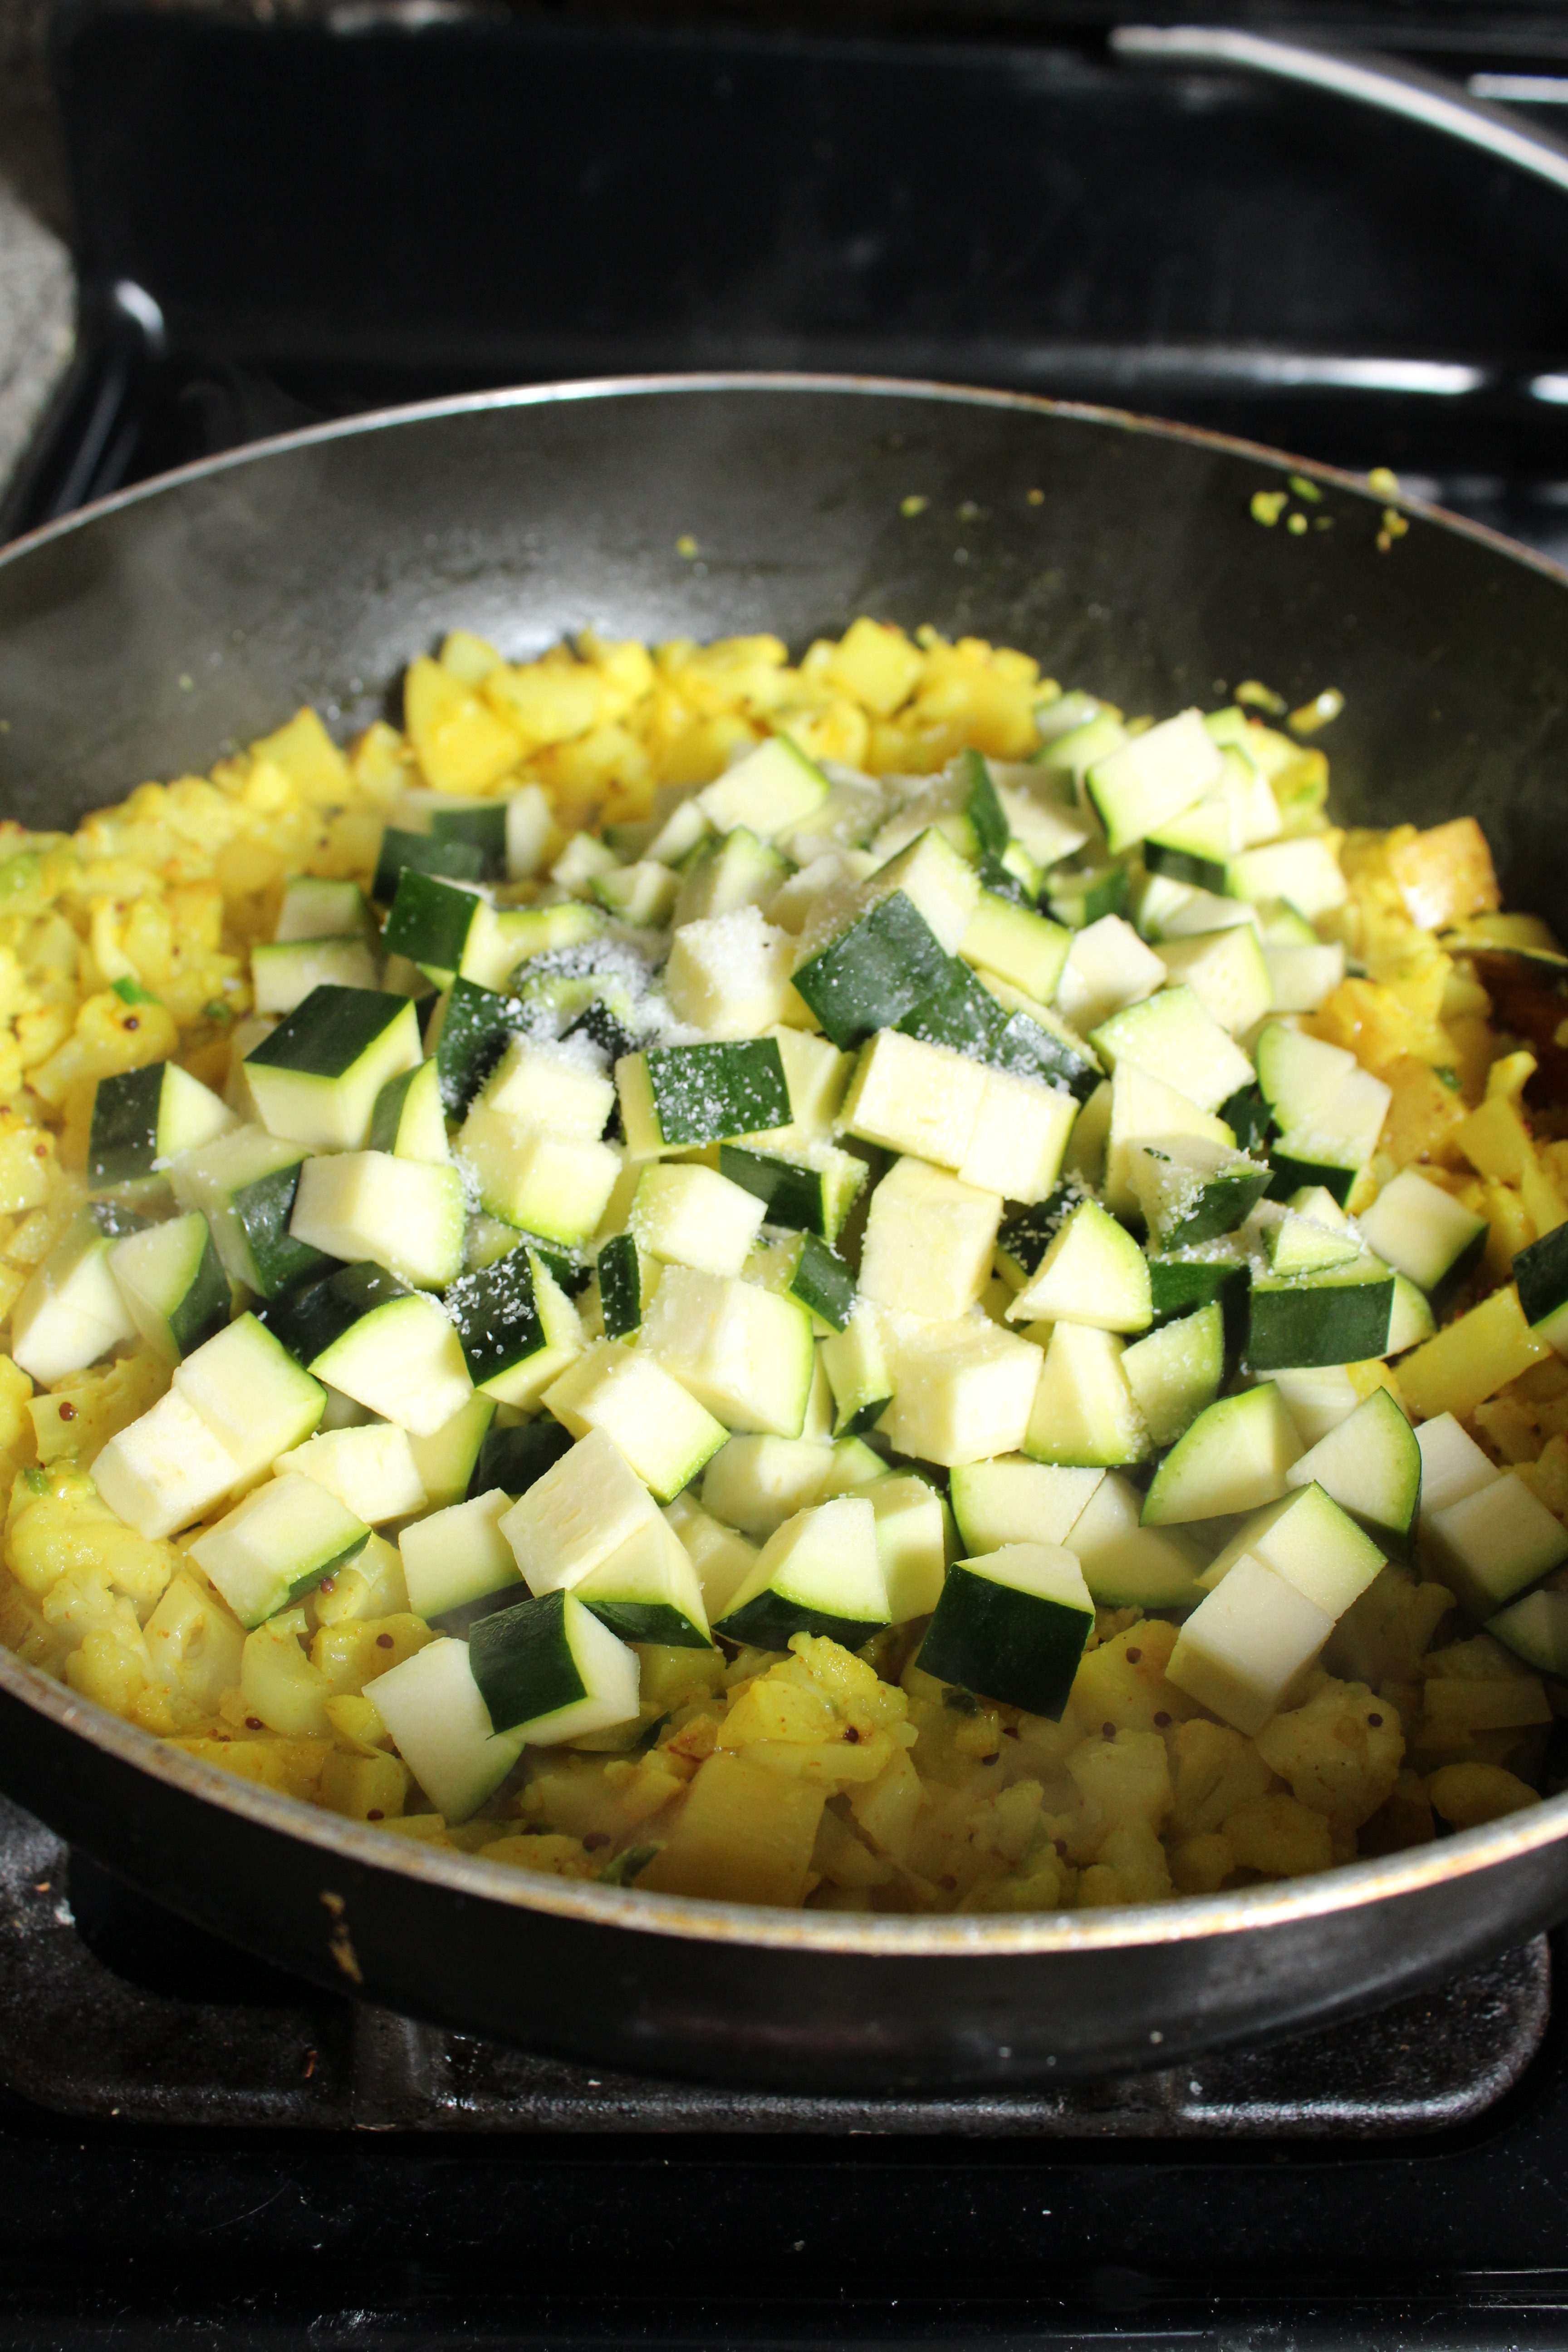
Hope you enjoy this Bengali staple and add it to your Meatless Monday menu. The zucchini at the end can be swapped out for many other vegetables. Growing up my mom would always keep a bag of frozen mixed vegetables, to add to a stir fry like this and really stretch a buck.
fullsizeoutput_4832

Serve with rice, daal, and any other protein of choice.

Ingredients

  • 1/4 cup olive oil
  • 1 large potato, diced small
  • 1 head cauliflower, diced small
  • 1 tsp mustard seeds
  • 4 cloves garlic, minced
  • 2 tsp salt
  • 1 tsp turmeric
  • 2 zucchini, diced small
  • 2-4 green chilis, split down the middle
  • 1/2 cup chopped cilantro, finely chopped

Directions

  1. In a large wok, heat oil over medium high heat. Add the potatoes in a single layer, then the cauliflower on top of them. Allow to cook for 2-3 minutes without stirring.
  2. After the potatoes have started to cook, stir to evenly distribute the cauliflower and potato, and add the mustard seeds, garlic, salt and turmeric. Depending on whether you like it spicy or not, add the chilis at this stage as well. Stir to combine and cook for 10-12 minutes, stirring occasionally.
  3. Add the zucchini and continue to cook. If you like your feed less spicy, add your chilis now. Cook for an additional 7-8 minutes or until all the vegetables are tender. Take care to moderate the heat, and move the vegetables from the bottom of the wok to the top, so nothing browns excessively and all the veggies cook slowly.
  4. Add the cilantro in the last minute of cooking. Taste for seasoning. I used a total of 2 3/4 tsp salt when I made this dish. Serve with white or brown rice.

Leave a Comment · Labels: Recipes, Side, Veg Tagged: bengali, bhaji, cauliflower, healthy, meatless monday, side dish, vegan, vegetarian

Chocolate Wafer Cookies

January 5, 2017

fullsizeoutput_47ec
If ever you’ve craved a cookie so intensely chocolately, with little to meddle with it pure chocolate flavor (no nuts, no eggs, and a high cocoa to flour ratio), then this cookie is it.

I first made these about 1 year ago when I made my first ice box cake…for 50 people. I must have made 4 batches. Probably could have made less if I hadn’t been snacking on them along the way.

These cookies mimic the famous Nabisco Chocolate Wafers that most icebox cake recipes call for. For some reason, they’ve been discontinued in store, and are only available online. Every time I attempt to purchase some, that little voice in my head goes “hydrogenated oils…preservatives” then I head to the kitchen to make my own. They are easy to make, hard to mess up, and I always have the ingredients on hand.fullsizeoutput_480c
It’s hard to tell when these cookies are done, since they are so dark. I usually just go by 10 minutes, as the recipe indicates. Since the cocoa is the predominant flavor, quality really matters. And unfortunately, it is one of those slightly fussy recipes in that it requires dutch-processed cocoa (cocoa powder that’s been alkalized, making it less acidic than natural cocoa powder). You could try to use a natural cocoa powder, such as Ghirardelli (I wouldn’t recommend Hershey’s for these), but you may need to increase the baking soda. I haven’t tried it yet, but if you do, please let me know!
img_8480
As these cookies cool, they become crisp, which is why they work so well in icebox cakes, and in this week’s case, ice cream cake. More on that coming soon!

They absorb the moisture from the surrounding medium without getting too soggy. They aren’t as heavy as say a brownie or a chocolate chip cookie, so you can satisfy your chocolate craving with a fraction of the guilt.

Recipe from Cooking Channel.

Ingredients

  • 1/2 cup or 1 stick unsalted butter
  • 3/4 cup granulated sugar
  • 1/2 cup dark brown sugar*
  • 1 tsp vanilla
  • 1 cup flour
  • 3/4 cup Dutch processed cocoa (such as Rodelle)
  • 1/2 tsp baking soda
  • 1/4 tsp salt
  • 1/4 cup whole milk

Directions

  1. In the bowl of your stand mixer, or in a large bowl using a handheld electric mixer, cream together the butter and both sugars for 2 minutes at medium speed. Add vanilla and beat until combined.
  2. In a medium bowl, sift the flour, cocoa, baking soda. Add salt and stir to combine.
    With the mixer running on low, slowly add the dry ingredients to the butter/sugar mixture. Stop to scrape down the sides of the bowl occasionally. Once all the flour’s been added, add the milk and mix until combined.
  3. Lay a piece of plastic wrap on a flat surface. Dump cookie dough directly onto the plastic wrap, in a log-like shape. Wrap up the dough with the plastic wrap and continue to shape into an even-width log. Refrigerate for at least 1 hour.
  4. Preheat oven to 350 degrees F. Score cookie dough with a ruler 1/4in apart. Slice the log into 1/4in thick disks and place disks on a cookie sheet lined with parchment paper. Bake for 7 to 8 minutes. Refrigerate the remaining cookie dough. Then rotate baking sheet and bake for 2 minutes more. Allow to cool for a few minutes before transferring to a wire rack to cool completely.
  5. Continue with remaining cookie dough. Wrap well and store at room temperature.

*I only had light brown sugar in stock, so I added half a tablespoon of molasses to substitute for the dark brown sugar.

Leave a Comment · Labels: American/Mediterranean, Dessert, Recipes Tagged: chocolate, cookie crumbles, cookies, dark chocolate, dessert, easy, egg free, ice cream cake, icebox cake, wafers

  • Newer Entries
  • 1
  • 2
  • 3
  • 4
  • 5
  • …
  • 17
  • Previous Entries
American, Bangladeshi. Savory, sweet. I don't discriminate and neither should you.

Most recently…

Load More...
Follow on Instagram

Social

Subscribe to Blog via Email

Enter your email address to subscribe to this blog and receive notifications of new posts by email.

Tags

appetizer beef bengali breakfast butter cake caramel chicken chocolate chocolate chips cilantro clean eating coconut comfort food cookies dessert dinner entertaining fall fruit ganache gluten free halal healthy homemade honest chops honest creations iftar italian pasta pastry pistachio quick and easy dinner ramadan recipe side side dish south asian spinach vegan vegetables vegetarian weeknight dinner weeknight meal whipped cream

Theme by 17th Avenue · Powered by WordPress & Genesis