Kitchen3N

Recipes and food fun from Apt 3N

  • About
  • Gallery
  • Recipes

Roasted Acorn Squash with Quinoa Pilaf

October 24, 2016

img_7375

When was the last time you embarrassed yourself? Like reeally really embarrassed yourself? Well this recipe is from one such incident.

Let me take it back a few steps – have you ever been to a South Asian wedding? There are kids running around, loud aunties and uncles in technicolor outfits fighting over placement on the buffet line and general disorganization/mayhem.

Now – have you ever been to an American wedding? A Northeastern, Catholic wedding? Civilized, subdued, tasteful. Bride is in white. The events more or less stick to schedule. Not so many kids running around.

As a Bengali, this cultural difference just went over my head when I was invited to a friend’s wedding a couple of years ago. Not only did we show up to the wedding with uninvited kids in tow, we entered the church after the bride made her entrance. Afterwards, at the reception, the mother of the bride said to me, “So, you brought the kids” and then it dawned on me.

Oh. Shit. There weren’t chairs for them, so they sat on our laps until the venue could manage some. The reception was way past their bedtime so they were pretty much on meltdown mode the entire time. By the time we wrapped up dinner at 9 they were SO cranky we had to run out of there before my favorite part of any wedding: the dancing!

img_7356

Lesson learned. My husband and I attended another wedding this past summer, happy to report gaffe free.

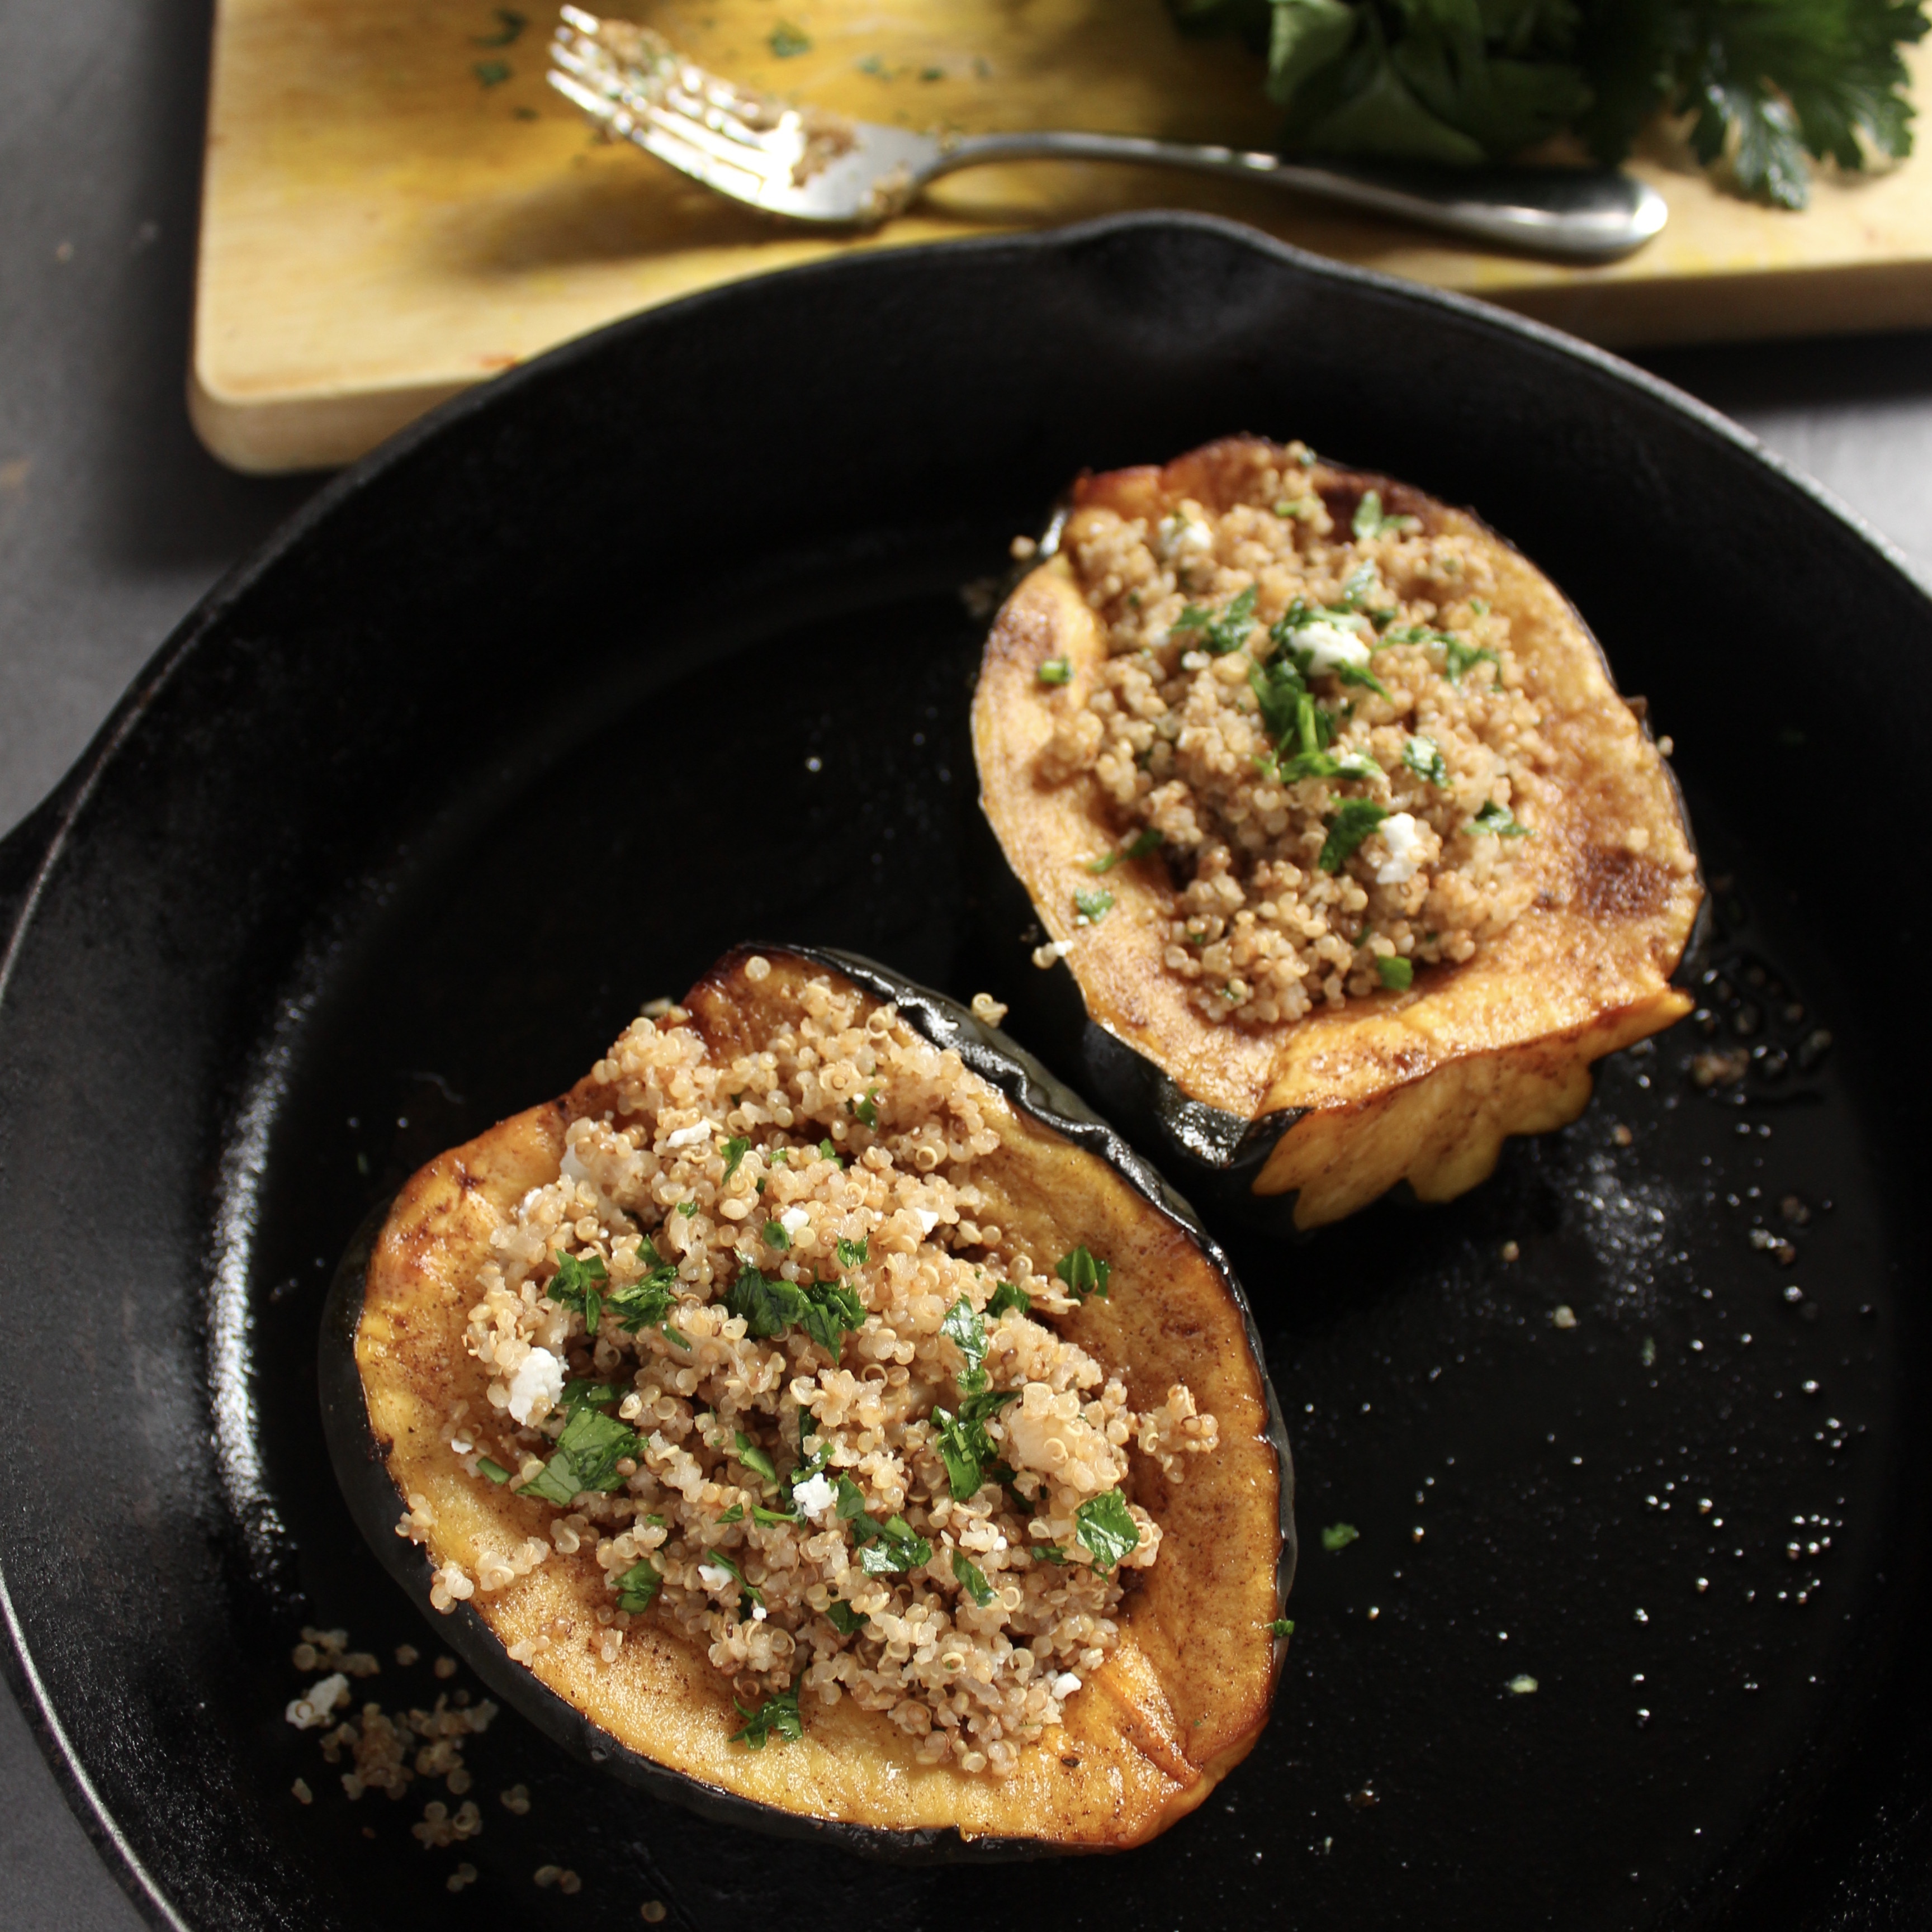
What does this story have to do with roasted acorn squash with quinoa pilaf? Just that we had it for dinner at said Northeastern wedding reception and it was surprisingly so good, I’m amazed it took me this long to recreate it.

The recipe for the quinoa pilaf is an adaptation of the America’s Test Kitchen version. It’s tasty on its own with the addition of a tablespoon of lemon juice.

Ingredients

For the roasted acorn squash

1 acorn squash, scrubbed and rinsed clean
1/2 tsp salt
1 tsp dark brown sugar
1/8 tsp nutmeg
1/4 tsp cinnamon
1/8 to 1/4 ground black pepper
olive oil

For the quinoa pilaf

1 cup washed quinoa
1 small onion
2 tbsp butter
3/4 tsp salt
1 3/4 cup water
3 tbsp fresh herbs
1 oz goat cheese (optional)

Directions

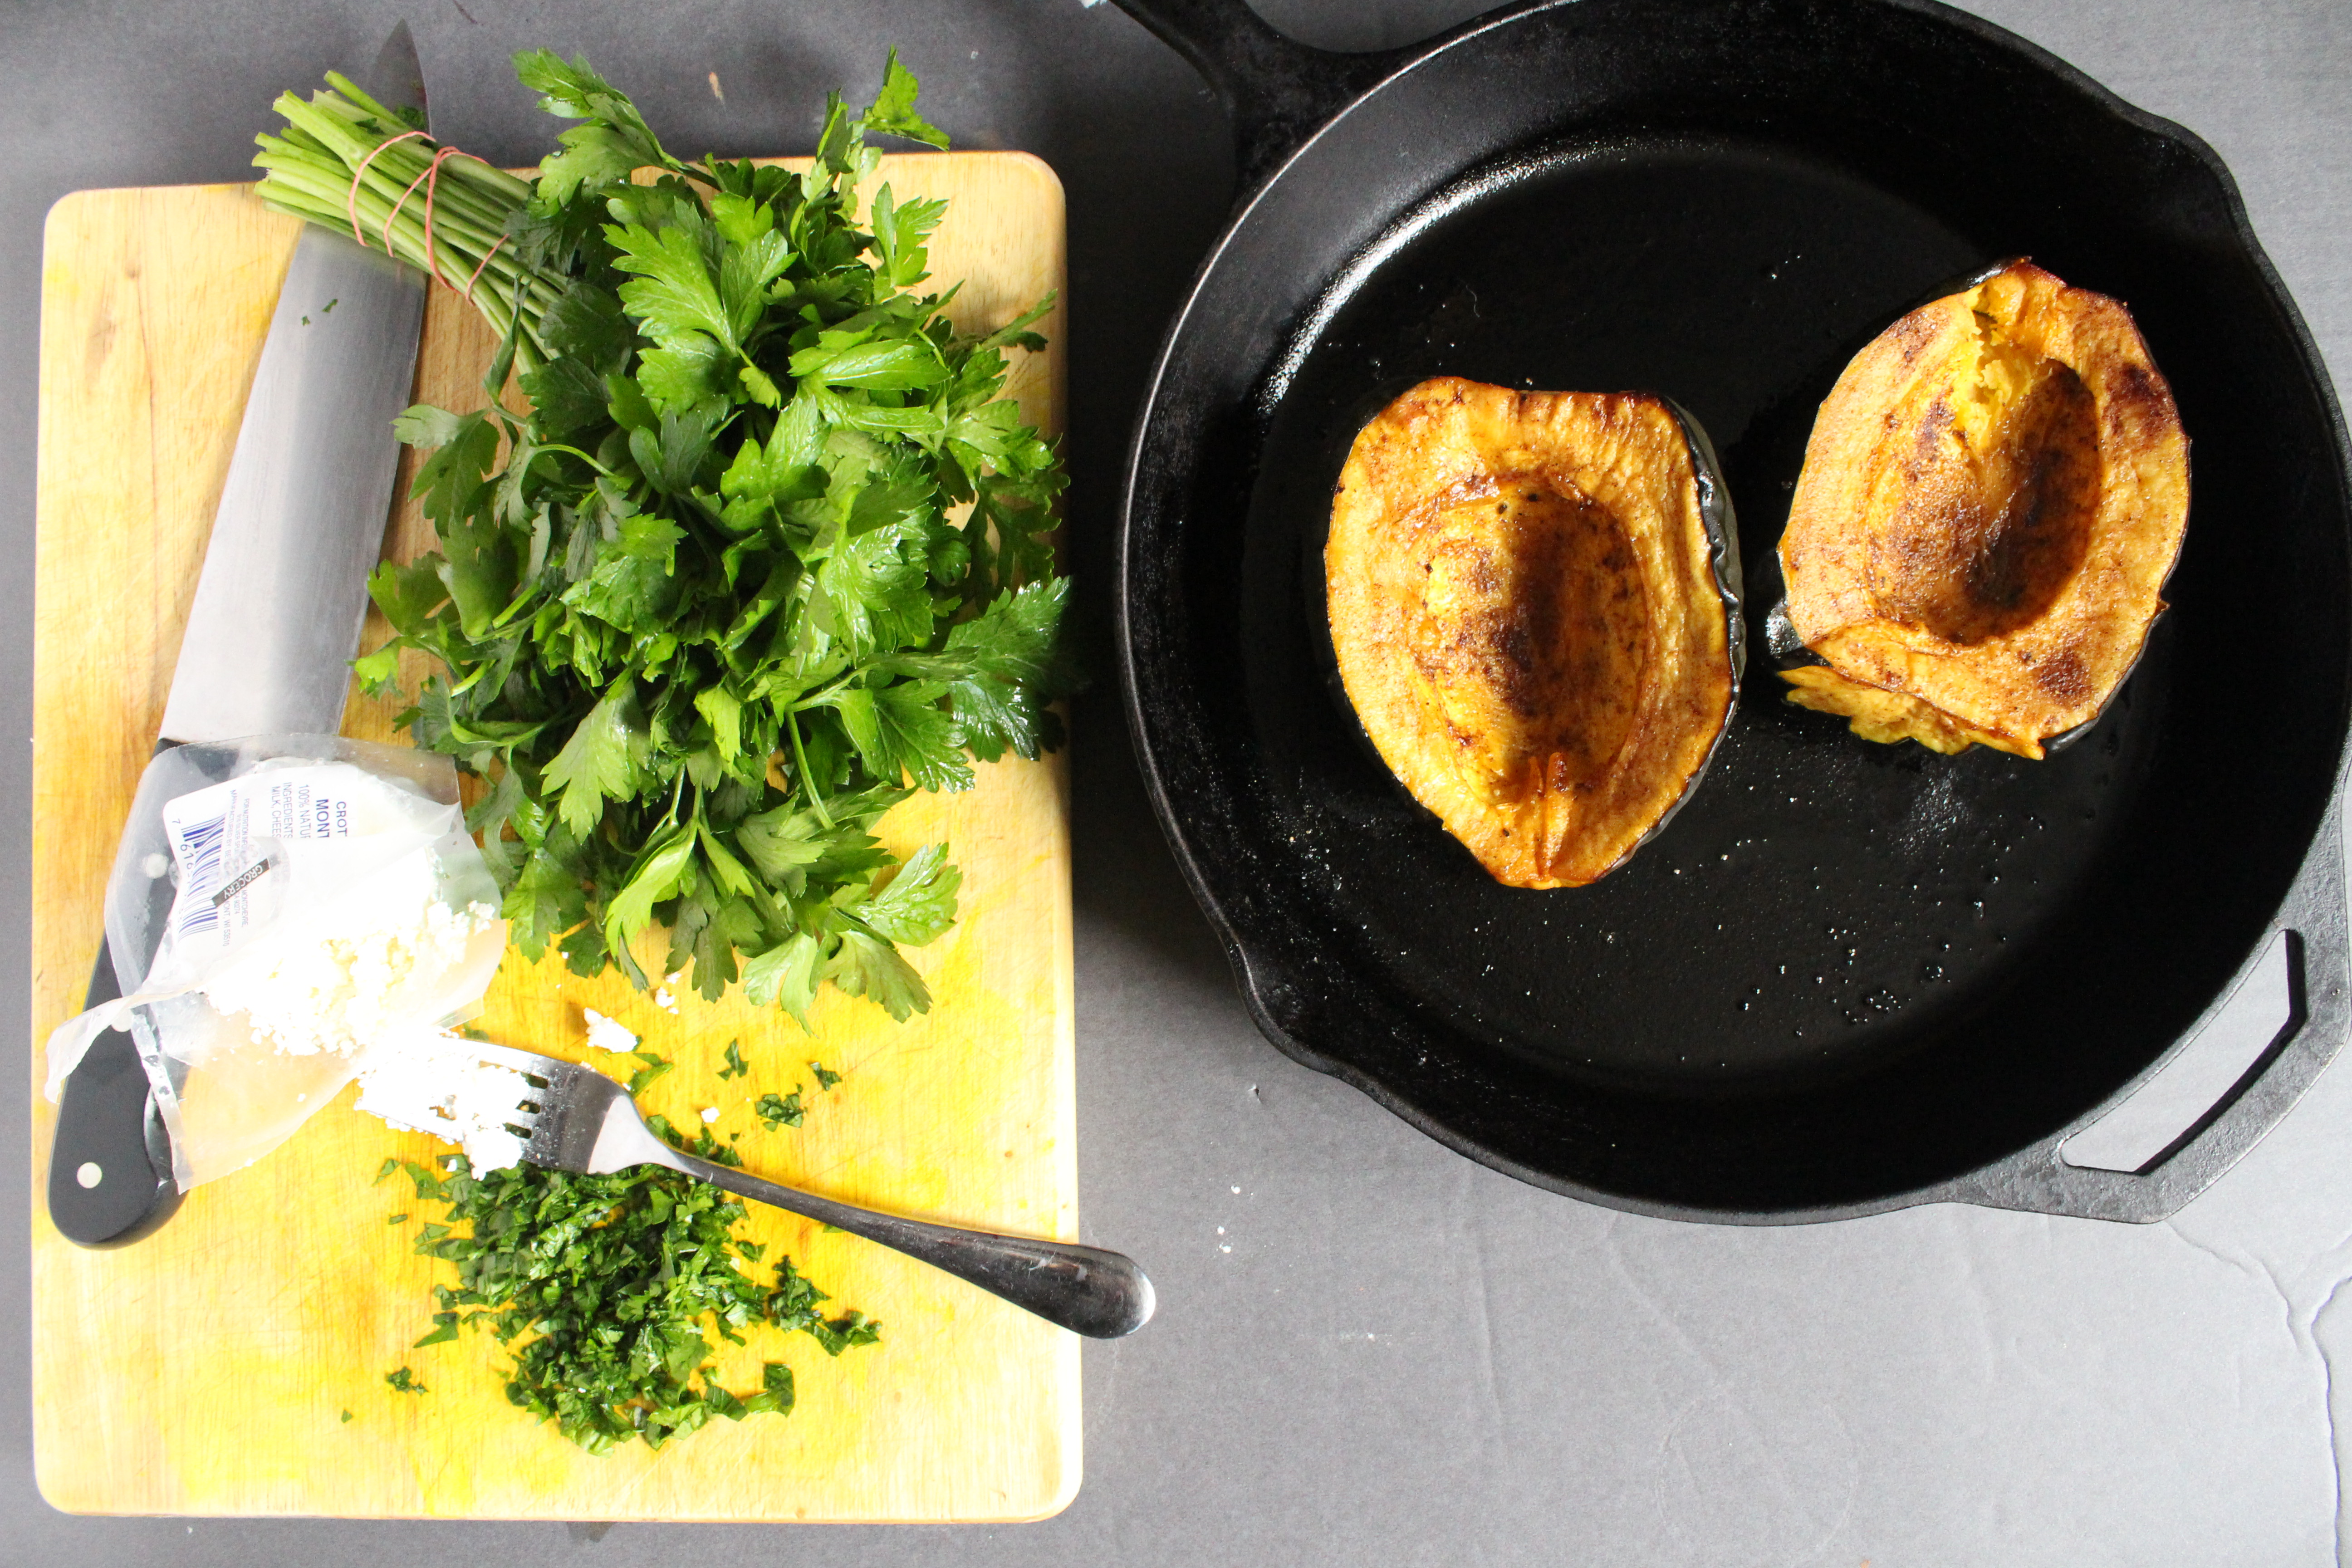
1. For the acorn squash: Preheat oven to 400 degrees Fahrenheit. Cut the acorn squash down the middle, scoop out the seeds and fibrous parts with a spoon and discard. Place both halves on a baking sheet cut side up. Season with salt and spices then drizzle with oil. Rub the oil and seasonings all over the flesh. Bake in preheated oven for about 1 hour.
2. For the quinoa pilaf: In a medium saucepan, toast the quinoa over medium high heat, stirring frequently until quinoa is light brown and makes a popping noise. This will take about 5 minutes. Transfer to a bowl and set aside.
3. In the same saucepan, melt butter over medium low heat. Add onion and salt and cook until onions soften, about 5 minutes. Add the quinoa, increase heat to high and add water. Allow to come to a boil, then cover, reduce heat to low and cook for 15 minutes. After 15 minutes, uncover and fluff with a fork. Add herbs and mix together. Put the lid back and allow to continue to steam.
4. To serve, place one of the acorn squash halves on a plate, spoon some quinoa pilaf into the cavity, and top with goat cheese if desired.

Leave a Comment · Labels: American/Mediterranean, Dinner, Veg Tagged: acorn squash, autumn, clean eating, eat clean, fall, healthy eating, pilaf, quinoa, roast, seasonal cooking, spiced squash, vegetarian

Pumpkin Cupcakes

October 29, 2015

img_7429

I usually shy away from pumpkin spice anything. It’s just not my cup of tea. But a few weeks ago our family went to Wightman Farms in New Jersey, where they attempt to ameliorate the hurt inflicted on your wallet from overpriced hay rides with complimentary pumpkins. Thus, I had 4 pumpkins and a whole lotta cooking to do. I made a pumpkin bread which was a bust (recipe said to bake in two 8×4 loaf pans; I brazenly baked it in a single 10×5 in pan and sadly watched through the oven door as it never rose), a pumpkin pasta which was delish, and finally, these fabulous little bites. Important to note that my homemade pumpkin puree is thinner than the canned ones, but I think since this recipe uses vegetable oil and not butter, you should be fine. IMG_5142I whipped these up without a recipe to refer to (hence most of the amounts are 1, 1, 1 [1 cup sugar, 1 cup flour, 1 cup pumpkin, etc.] but hey, it works!) and without even being sure if the end result would be a cupcake or a muffin. Since I wanted to practice my piping, I frosted them with a cream cheese frosting – so I guess they are officially in Camp Cupcake! They are so moist you can serve as a snack without the frosting.

Ingredients

  • 1/2 cup brown sugar
  • 1/2 cup granulated sugar
  • 1/2 cup vegetable oil
  • 1 egg
  • 1 cup pumpkin puree*
  • 1/2 cup all purpose flour
  • 1/2 cup whole wheat flour (could omit this and use all all-purpose flour)
  • 1/4 tsp cinnamon (can increase to 1/2 tsp if you prefer)
  • 1/8 tsp ground clove
  • 1/4 tsp kosher salt
  • 1/2 tsp baking powder (make sure it’s fresh! i.e. not older than 3 months)
  • 1/4 tsp baking soda (same)

Directions

  1. Preheat oven to 325 degrees F. Spray either a mini muffin pan or a standard muffin pan with non-stick spray.
  2. In the bowl of a stand mixer (or in a large bowl using a handheld electric mixer), combine both sugars with vegetable oil and beat for a minute. Add egg and continue beating. Add pumpkin puree and continue beating for another minute.
  3. In a separate bowl, combine flours, spices, salt and leavening. Whisk a few times.
  4. With the mixer on low speed, slowly add the dry ingredients just until combined. Scoop batter into prepared pans to about 3/4 way up. If using the mini muffin pan, bake for 15-17 minutes until a toothpick inserted in the center comes out clean. For a standard muffin pan, bake 18 to 20 minutes.
  5. If you choose to frost them, allow them to cool to room temperature. Frost with a cream cheese frosting.

*To make the pumpkin puree, I peel a pumpkin similar to how you would peel a butternut squash – with a big knife, going from top to bottom, around on all sides. Scoop out seeds, chop, then place in a large wok or pot with 1/2 inch of water. Bring to a boil then reduce heat. Simmer until tender. Blend in a food processor.


Leave a Comment · Labels: American/Mediterranean, Dessert, Recipes, Veg Tagged: autumn, cupcakes, dairy free, dairy free dessert, dessert, easy dessert, fall, pumpkin, seasonal cooking

Chocolate Zucchini Cake

August 18, 2015

IMG_4847I was incredulous the first time I heard the words “Zucchini Bread” at my adopted Jewish grandmother’s apartment some 15 years ago. Her name is Sophie and she was my mother’s confidant, advisor, protector and friend for many years. She taught her the value of saving. She raised two children during the Depression. She told my mother, every week she set aside $0.50. She grew such a small sum into stake in a multi-million dollar company and a condo in a luxury apartment building in downtown Manhattan. IMG_4854So when she talked, we listened:

  • “Eat Romaine lettuce, not iceberg. It’s all water.”
  • “Ya ever tried zucchini bread? It’s delicious.”
  • “Take care of ya mother. She works hard.”

Right on all counts. Take it one step further with chocolate zucchini cake. I was skeptical when a mom brought zucchini brownies to a play date. But it had such deep chocolate flavor! And it was moist! And magical! I realize that zucchini’s blandness kind of works in its favor in baked goods. Between that and the water content, it’s the perfect vessel for delivering a rich, moist, chocolate crumb. I was nervous as I folded the 3 cups into the batter, that those eating the cake would see slivers of green running throughout, but it melted right into the cake. And with that much veg content, you don’t feel like the world’s worst parent when your kid (and husband) reaches for it throughout the day.

Adapted barely from King Arthur Flour.

Ingredients

  • 1/2 cup unsalted butter (1 stick) at room temperature
  • 1/2 cup vegetable oil
  • 1 3/4 cups sugar
  • 1 tsp vanilla extract
  • 2 large eggs
  • 1 tsp baking soda
  • 1/2 tsp baking powder
  • 1/2 tsp salt (next time I would try increasing this to 1 tsp!)
  • 1/2 cup buttermilk, sour cream, or yogurt (I used buttermilk)
  • 2 1/2  cups all purpose flour
  • 3/4 cup Dutch process cocoa*
  • 3 cups shredded zucchini
  • 1 cup chocolate chips
  • 1 cup heavy cream

Directions

  1. Preheat oven to 325 degrees F. Grease a 9″x13″ baking pan.
  2. Sift flour, cocoa, baking soda, baking powder and salt into a large bowl. Stir gently to combine.
  3. In a stand mixer or in a large bowl with a handheld electric mixer, beat butter at medium high speed until light and airy – about 1 minute. Lower the speed to medium low and gradually add half the sugar, then oil, then remaining sugar. Add vanilla, then eggs, one at a time, until incorporated fully. Stop to scrape down the bowl. Turn on the mixer briefly once more to incorporate everything.
  4. At low speed, add half of the flour/cocoa mixture. Then slowly pour in the buttermilk (or sour cream or yogurt). Add the rest of the dry ingredients.
  5. Remove bowl from stand mixer and fold in the zucchini with a rubber spatula or wooden spoon. When fully incorporated, pour into greased pan and bake for 40-45 minutes, until a toothpick inserted comes out clean. Let cool.
  6. Heat heavy cream in a saucepan until scalding hot (bubbles appear around the perimeter). Pour over the chocolate chips and stir until it becomes a spreadable ganache. Pour and spread evenly over cooled cake.

*Dutch process cocoa, though harder to find, is essential for that deep chocolate flavor. When you use a quality cocoa powder, it makes all the difference between a standard chocolate cake and a gourmet one. Can be purchased online.

Leave a Comment · Labels: American/Mediterranean, Dessert, Recipes Tagged: chocolate cake, cocoa, dutch process cocoa, ganache, seasonal baking, seasonal cooking, snack cake, squash, summer squash, zucchini

Caprese Salad with Roasted Tomatoes and Burrata

July 26, 2015

IMG_4809When I went to Capri in April of 2008, I trekked up the steep hills to a trattoria for lunch after a morning of taking in the vistas. I was so excited to have a Caprese Salad in the birthplace of Caprese Salads. Imagine my disappointment when the waiter brought us green, far from ripe tomatoes, mozzarella and basil. Then it hit me. The seasons.  IMG_4788Seasonal eating was such a novel concept to me as an American – everything’s available all year round, and the whole conscious foodie thing hadn’t really come into full swing at that time. So, what I had imagined was a plate of luscious, bursting at the seams red tomatoes with buttery mozzarella and verdant basil. What I got was lackluster citrus with less than memorable accompaniments. If I had only come in the summer!IMG_4792Fast forward a few years and now I know that even the most lame tomatoes can be made dynamite by a long, sweet roast in the oven. It’s precisely what’s required of the tomatoes I’ve seen so far this season. Mild summer temperatures means mediocre sweetness and acidity (I think). So I topped regular grocery store tomatoes with sugar, salt, black pepper, olive oil and balsamic vinegar. They reach a flavor complexity that rivals the most pungent pickles. Sweet, tangy and savory, it balances the mild, creamy addition of burrata.  IMG_4798Burrata, if you’ve never had it, is cream filled mozzarella. On top of pizza, it makes for the creamiest cheese topping. I wanted to try it on this salad, but freaked out once I tried picking it up from its solution and found it to be so soft, it immediately started running all over the board. And then when you cut into it, it’s even more of a mess! I grabbed a bunch of paper towels and started wiping up the mess and I thought this dish was doomed for sure. But when I started picking up the squares (or blobs) I had cut from the ball of burrata, I appreciated the rustic appearance. It certainly wouldn’t work with raw slices of tomatoes. The whole aesthetic of the traditional Caprese Salad relies on the symmetry of the tomatoes and mozzarella. But with the warped form of the tomatoes from the heat of the oven, it worked well. IMG_4800I didn’t drizzle additional olive oil atop since I felt the burrata had plenty fat content. A sprinkling of cracked pepper and hand torn basil was the perfect adornment. Hopefully your basil is fresh and not the last scraps you could salvage from your (read: my) week-old bunch.

Ingredients

  • 3-4 beefsteak tomatoes, depending on the size (I used 3 in the pictures above)
  • 1-2 tsps sugar
  • 3-4 tbsps olive oil
  • 2 tbsps balsamic vinegar
  • salt and pepper
  • 1 8 oz ball of burrata
  • 4 to 6 basil leaves, torn

Directions

  1. Preheat oven to 400 degrees F. Line a baking sheet with parchment paper.
  2. Slice 2 tomatoes between 1/4 and 1/2 inch in thickness (see pictures). Arrange slices on baking sheet lined with parchment and season liberally with salt and pepper (about 3/4 tsp salt and 1/4 tsp pepper). Lightly sprinkle tops with 1 tsp sugar, 2 tbsps olive oil and 1 tbsp balsamic vinegar*. Use a pastry brush or your hands to smooth out all the seasonings. Bake in preheated oven for 40-45 minutes.
  3. Remove from oven and let cool for 5 minutes before removing to serving platter. Repeat Step 2 with fresh parchment paper and second batch of tomato(es).
  4. Arrange tomatoes on platter, overlapping them slightly. Remove burrata from solution and place on cutting board. With a SHARP knife, slice the burrata into 1/2 cubes (as shown above). Top the roasted tomato slices with the burrata pieces. Sprinkle the tops with black pepper and torn basil.

*Cook’s note: I ran out of balsamic vinegar and instead used a balsamic reduction that you can see me brushing onto the tomatoes in one of the pictures. If you find yourself in the same conundrum, simply leave out the balsamic in the initial seasoning. Forty minutes in to the cooking process, brush your balsamic reduction onto the tomatoes and stick back in the oven for 5 minutes.

Leave a Comment · Labels: American/Mediterranean, Recipes, Salad, Side Tagged: balsamic vinegar, basil, burrata, caprese, caprese salad, caramelized, cheese, cream, mozzarella, oven roasted, roasted tomatoes, salad, seasonal cooking, seasonal eating, summer salad, tricolore

American, Bangladeshi. Savory, sweet. I don't discriminate and neither should you.

Most recently…

Load More...
Follow on Instagram

Social

Subscribe to Blog via Email

Enter your email address to subscribe to this blog and receive notifications of new posts by email.

Tags

appetizer beef bengali breakfast butter cake caramel chicken chocolate chocolate chips cilantro clean eating coconut comfort food cookies dessert dinner entertaining fall fruit ganache gluten free halal healthy homemade honest chops honest creations iftar italian pasta pastry pistachio quick and easy dinner ramadan recipe side side dish south asian spinach vegan vegetables vegetarian weeknight dinner weeknight meal whipped cream

Theme by 17th Avenue · Powered by WordPress & Genesis